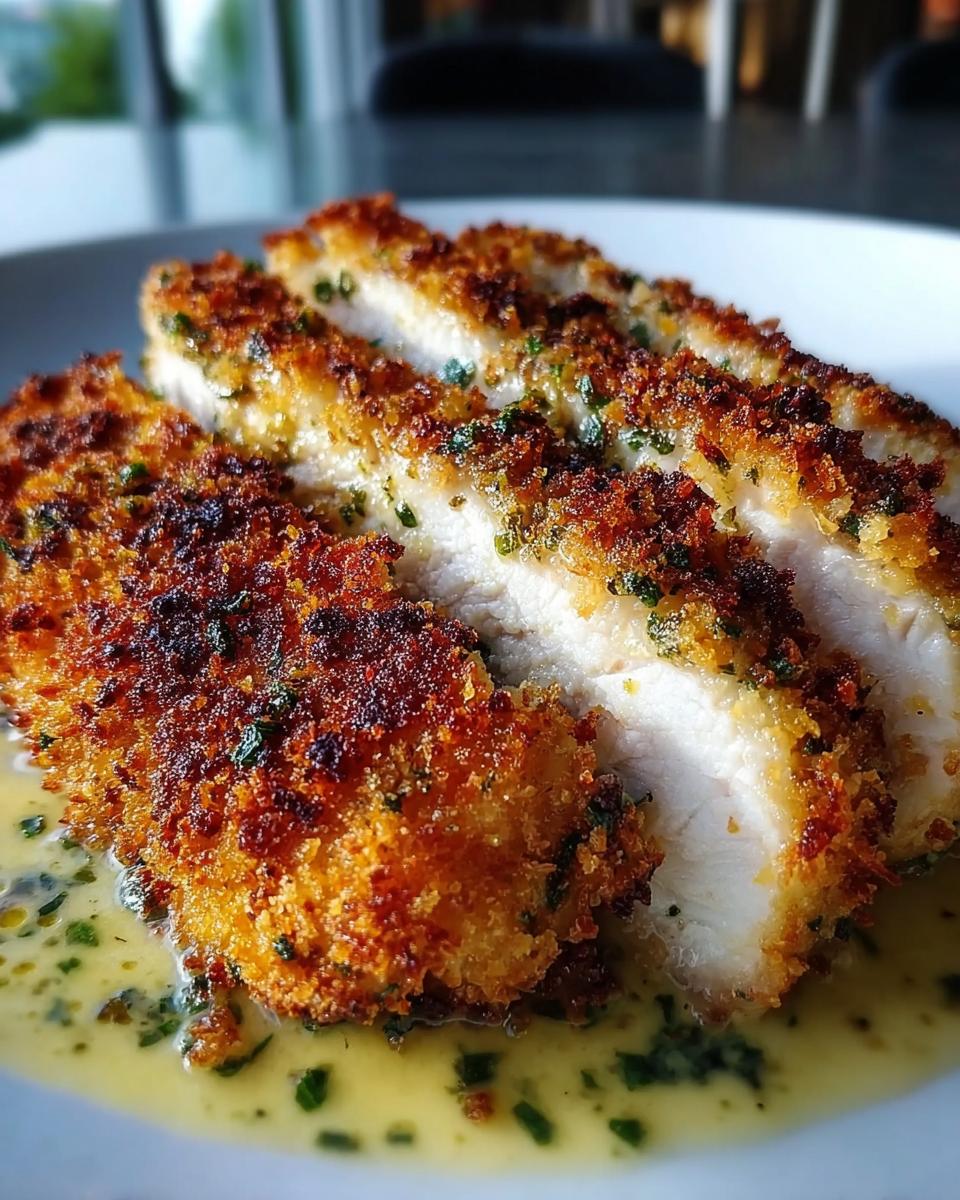
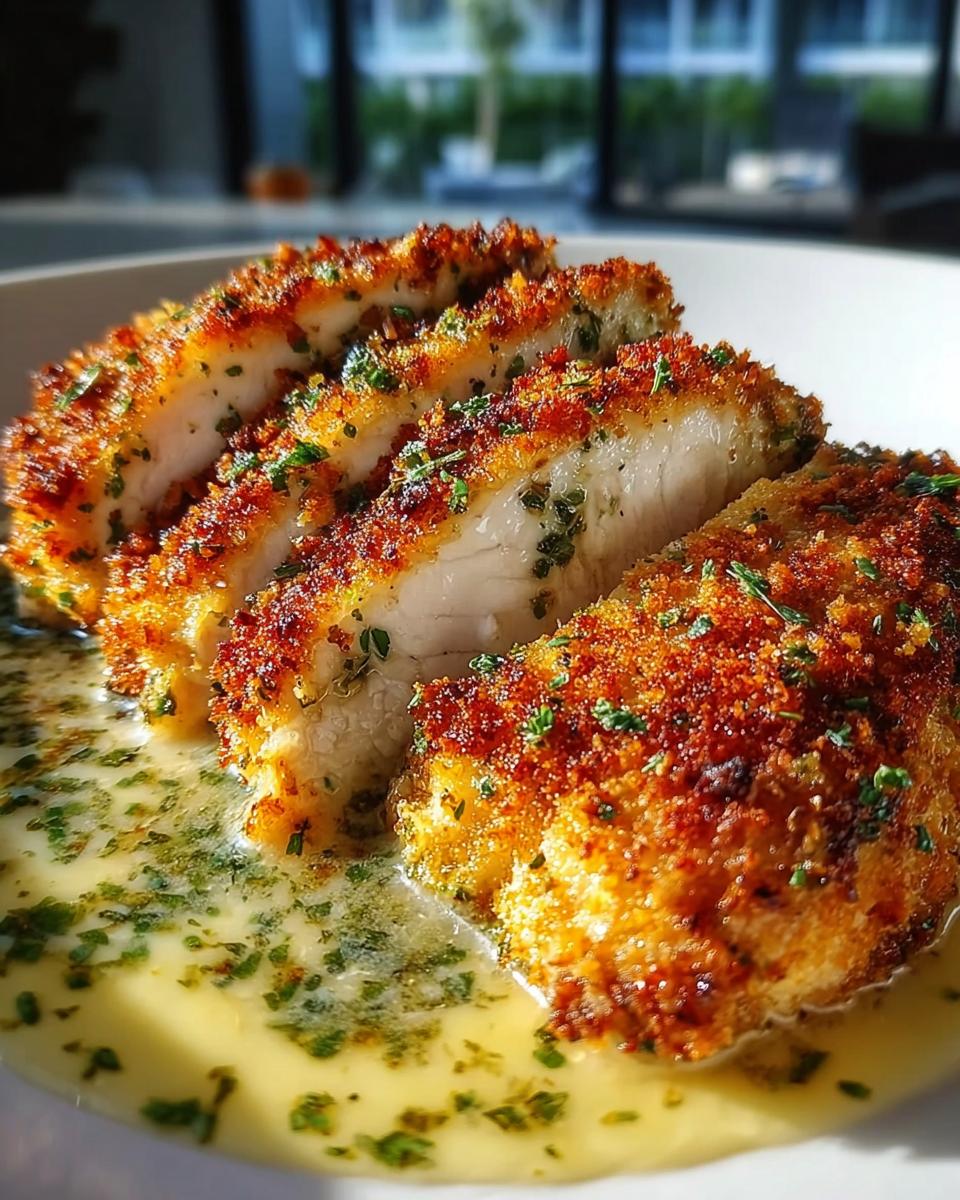
Oh, the weeknight dinner struggle. Anyone else feel like by 6 PM, you’re running on fumes and your brain just screams for takeout? I totally get it! That’s why I developed this absolute lifesaver of a recipe. It delivers on flavor—we’re talking juicy chicken with a crunchy, salty crust—but it’s genuinely fast. You get that ultimate satisfaction with my recipe for the Zesty Parmesan Chicken with Crispy Edges in under 35 minutes flat. Finding meals that are quick, feel indulgent, yet still fit my goal of eating clean nourishment without restriction sometimes felt impossible. This chicken proves you can have a restaurant-quality crunch and zest without the complicated mess or guilt. If you need more quick wins like this in your life, check out my guide to healthy meals and recipes in 20 minutes!
Who This Zesty Parmesan Chicken with Crispy Edges Recipe Is For
I’m talking to you if you look at your prep schedule for the week and think, “There is no way I’m cooking anything that requires more than thirty minutes tonight.” This isn’t a slow-cooker kind of meal; this is a fast-finish dinner.
If you love that satisfying crunch you get from fried food but usually skip it because cleanup is a nightmare, this pan-fried chicken is your answer. We’re keeping the mess minimal thanks to one good skillet!
Also, if you’re trying to focus on intentional eating—things you actually feel good about eating—but you refuse to give up flavor, this recipe is perfect. It’s straightforward, uses whole ingredients, and delivers that savory, zesty punch you crave. For more ideas that fit that busy but intentional lifestyle, take a peek at my post on easy healthy dinner recipes for busy nights.
Why You Will Love This Zesty Parmesan Chicken with Crispy Edges
Listen, I don’t keep recipes on the ‘must-make’ rotation unless they tick these specific boxes. This chicken does it all, and honestly, it’s become one of my easiest go-to meals when sanity needs saving!
Here’s the quick rundown on why this Zesty Parmesan Chicken with Crispy Edges is about to become your new staple:
- Dinner in a Flash: We’re talking 15 minutes of prep and 20 minutes of cooking. You can seriously have this on the table before the kids even finish whining about homework. It’s that good for those quick dinner ideas for busy weeknights.
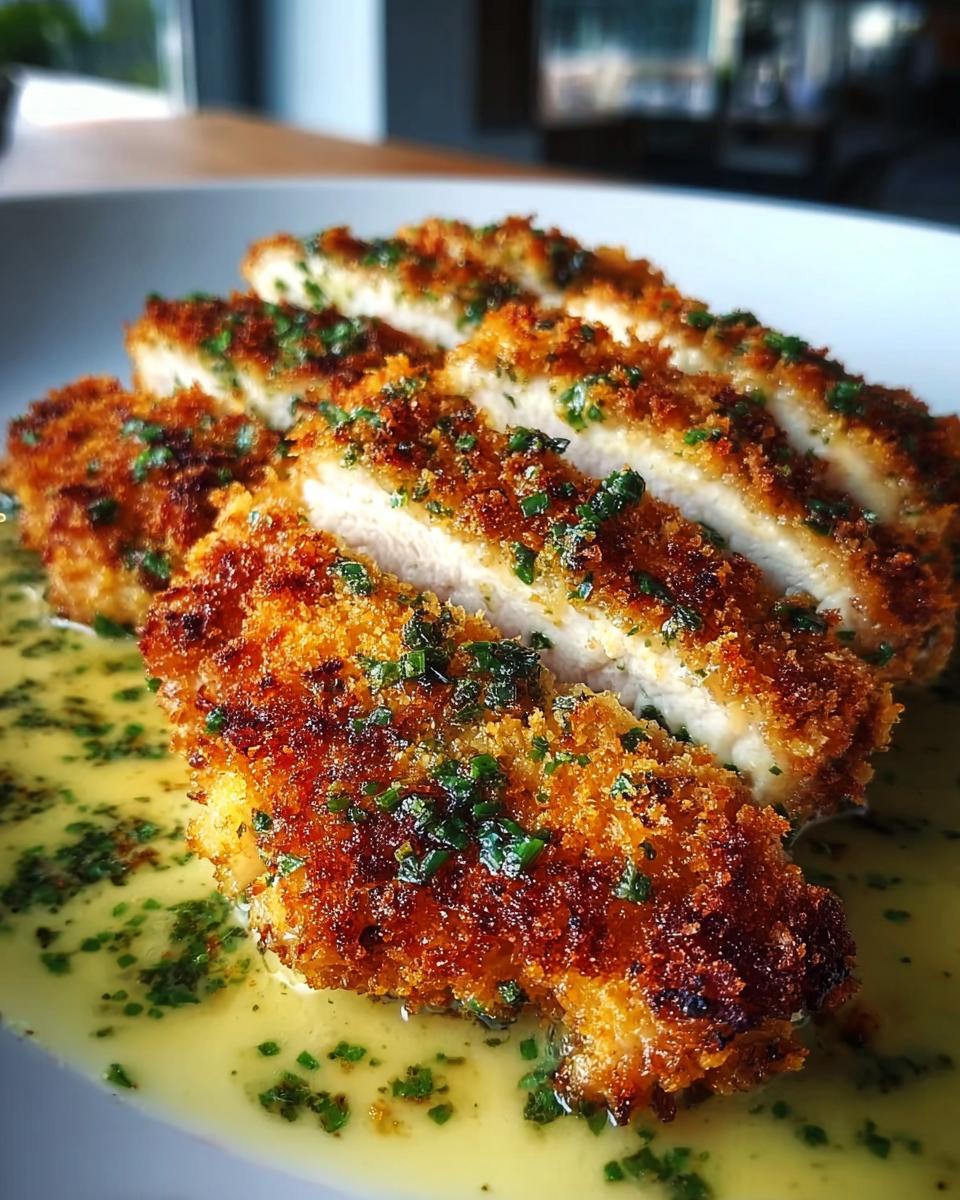
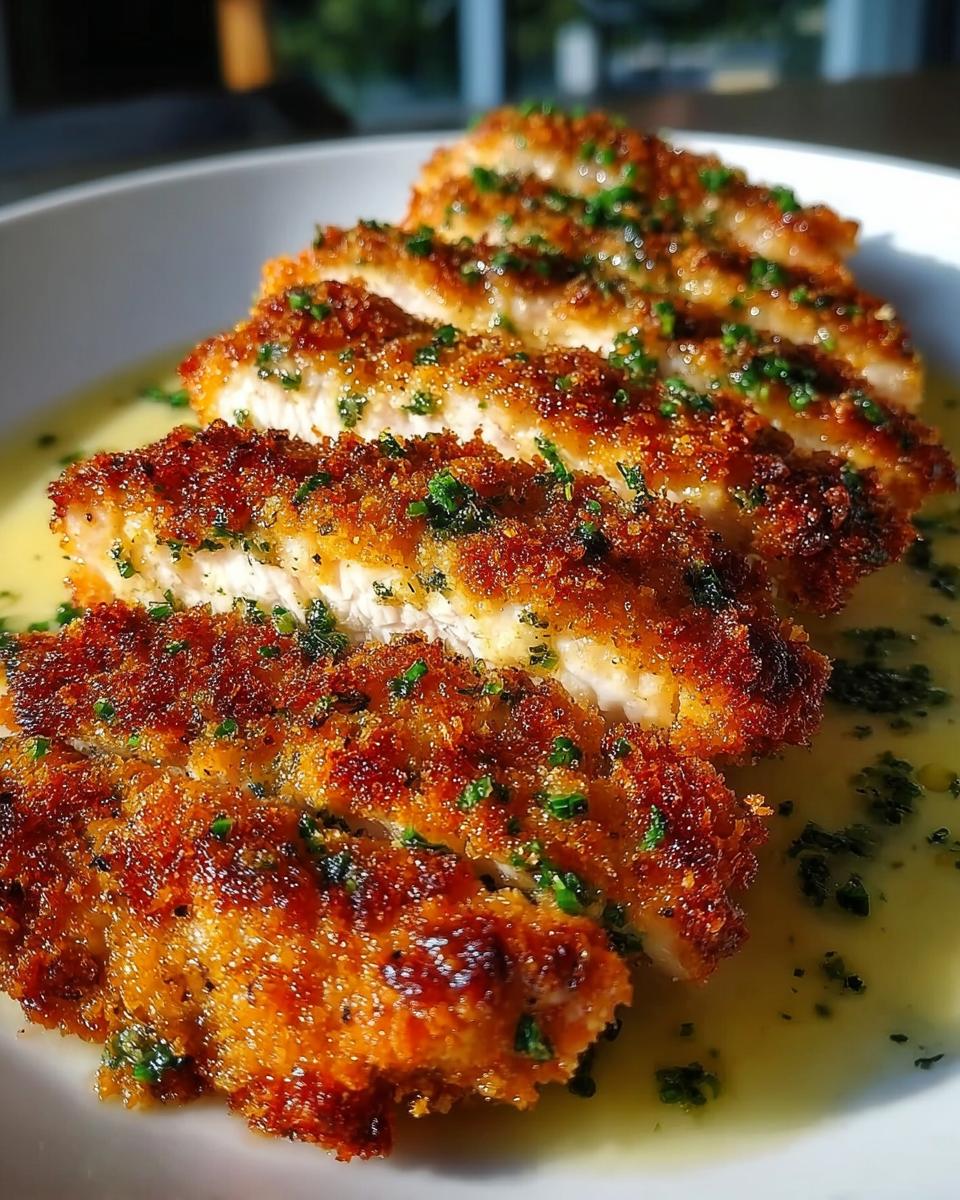
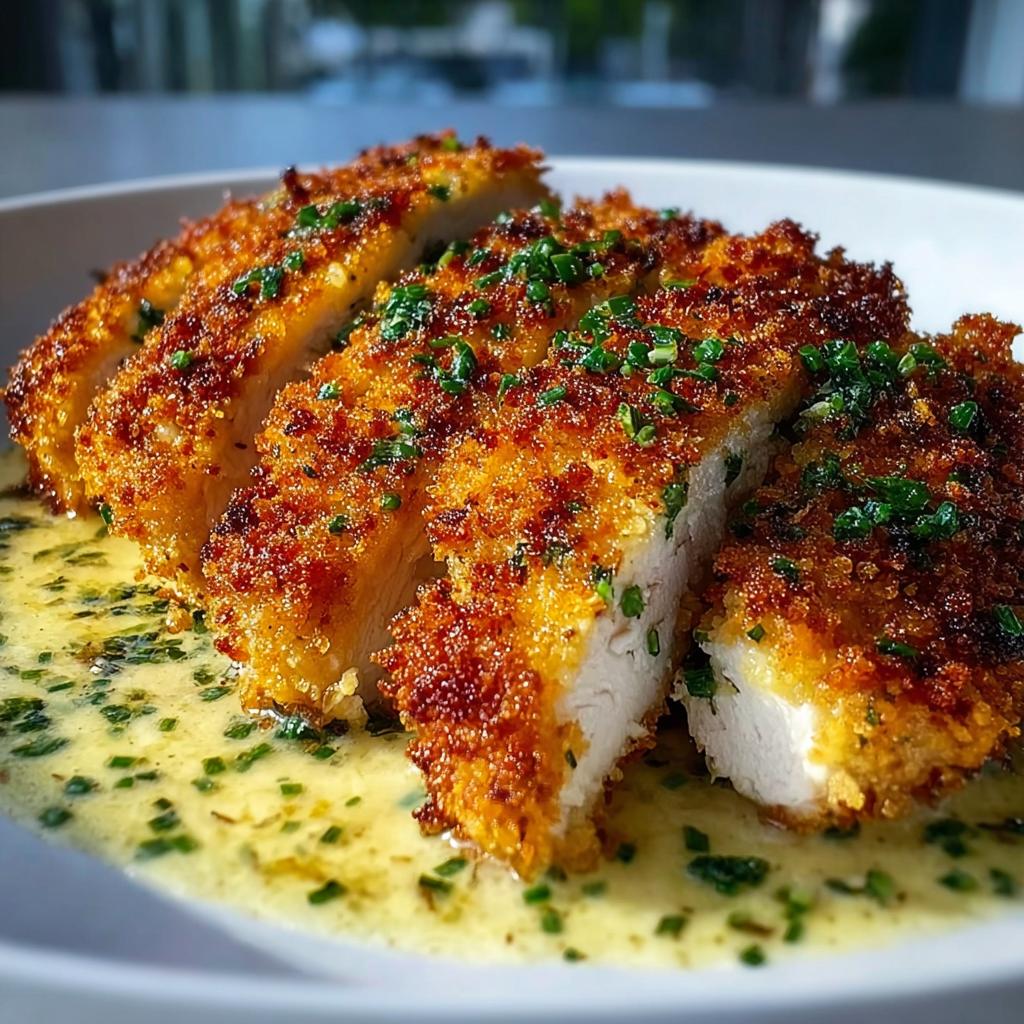
- That Crunch Factor: That happy sound when you cut into perfectly crisped panko? That’s the magic here. The Panko breadcrumbs paired with Parmesan create a shell that holds up beautifully to the simple, herby sauce we make right in the pan.
- Zero Fuss Technique: We’re skipping the deep fryer and the complicated baking setup. A simple skillet does all the heavy lifting. You get incredible flavor with minimal cleanup, which is a huge win in my book.
- Sauce Perfection: After the chicken comes out, we use those tasty brown bits left in the pan to whip up a light, creamy herb butter sauce using just cream and broth. It’s totally decadent but keeps the macro picture clean!
Essential Equipment for Perfect Zesty Parmesan Chicken with Crispy Edges
You don’t need a cabinet full of fancy gadgets for this one, thank goodness! When I’m aiming for speed and clean eating, I rely on tools that are efficient and multi-task well. For the Zesty Parmesan Chicken with Crispy Edges, a few key items make the difference in getting that beautiful, even crust.
First up, you absolutely need plastic wrap. This isn’t just for storage, trust me! We use heavy-duty plastic wrap to create that perfect, even thickness on the chicken breasts, which is key to cooking them through without burning that lovely crust. If your plastic wrap is thin, double up!
Next, you need exactly three shallow bowls for your dredging station. This keeps your flour, eggs, and Panko mixture separate and organized. A messy station equals a messy crust, and we want pristine edges!
Finally, and this is my pro tip for getting that signature crispiness: a heavy-bottomed skillet. I love my cast iron for this, but any sturdy, heavy skillet will do the trick. Why? Because a heavy pan distributes the heat so much more evenly than a lightweight one. Uneven heat means some parts of your chicken will get scorched while others are still pale. We want golden perfection across the board!
So, plastic wrap, three shallow bowls, and one really great skillet—that’s your arsenal right there! Easy, right?
Ingredient Notes for Zesty Parmesan Chicken with Crispy Edges
Okay, let’s talk ingredients because this is where a good recipe turns into a great one, especially when you’re focused on clean, whole foods that still pack massive flavor. When I first started making a version of this Zesty Parmesan Chicken with Crispy Edges, I realized technique around the main components mattered more than fancy additions.
First thing’s first: the chicken breasts. Don’t just throw them in the pan whole! You absolutely must pound them out evenly to about a half-inch thickness. I know, it feels violent, but trust me, POUNDING is crucial. If you have thick spots, they will be raw while your crispy edges are turning black. You want uniform thickness so everything cooks through at the same speed. If you want to get a jump start on moisture retention, you can check out how I prep my chicken ahead of time—it really helps, especially since we’re not swimming them in oil! Brined chicken breasts that never dry out is a game-changer.
Now, for the texture that gives this dish its name: the crispy edges. You need Panko breadcrumbs. Don’t try to substitute these with regular dried breadcrumbs if you can help it! Panko are Japanese-style flakes, and they stay lighter, airier, and crunchier when they hit that hot oil. Regular crumbs compress and end up feeling heavy or soggy much faster.
A quick note on butter: you’ll see two usages in the recipe. Some butter goes right into the hot oil to help the Panko brown beautifully and add richness to the pan-fry, but then a separate tablespoon of butter goes into the sauce base at the end. That final bit of butter is just for finishing the herb sauce—it melts in cleanly and gives it that luxurious mouthfeel without all the extra fat from frying.
Ingredient Substitutions and Zest Boosters
Life happens, and sometimes you’re missing one thing. If you are totally out of Panko, Italian-style breadcrumbs will work in a pinch. Just know that your crust will be a bit finer and maybe slightly less crunchy, so watch your pan heat carefully! You might need to cook them a minute less.
To really boost that “Zesty” part of the name *without* messing up the coating process, wait until you get to the sauce step. Remember how the recipe calls for chicken broth and cream? This is the perfect time to stir in a splash of fresh lemon juice or a little lemon zest right as the sauce finishes simmering. It brightens everything up and cuts through the richness of the Parmesan beautifully. I usually add a tiny squeeze right before I take it off the heat!
Step-by-Step Instructions for Zesty Parmesan Chicken with Crispy Edges
Alright, let’s get cooking! I know instructions can sometimes feel like reading technical manuals, but I promise this process flows so naturally once you get into the rhythm. We are moving fast here, so setting up your “station” first—like building a very delicious assembly line—is key when making this Zesty Parmesan Chicken with Crispy Edges! Grab your plastic wrap and get those chicken breasts pounded down first.
Preparing the Chicken and Coating Station
Take those chicken breasts and get them nice and flat, about a half-inch thick, between your plastic wrap. Seriously, focus on making them even; it’s the secret weapon for perfect cooking time. Once they’re pounded? Time to organize your shallow bowls. You need three distinct stops for your dredging process.
Bowl number one is your flour, seasoned simply with that salt and pepper we talked about. Bowl two? The eggs, just beaten really well. And bowl three is the star: your Panko breadcrumbs mixed thoroughly with the grated Parmesan and the garlic powder. Make sure that Parmesan is evenly distributed in that Panko mix—you want cheese in every single bite!
Now, we dredge! Go flour first, shaking off any excess, then into the egg bath, letting the drips fall away, and finally, into the Panko mix. This part is important: press that Panko coating firmly onto both sides of the chicken. Don’t be gentle! We need that crust adhered tight so it doesn’t fall off when it hits the heat. Once coated, set the chicken aside on a clean plate while your pan heats up.
Achieving the Crispy Edges While Pan-Frying
Get your skillet heating over medium heat. We use a mix of olive oil and butter here—the oil raises the smoke point, and the butter brings the flavor, naturally! You want that fat shimmering hot before the chicken goes in. If you toss a pinch of Panko in and it sizzles immediately, you’re ready.
Carefully lay the chicken into the pan. Do not push them together! Overcrowding the pan is the fastest way to steam your chicken instead of crisping it. If you have a small skillet, you must cook these in batches. Seriously, hold back if necessary. You’re looking for about four to five minutes on the first side until it’s deeply golden brown. If you want to see how I achieve maximum crispness on cutlets, check out my recipe for crispy chicken cutlets with lemon!
Flip carefully and cook the other side for another four to five minutes until done. Once that gorgeous crust is achieved and the chicken feels firm, transfer it immediately to a plate to rest while you handle the sauce. Don’t wipe out the skillet; all those little brown bits, the *fond*, are gold!
Making the Simple Herb Butter Sauce
Keep your burner turned down to low heat now; we don’t want to burn the cream! Add that final tablespoon of butter to the same skillet. Once it melts, toss in your fresh parsley. That sizzle is going to smell amazing!
Pour in your chicken broth and heavy cream right away. Use a wooden spoon to scrape up all those tasty little caramelized crumbs stuck to the bottom of the pan as the liquid starts to bubble. Let this simmer gently. You aren’t looking for a rolling boil; just a gentle simmer for maybe three to five minutes. You’ll know it’s ready when you dip a spoon in and the sauce is thick enough to lightly coat the back of it. If you want that extra pop of zip, stir in that lemon juice now! Then, just pour that creamy herb goodness right over your rested chicken.
Tips for Success with Zesty Parmesan Chicken with Crispy Edges
Getting that perfect crunch and flavor combo in the Zesty Parmesan Chicken with Crispy Edges isn’t just about following the instructions; it’s about honoring a few key principles that make the difference between good chicken and *great* chicken. If you nail these three things, you’re basically a kitchen rockstar!
First up, the pounding. I mentioned it before, but I’m hitting this point again because it is non-negotiable for success. If your chicken breasts are thick on one end and thin on the other, you are guaranteed to end up with dry edges and raw centers. Trust me, I used to rush this step, and I paid for it with unevenly cooked meat. Take the extra minute, place that plastic wrap down, and flatten them gently but firmly so they are all the exact same thickness. It ensures your 4 to 5 minutes per side timing is accurate!
Second: Do NOT overcrowd the pan. This is the number one reason people end up with pale, soggy chicken instead of those glorious crispy edges. When you put too many pieces in hot fat, the temperature of the oil drops immediately. Instead of frying, your chicken starts slowly steaming in its own moisture and the moisture released by the other pieces. If you have to cook in two batches, DO IT. It adds maybe three extra minutes total, but that golden, crunchy crust is worth every second of patience. It’s a non-negotiable part of getting that Zesty Parmesan Chicken with Crispy Edges texture right!
Finally, let’s talk Parmesan quality. Since this recipe leans heavily on the flavor of the crust, use the best cheese you can find. I know the pre-grated stuff is super convenient for quick dinners, but for this recipe, I truly feel like freshly grating a block of real Parmesan cheese makes a huge difference in the melt and the depth of flavor. It grates finer, mixes into the Panko better, and just tastes brighter when it hits that heat. When I started just grating my own block, honestly, the flavor of my crispy chicken just *leveled up*. It’s one of those small swaps that aligns perfectly with the clean nourishment I aim for.
Serving Suggestions for Zesty Parmesan Chicken with Crispy Edges
So you’ve got this incredibly delicious, crunchy, zesty chicken on your plate, and now you’re thinking, “What do I even put next to this masterpiece?” Don’t stress! Because the sauce is rich and herby, we want to keep the sides light and bright so they complement the Zesty Parmesan Chicken with Crispy Edges rather than competing with it!
My absolute favorite way to serve this is with something green and slightly charred. Think simple steamed green beans tossed quickly in a little olive oil, or even better, roasted broccoli. The slight bitterness of the charred greens is the perfect contrast to the salty Parmesan crust and the creamy sauce. If you’re looking for an inspired, easy veggie side, you have to try my recipe for roasted asparagus with Parmesan! It uses similar flavor profiles and only takes minutes to toss together.
If you’re hungry and need something more substantial underneath that chicken, steer clear of heavy mashed potatoes, as it competes with the creamy sauce. Instead, think light pasta or grains. A simple bed of angel hair pasta tossed with just a tiny bit of butter and garlic would be divine—it just soaks up that extra sauce at the bottom of the plate.
Another quick idea is rice, but not just plain white rice. Try mixing in some finely chopped fresh herbs like chives or basil with a little lemon zest into some perfectly fluffed brown rice. It keeps the meal clean and light while still feeling substantial. Honestly, whether you serve this Zesty Parmesan Chicken with Crispy Edges over a light grain or beside vibrant roasted veggies, the star flavor stays shining through!
Storing and Reheating Your Zesty Parmesan Chicken with Crispy Edges
We all hope there are leftovers because this Zesty Parmesan Chicken with Crispy Edges is just as good the next day, but reheating it correctly is the absolute key to keeping that beloved crispy crust intact. Nobody wants soggy weeknight chicken!
If you happen to have any leftover chicken, you need to get it stored quickly. Once they have cooled down a bit, I recommend placing the pieces in an airtight container. If you stack them directly on top of each other, that delicious Panko crust will definitely steam itself into oblivion. Trust me on this one—I learned that the hard way after forgetting a piece in the fridge!
My best advice? If you have a lot of pieces, try to layer them with a small piece of parchment paper or paper towel between them. This simple step stops them from sticking together and helps absorb any residual moisture. Pop that container in the fridge, and it should keep well for about three days. It freezes okay too, but you definitely lose some texture when you thaw and reheat frozen breaded chicken.
Now for the critical part: reheating the Zesty Parmesan Chicken with Crispy Edges. Please, promise me you won’t reach straight for the microwave! Microwaving any crispy coating turns it instantly soft and chewy, and we worked hard for that texture.
If you have an air fryer, this is your moment to shine! Set it to about 375°F (190°C) for just five to seven minutes. It’s loud, it’s fast, and it blasts the heat right back onto that crust, bringing it back to life beautifully. It smells exactly like it did fresh out of the pan!
If an air fryer isn’t your thing, the small oven or toaster oven works perfectly too. Place the chicken right on a baking sheet—no need to cover it—and heat it at 350°F (175°C). Give it about 10 minutes, maybe flipping halfway through if your oven heats unevenly. You just need to heat it through until it’s piping hot again. The sauce? You’ll want to warm that gently on the stove separately in a tiny saucepan until it’s just bubbling, then drizzle it over the freshly crisped chicken!
Frequently Asked Questions About Zesty Parmesan Chicken with Crispy Edges
I always get questions when I post this recipe because people want to make sure they get that perfect crunch. It’s usually the fast dinners that require the most technique, right? Here are a few of the things I hear most often about this Zesty Parmesan Chicken with Crispy Edges!
Can I bake the Zesty Parmesan Chicken with Crispy Edges instead of pan-frying?
Oh, you absolutely can! If you just aren’t feeling the stovetop cleanup, baking works great, though I have to be honest, you sacrifice just *a tiny bit* of that authentic, deep-golden crispiness that pan-frying gives you. If you decide to bake, line a sheet pan with parchment paper (or use a wire rack placed over the sheet pan—that helps air circulate underneath!).
Preheat your oven to 400°F (200°C). You might want to spray the tops of the breaded chicken lightly with cooking spray to help everything brown up nicely. They will need about 20 to 25 minutes, flipping halfway through. Since the chicken breasts are pounded thin, they should cook through nicely, but always double-check the internal temperature!
What is the best way to keep the Parmesan crust from falling off?
This is all about technique in the dredging station! If the crust keeps sliding off your Zesty Parmesan Chicken, typically it’s because one boundary was skipped or rushed.
First, make sure your chicken is totally dry before you hit it with the flour. Moisture is the enemy of the crust sticking! Second, make sure you fully coat it in flour first—the flour gives the wet egg something to grab onto. Third, when you put it into that Panko/Parmesan mix, you have to treat it like you’re applying stucco—press it on firmly! Don’t just gently roll it; use your hands to physically press that coating into the egg-washed surface so it adheres totally before it ever meets the oil. That firm pressing action locks everything in place!
Can I use chicken thighs instead of breasts for this recipe?
Yes, you certainly can play around with this recipe! Boneless, skinless chicken thighs are often more forgiving and stay juicier than breasts, which is fantastic. The main difference you need to watch out for is the cooking time because thighs are naturally thicker and less uniform than the pounded breasts we use here.
When you pan-fry chicken thighs, you’ll likely need closer to 6 or 7 minutes per side on medium heat to ensure they cook all the way to a safe internal temperature without burning that gorgeous crust. Keep an eye on the heat so you don’t scorch the Panko while waiting for the center to finish cooking. They will still be delicious in this creamy sauce!
If you’re looking for more great poultry inspiration that keeps your eating intentional and clean, definitely browse through my collection of chicken recipes!
Final Thoughts on Making Zesty Parmesan Chicken with Crispy Edges
I really hope you give this Zesty Parmesan Chicken with Crispy Edges a try next time you need a dinner that feels like a real treat but doesn’t demand hours of your precious evening time. Seriously, 35 minutes of work for this level of flavor? It’s an absolute steal!
When you make it, I genuinely want to know how it turned out for you! Did you get those perfect crispy edges or did you have to cook in batches like I sometimes do? Did you try the little squeeze of lemon in the sauce like I suggested? Don’t just walk away after dinner!
Snap a picture, drop a comment below, or give this recipe a quick star rating right on the page so others know it’s a certified weeknight win. Your feedback helps me keep bringing you the clean, life-fitting recipes you need. If you’re hanging out for more inspiration for meals that support your wellness journey, swing by the main blog page here!
A Personal Note on Weeknight Wins
You know, when I was deep in the cycle of trying every diet fad out there, the biggest roadblock wasn’t necessarily the food choices themselves; it was the time commitment. I felt like if a meal wasn’t “perfectly clean,” I had failed, and if it took longer than 45 minutes, I wasn’t committed enough. It was exhausting!
That pressure used to make me crack and order pizza way too often. But making recipes like this Zesty Parmesan Chicken with Crispy Edges changed my perspective entirely. Because it’s so fast and satisfying, I never reached that point of burnout where I just gave up on the whole day’s healthy choices.
It was a total mindset shift. Real wellness isn’t about restriction or endless hours spent cooking; it’s about supporting your body with nourishing food that fits seamlessly into your actual, busy life. This chicken is my proof! When I served this to myself and my family after a marathon work day, and we all genuinely loved it and felt energized afterward, I knew I was building sustainable habits. It’s those quick, flavorful wins that truly keep the momentum going on your wellness journey. You deserve food this good without the fuss, I promise you do!
By EMILIA, Founder of MeltItClean.com
Hi, I’m EMILIA, the founder of MeltItClean.com – your digital space for natural weight loss, real wellness habits, and clean-living inspiration that actually fits your life.
For years, I struggled with the ups and downs of dieting. I tried everything — juice cleanses, low-carb crazes, fitness challenges — but I always ended up back where I started: tired, bloated, and frustrated. I didn’t just want to “lose weight” — I wanted energy, mental clarity, glowing skin, and confidence without sacrificing my joy or sanity.
After years of experimenting, learning, and unlearning, I discovered a simple truth: your body is already powerful — it just needs support, not restriction. That’s when I created Melt It Clean — a site dedicated to real transformation through clean, intentional, and nourishing daily habits that anyone can follow.
My goal was simple: build a place where people could feel informed, supported, and empowered without being overwhelmed by wellness fads.
Zesty Parmesan Chicken with Crispy Edges
Ingredients
Equipment
Method
- Place chicken breasts between two sheets of plastic wrap and pound to about 0.5-inch thickness.
- Set up three shallow bowls: one with flour mixed with salt and pepper, one with beaten eggs, and one with panko, Parmesan, and garlic powder.
- Dredge each chicken breast in flour, dip into egg, then coat with the breadcrumb-Parmesan mix. Press firmly to adhere the coating.
- Heat olive oil and 2 tablespoons butter in a skillet over medium heat. Cook chicken 4 to 5 minutes per side until golden and cooked through. Set the chicken aside and keep it warm.
- In the same skillet, lower the heat and add 1 tablespoon butter, parsley, chicken broth, and heavy cream. Simmer until the sauce thickens slightly.
- Slice the chicken and serve it over the creamy herb sauce. Garnish with more parsley if you want.