
Honestly, who hasn’t been there? You lovingly mash those spotty, nearly black bananas, full of potential, and yet somehow end up with a loaf that tastes like sweet, spiced cardboard? It’s the culinary tragedy of quick breads! Well, friends, I’m here to tell you that the search is over. We have cracked the code on what makes this World’s Best Banana Bread So Good (and So Easy). Seriously, if you’re looking for a deep dive into the science behind perfect quick breads, check out the comprehensive guide over at ultimate banana bread guide.
This isn’t just another recipe; this is the one you’ll want to bookmark and pass down. My kitchen used to smell fantastic but yield dry results until I stopped thinking so hard about it and focused on the fruit. This version delivers on moisture like nothing else, without requiring complicated steps or fancy equipment. It’s pure, classic banana flavor made foolproof. You trust me on this; once you master the simple technique for this easy banana bread, you’ll never look back!
Why What Makes This World’s Best Banana Bread So Good (and So Easy)
I know every recipe promises to be the ‘best,’ but for banana bread, it’s about hitting that glorious intersection where incredible flavor meets ridiculously simple technique. This recipe nails it, and frankly, that’s why it stays in heavy rotation at my house. It’s perfect for a chaotic Tuesday afternoon when you need something comforting fast!
Here’s the short list of why this recipe always comes out perfectly:
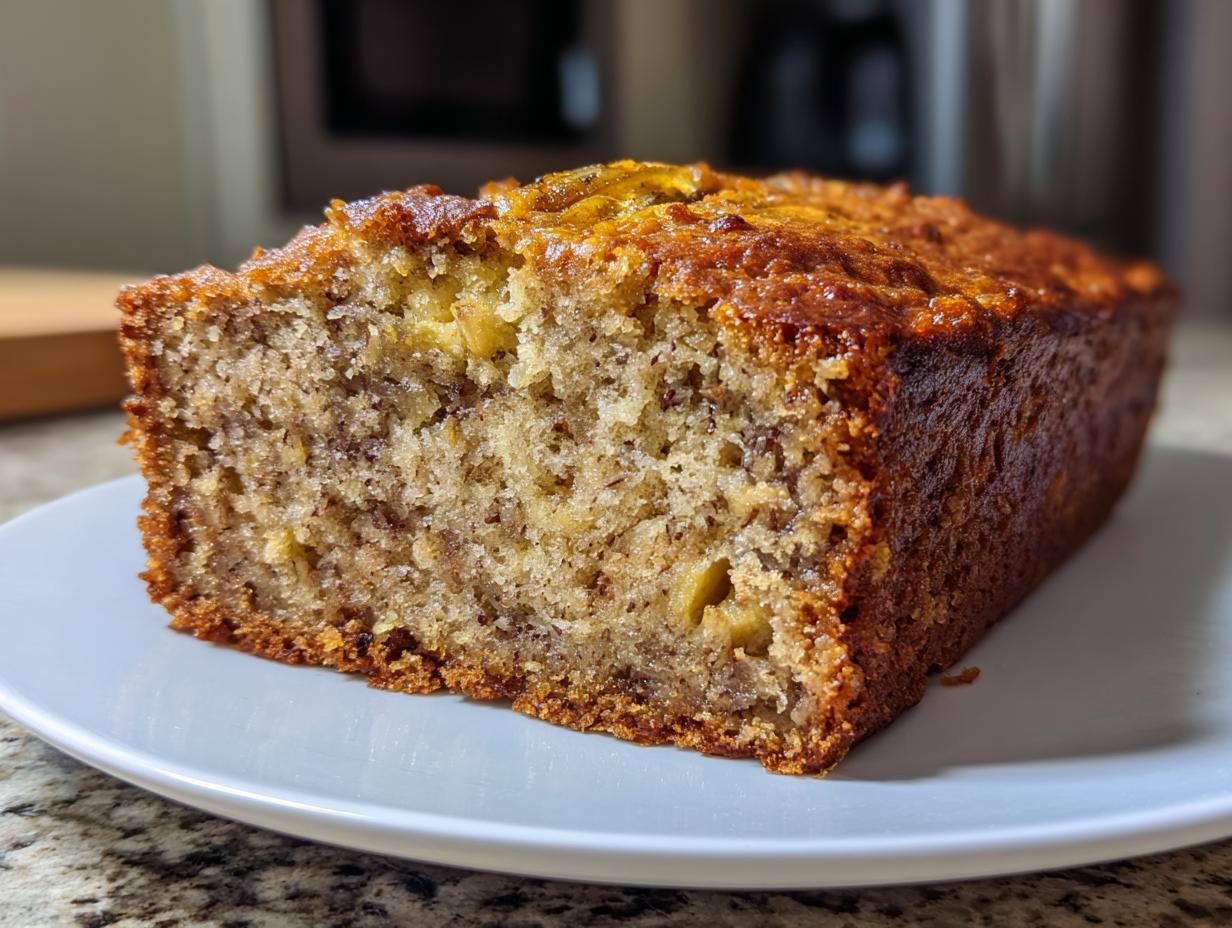
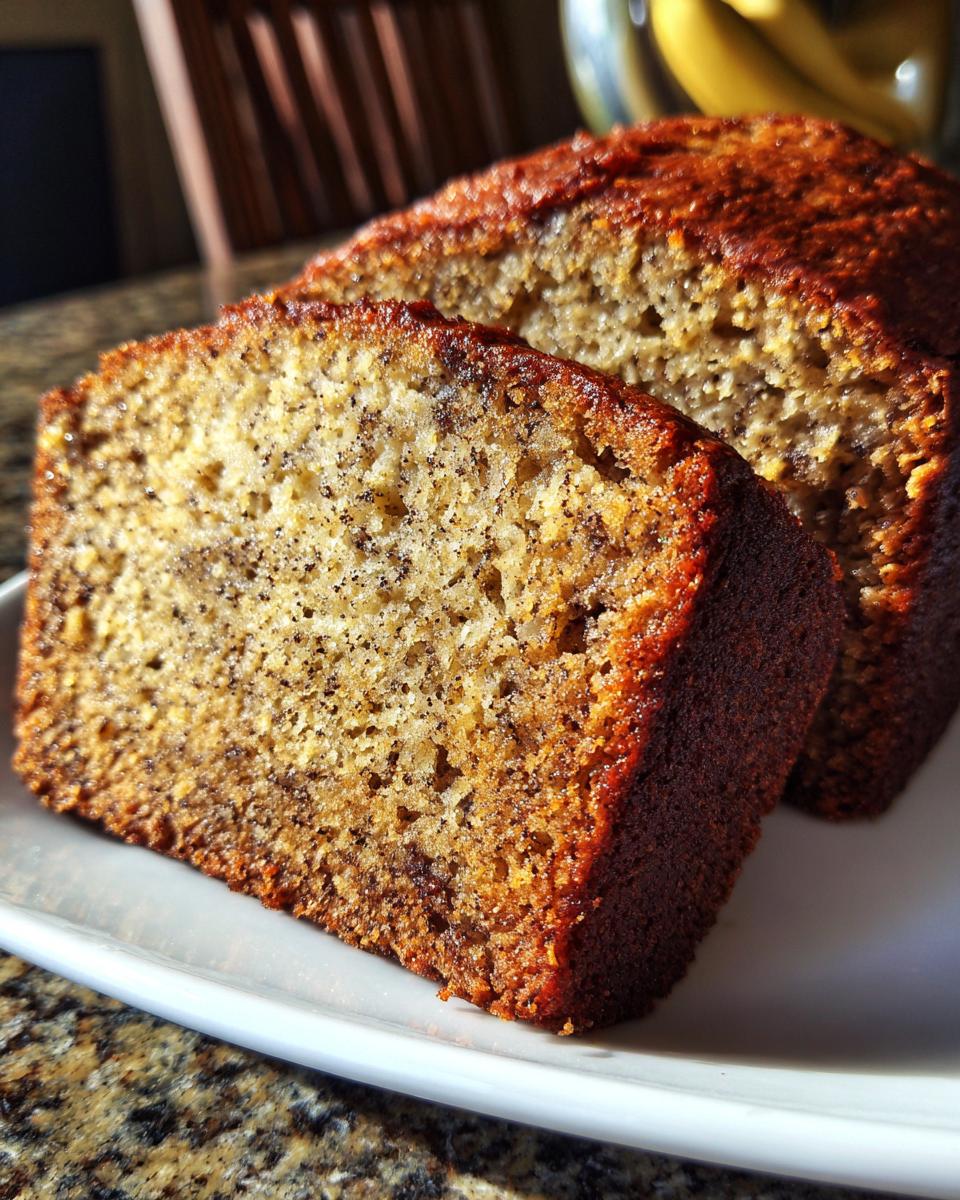
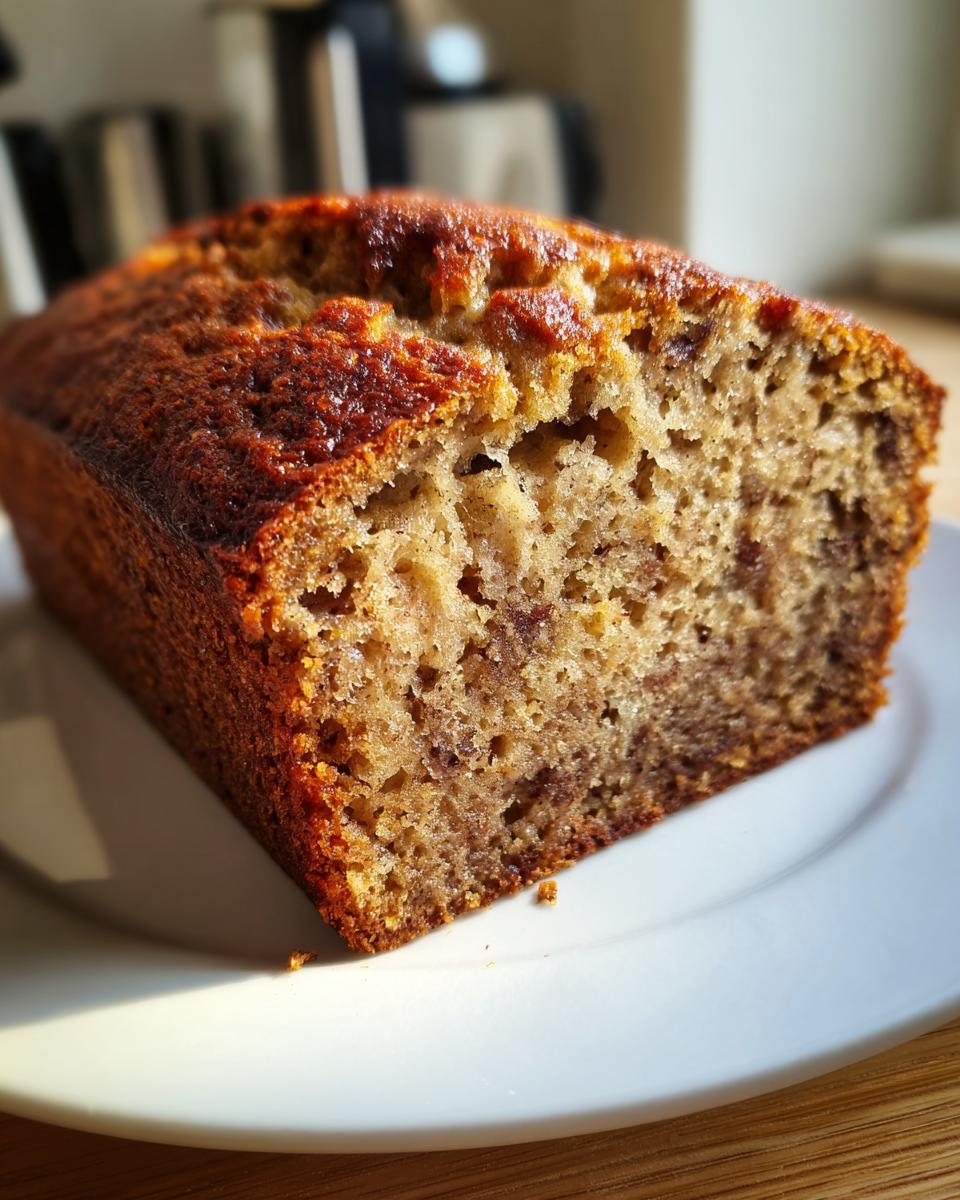
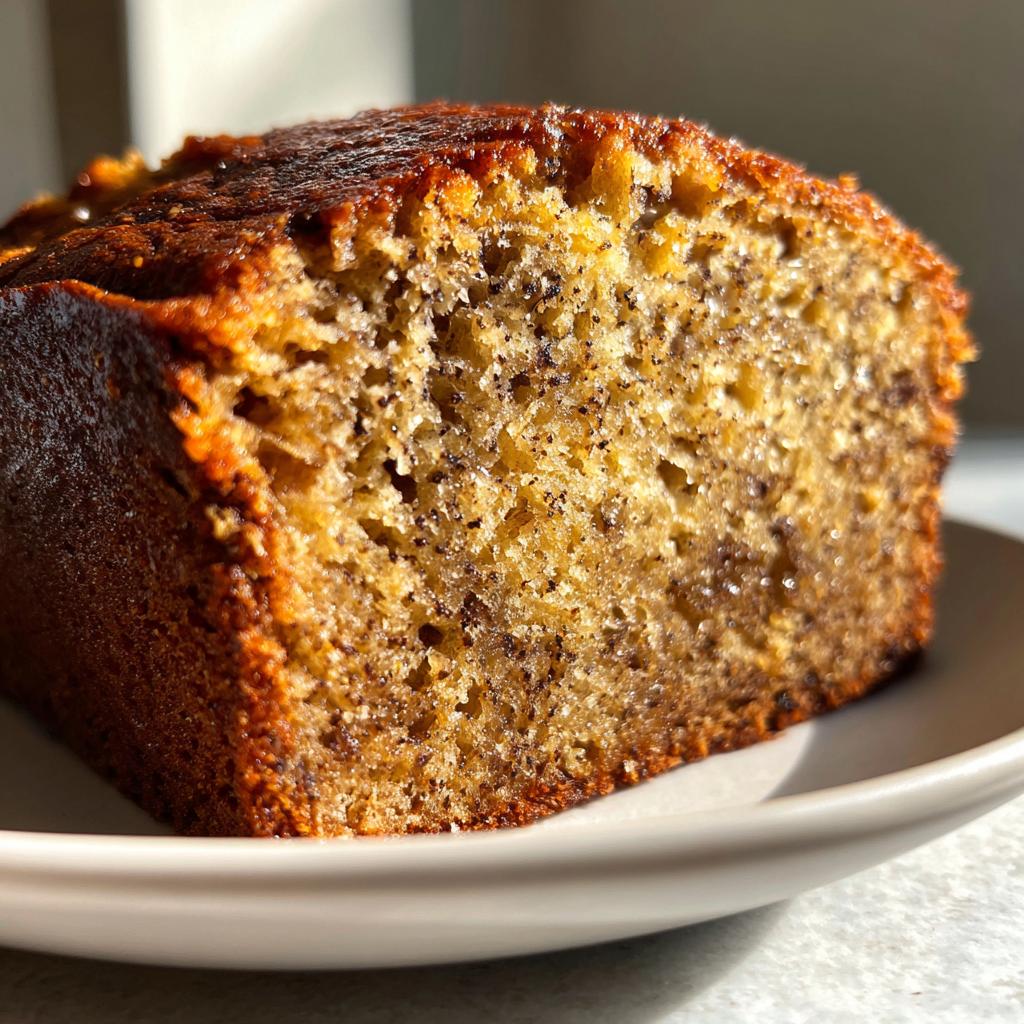
- Maximum Moisture: We utilize the full power of nearly black bananas. The rule here is: the spottier, the better! Those dark peels mean pure sugar and intense banana flavor that seeps right into the crumb.
- Hands-Off Mixing: Unlike finicky cakes, this quick bread is very forgiving. Once the dry ingredients meet the wet, you stop stirring almost immediately. Seriously, don’t even think about overmixing it!
- Flavor Depth: A little vanilla and a dash of optional cinnamon work overtime here. They aren’t fighting the banana; they’re amplifying it, making the loaf taste richer than just plain banana bread.
It’s easy because the steps are straightforward, and the ingredients are pantry staples. You don’t need fancy machines, either. Just grab a bowl and a whisk, and you’re practically halfway done. If you’re looking to make smaller portions for lunchboxes, check out the tips for banana bread minis!
Essential Equipment for What Makes This World’s Best Banana Bread So Good (and So Easy)
The beauty of this easy banana bread is that you don’t need a giant stand mixer or specialized baking gear. If you’ve got bowls and a way to mix stuff, you’re in great shape! Before you even start mashing those bananas, take a quick inventory of what you need so there are no last-minute scrambles. If you’re constantly looking for one-bowl solutions, this isn’t quite it, but it’s close! Speaking of getting things done fast, I’ve got a great article on one-bowl banana bread if you ever want to see a different approach!
Here are the absolute must-haves to ensure your loaf turns out perfectly:
The Pan is Key:
- 9×5 inch loaf pan: This is the standard size, and it’s crucial for accurate cooking time. If you use a smaller or deeper pan, remember bananas are dense, and they might not bake all the way through. Always err on the side of a wider loaf pan for this recipe.
Mixing Tools:
- Mixing Bowls: You’ll need at least two – one medium bowl for your dry ingredients (flour, soda, salt) and one nice big one for creaming the butter and sugar.
- Whisk: A simple wire whisk is perfect for combining the dry stuff quickly without getting things too airy. For the wet side, a sturdy wooden spoon or rubber spatula is your best friend when folding everything together at the end.
That’s honestly it! No fancy thermometers, no special spatulas for scraping down sides—just the basics. Having the right size pan ready to go is the biggest hurdle, in my opinion, so make sure it’s greased and floured (or sprayed well!) before you touch the butter.
Ingredient Breakdown for What Makes This World’s Best Banana Bread So Good (and So Easy)
Okay, let’s talk ingredients. This is where the magic really happens, and where you build that incredible flavor foundation that cuts through any dryness. Unlike recipes that hide behind mountains of sugar or weird oil substitutions, this one relies on simplicity. If you’re feeling like healthy swaps are more your style, I do have a great guide to healthy banana bread alternatives, but for the absolute best, classic flavor, stick to these basics!
Everything goes into one big category here—the bread itself—because we’re keeping it simple. Just make sure your butter is actually softened, not melted. That little detail makes a huge difference in trapping air when you cream it.
For the Bread Components
You are going to need:
- All-Purpose Flour: We call for 1 and 3/4 cups. This is your structure, so don’t pack it down into the measuring cup! Spoon it gently into the measuring cup, then level it off.
- Baking Soda: Just 1 teaspoon. This is working hard to lift our heavy, moist batter, so measure it precisely.
- Salt: A half teaspoon only. It won’t make the bread salty; it just makes the banana taste like super-banana!
- Cinnamon: About a half teaspoon, and this one is totally optional, but I highly recommend it. It just warms everything up.
The Wet Essentials for Maximum Moisture
Pay close attention here, because this is where we guarantee that moist banana bread quality:
- Unsalted Butter, Softened: You need a half cup. If you forget to take it out early, don’t throw it in the microwave! Let it sit on the counter while you gather everything else. Creaming warm butter makes the whole thing greasy, trust me.
- Granulated Sugar: Three-quarters of a cup. We depend on the bananas for most of the sweetness, so this amount keeps it from tasting like dessert and keeps it tasting like perfect morning bread.
- Eggs: Two large ones, beaten in one at a time. They provide structure and richness.
- Vanilla Extract: One teaspoon. Always use real vanilla if you can—it just smells better baking!
- Mashed Ripe Bananas: This is the most important part! You need 1 and 1/2 cups of mashed fruit. Pro Tip: This usually means you need about 3 really, really overripe bananas (the kind that are practically black). Don’t measure the whole bananas; measure the mash!
Once you have your ingredients ready to go, the mixing part flies by. You mix the dry stuff, you mix the wet stuff, and then you combine them gently. That’s it! No fuss, just fantastic bread.
Expert Tips for What Makes This World’s Best Banana Bread So Good (and So Easy)
You followed the ingredient list exactly, you creamed the butter perfectly, but you still want that extra insurance policy against dry bread, right? I get it. Even with an easy recipe, a couple of tiny secrets tucked away in my back pocket make the difference between good banana bread and the *best* banana bread.
If you’ve ever tried adding sour cream for moisture, you might want to see how this recipe compares! I found a great comparison in this article about banana bread with sour cream to see why we skip it here.
Tip One: Embrace the Ugly Banana
Look, if your bananas are yellow, they are lying to you. They are holding out on their flavor potential! I wait until my bananas look like something a squirrel rejected—black, soft, maybe even starting to weep a little juice onto the counter. Those are the ones packed with starches that have converted totally into sugar. When you mash them, they almost become a liquid themselves, which is fantastic for moisture retention.
If you’re running a bit behind and don’t have ugly bananas yet, I swear by this trick I learned: you can bake slightly yellow bananas on a sheet pan at 300°F (150°C) for about 15-20 minutes until the peel is black. Let them cool, and then mash away. It speeds up the process without sacrificing that deep flavor!
Tip Two: Stop Stirring the Second the Flour Disappears
This is the golden rule for any quick bread, and it’s easy to break when you get excited and want to see a perfectly uniform batter. You only mix the dry ingredients into the wet ingredients until you no longer see streaks of white flour. That’s it!
If you keep beating the batter after that point, you are developing the gluten in the flour. Gluten is great for chewy bread loaves, but it turns moist banana bread tough and spongy. A few small lumps in the batter are actually a good sign! It means the gluten hasn’t been overworked. You can see a few more tips on handling peanut butter variations in this excellent piece on peanut butter banana bread baking tips, but the ‘don’t overmix’ rule applies everywhere.
Tip Three: The Foil Tent is Your Friend
Because this bread is so incredibly moist and dense due to the high fruit content, the top often sets much faster than the center cooks. If you let it go unchecked, the outside burns while you’re waiting for the center skewer to come out clean.
About 40 minutes into the bake, take a peek. If the top is already dark golden brown, just grab some aluminum foil, loosely tent it over the top of the loaf pan, and keep baking. This reflects the heat just enough so the top doesn’t scorch, allowing that beautiful moist center to fully cook through without penalty. It’s truly a game-changer for thick loaves!
Step-by-Step Instructions for What Makes This World’s Best Banana Bread So Good (and So Easy)
Okay, deep breaths! We have gathered the ingredients, we know the secrets to max moisture, now it’s time to put it all together. This process is fast, I promise. As long as you don’t start cleaning up between every single step, you’ll be pouring this gorgeous batter into the pan in under fifteen minutes. Remember that little tip I shared earlier about the cinnamon swirl? If you decide to try that out, you’ll want to check out the instructions on cinnamon swirl banana bread recipe tips before you combine the wet and dry ingredients!
Prep Work: Oven and Pan Ready
First things first: heat! You want the oven ready to go when the batter is finished, because we don’t want this beautifully aerated mixture sitting around waiting for the oven to catch up. Set your oven temperature to 350°F (175°C).
Next, grab that 9×5 inch loaf pan. You need to prepare it really well; this dense bread loves to stick if you let it! Just grease it generously with butter or cooking spray, and then dust the whole inside with flour, tapping out any major excess. Make sure you get the corners well coated!
Mixing the Dry and Wet Components
We separate the mixing initially. Grab your medium bowl and take a simple whisk. Toss your 1 3/4 cups of flour, the baking soda, the salt, and if you’re using it, the cinnamon. Whisk it all around for about 30 seconds just to make sure that baking soda is evenly distributed. Set that aside. No touching it until we tell you to!
Now for the main event in your big bowl. You need to cream that softened unsalted butter with the 3/4 cup of sugar. Use your mixer or a sturdy spoon and beat it until it looks pale yellow and genuinely fluffy, like light whipped frosting. This is where you build those initial air pockets!
Beat in your two eggs, making sure the first one is fully incorporated before you add the second. Then stir in the vanilla extract. Once that’s smooth, gently fold in your 1 1/2 cups of mashed bananas. Mix until it’s just combined. It’s going to look a little lumpy, and that’s perfect.
The Gentle Marriage: Combining Everything
Here is where patience pays off! You are going to add your dry mix into the wet mix in two or three additions. Only mix on the lowest speed if you’re using a hand mixer, or just fold very gently by hand. Do not mix until smooth!
As soon as you can’t clearly see streaks of powdery white flour anymore, STOP. I mean it! Overmixing is the enemy of moist banana bread. If you see a few tiny flour spots, the oven heat will take care of that. It is better to stop too early than too late here.
Baking Time and Doneness Checks
Scrape that thick batter straight into your prepared loaf pan and spread it evenly. Pop it into the preheated 350°F oven.
You are looking at a bake time of about 55 to 65 minutes. Because this loaf is so moist, the outside can look done way before the center is cooked. Now, remember that foil trick I talked about? If the top is darkening nicely around the 40-minute mark, loosely tent that pan with aluminum foil and continue baking. This prevents burning while the inside finishes setting.
When you think it’s ready, test it. A wooden skewer inserted right into the center should come out clean, or maybe with just a few moist, sticky crumbs attached—never wet batter.
The Crucial Cooling Step
The very last thing everyone wants to do when that glorious smell fills the kitchen is wait, but you must abide by this step for the best texture!
Leave the banana bread in the pan on a wire cooling rack for exactly 10 minutes. This allows the structure to set up nicely, so it doesn’t collapse when you handle it. After 10 minutes, run a butter knife gently around the edges if needed, and carefully turn the bread out onto the wire rack to finish cooling completely before you slice it. That final cool-down time is essential for achieving that perfect, sliceable texture.
Storage and Reheating for What Makes This World’s Best Banana Bread So Good (and So Easy)
Even though this is truly the best banana bread recipe, the temptation to eat the whole loaf in one day is strong! But we want to save some for tomorrow, right? The good news is that because we loaded this recipe up with moist ingredients like those beautiful ripe bananas, it keeps remarkably well. However, if you want to keep it fresh for days, presentation matters!
If you’re looking for ways to make this recipe ahead of time—maybe a weekend bake for busy weekday mornings—I’ve got some great meal prep considerations over on my guide to banana bread for busy weeknights. For storing, though, here’s what I do:
Keeping it Fresh at Room Temperature
This bread should never see the inside of the refrigerator, at least not in the first few days! Cold air is dry air, and putting this moist banana bread in the fridge is like putting a perfectly ripe avocado in the freezer—it just ruins the texture. We want to lock that moisture in, not suck it out.
Once the bread is completely cool (and trust me, you *must* wait until it’s totally cool, or condensation will make the crust soggy), wrap it tightly. I prefer to use plastic wrap first, making sure it’s snug all the way around the loaf. Then, I wrap that bundle securely in aluminum foil. This double wrapping creates a barrier against drying out.
Stored this way on the counter, wrapped well, this bread stays gorgeously moist for a solid 3 to 4 days. If you have half a loaf left after that, *then* you can think about freezing it.
Freezing for Later Indulgence
Banana bread freezes like a dream, which is another reason this recipe is so easy! You can freeze the whole loaf, but I actually prefer wrapping individual slices. That way, you only warm up what you need!
To freeze slices: Wrap each individual slice tightly in plastic wrap, then place those wrapped slices into a zip-top freezer bag. Squeeze out as much air as possible. It will keep perfectly for about three months. If you try to sneak a slice out later, just make sure the bag is completely sealed—no freezer burn allowed!

Reheating for That ‘Just Baked’ Warmth
When you’re ready to enjoy a slice, you want it warm and tender again. Microwaving a slice is the fastest way, but you have to be careful not to turn it rubbery. If you use the microwave, wrap the slice loosely in a damp paper towel before heating it for about 15 to 20 seconds.
The damp paper towel steams the bread lightly as it heats, bringing back that soft, just-out-of-the-oven texture. It works like magic! If you grabbed a frozen slice, thaw it on the counter first, and then give it that little 20-second microwave bath with the damp towel. It’s the fastest route back to banana bread heaven without compromising all that moisture we worked so hard to capture!
Customizing Your Banana Bread: Variations and Add-Ins
While I absolutely stand by this recipe as the gold standard for basic, easy banana bread, there is absolutely no crime in wanting to dress it up a bit! Sometimes you just need a little crunch or a hit of chocolate to elevate an already great thing. The beauty of this base recipe is how sturdy it is; it handles mix-ins really well without collapsing into a sad, dense pancake.
If you are feeling adventurous and want to add some real excitement, think about dipping into flavors like coffee! I recently saw someone incorporating espresso powder into their batter, and I found a fantastic recipe for it here: chocolate espresso banana bread. That sounds heavenly!
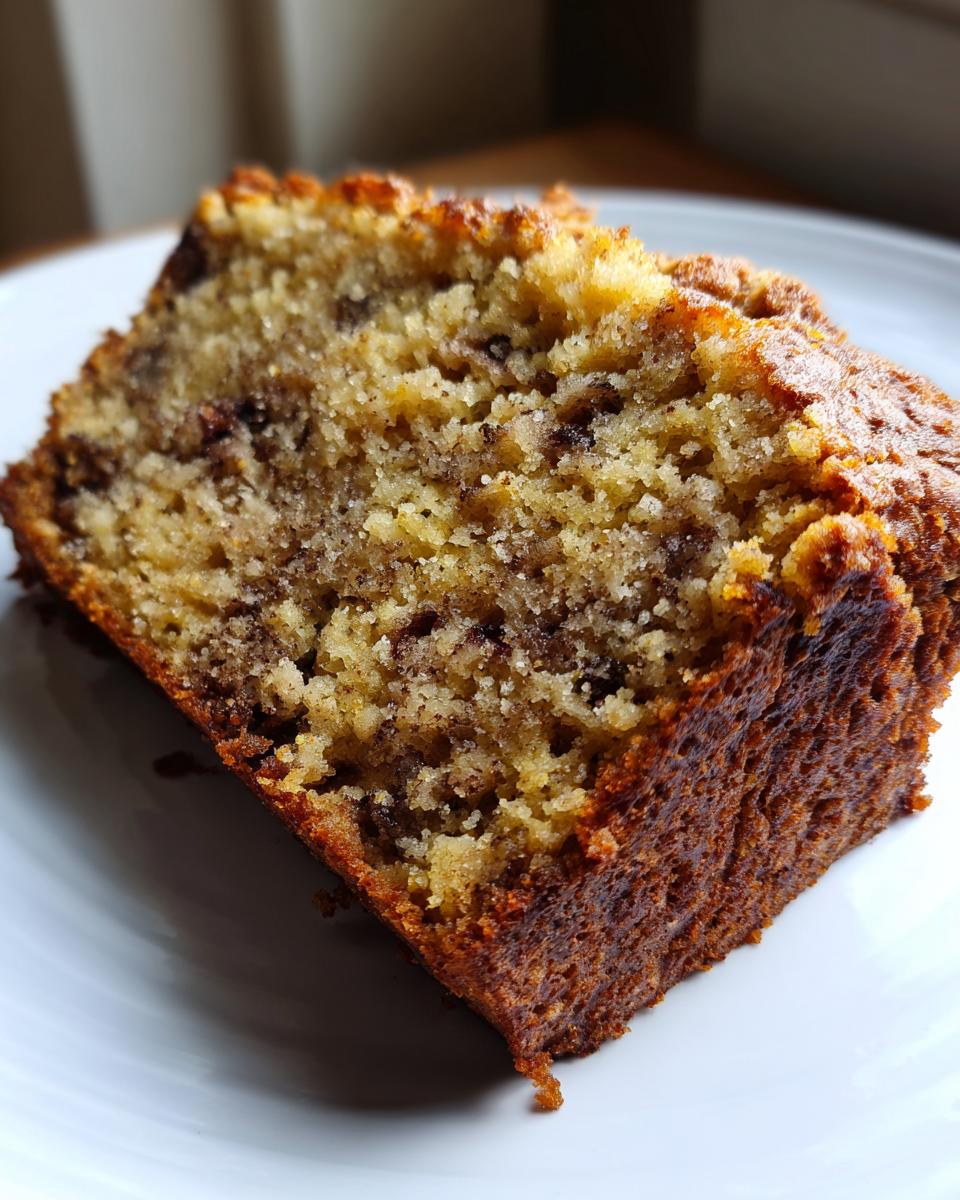
Nuts: For That Essential Crunch
If you’re a nut person, you have to include them! I prefer walnuts because they have a slightly bitter edge that contrasts beautifully with the sweetness of the banana, but pecans are a close second. If you are using nuts, you need to treat them right.
We can do this in two ways, depending on whether you want them mixed throughout or sprinkled on top.
- Mixing In: For the best distribution, use about a half cup of chopped walnuts or pecans. Toss those chopped nuts lightly in about one teaspoon of the dry flour mixture *before* you add them to the batter. I know, it seems like an extra tiny step, but trust me! Dusting them with flour keeps them from sinking straight to the bottom of the pan while baking.
- Topping For Texture: If you prefer a satisfying crunch right on top, save about a quarter cup of nuts. After you pour the batter into the pan, sprinkle those nuts evenly over the surface. They will toast up nicely during the longer bake time.
Chocolate Choices: Go Dark or Go Home
Chocolate chips might just be the most popular addition to banana bread, and for good reason. The pairing of rich, warm banana and melted dark chocolate? Perfection! Stick with semisweet or dark chocolate chips (milk chocolate tends to get too sweet here).
Just like with the nuts, half a cup is plenty for this loaf size. When you are at the very end of the mixing process—right after you’ve stopped mixing the flour in—gently fold in the chocolate chips using your spatula. You don’t want to break them up too much or they’ll melt entirely into the batter, leaving you with streaks of brown instead of distinct pockets of gooey chocolate.
Spice It Up or Sneak in Veggies
You already have the option for cinnamon, but if you want to bump up the warmth, try a quarter teaspoon of ground nutmeg or a pinch of cardamom when you mix your dry ingredients. Cardamom is surprisingly good with fruit!
On the vegetable front, while we rely on the banana, some people like to sneak in shredded zucchini. If you go this route (use about a half cup, squeezed dry!), make sure you up your baking soda by just a tiny pinch—about 1/8 teaspoon—because the zucchini adds a little more bulk and moisture that the soda needs to handle.
Remember, whatever you toss in, treat it gently in the final fold. We are baking for moistness, not toughness!
Frequently Asked Questions About This Recipe
So many people write in with their banana bread triumphs, but sometimes, you just run into a hiccup! Don’t worry if your first batch didn’t look exactly like mine. Baking is all about learning from the oven, and I’ve collected the most common questions I get asked about making this loaf truly the best and easiest banana bread around. If you’re really digging deep into making something perfect, you might also want to peek at some advanced tips in this guide to the best ever banana bread.
What makes this banana bread so much moister than others?
Honestly, it comes down to the ripeness of the fruit and the creaming method! We focus on bananas that are almost totally black on the peel—those are practically liquid sugar bombs waiting to happen. Also, remember what I emphasized about not overmixing the flour. Overmixing develops gluten, which equals tough, dry bread. Keeping the mixing minimal guarantees that moist banana bread crumb we’re aiming for. It’s that simple fusion of fruit quality and gentle handling.
Can I substitute the butter with oil or applesauce?
This is tough, and I’ll be straight with you: I strongly advise against it for this specific recipe if you want “the best.” The recipe calls for softened butter because the creaming process beats air into the butter and sugar, creating foundational air pockets that give the loaf its structure. Oil or applesauce won’t cream; they just mix in, leading to a denser, sometimes greasy texture.
You lose that beautiful, cake-like lift. If you absolutely must substitute due to allergies, use an equal amount of vegetable oil, but know your texture will change. For the creaming step, you’ll just beat the oil and sugar together until they are visually combined, but it won’t fluff up like butter does.
My loaf sank in the middle! What went wrong?
Oh, the dreaded banana bread collapse! This is usually caused by one of two things, especially with such a heavy, moist banana bread. Either your oven temperature was too low, meaning the crust set too slowly and the middle couldn’t support itself, or—and this is more common—you opened the oven door too soon to check it before the structure was set!
That beautiful lift happens around the 35-minute mark. If you disturb the oven before 45 minutes, the fragile air bubbles collapse. Make sure you keep the door shut until the time I suggested for checking doneness, and definitely use that foil tenting trick if the top browns too fast!
Do I really need to use the exact amount of mashed bananas?
Yes, the 1 1/2 cups of mashed bananas is non-negotiable for this recipe’s texture. Remember, the mash is acting as much as a wet ingredient as it is a flavor agent. If you only have two bananas and they seem small, you have to make sure you still get 1 1/2 cups of mash, even if it means grating the last bit of banana pulp you can squeeze out. Too little, and the loaf will be too floury; too much, and it will never cook through.
Can I use baking powder instead of baking soda?
In this specific recipe, we rely heavily on baking soda because the bananas and sugar create a slightly acidic environment. Baking soda reacts strongly with that little bit of acid to give us the lift we need. If you swapped strictly to baking powder, you wouldn’t get the same assertive lift, and the bread would end up heavier and potentially have a slight metallic aftertaste since the baking powder has its own mild acid already built in.
If you only have baking powder, you can try substituting 1 teaspoon of baking powder for the 1 teaspoon of baking soda, but I really recommend you just let those bananas ripen a little longer until you have the necessary acidity to activate the soda properly!
Share Your Experience Making What Makes This World’s Best Banana Bread So Good (and So Easy)
Whew! Now that you’ve mastered the secrets to that incredible moist texture and simple technique, I desperately want to hear how it went for you! My favorite part of sharing these old family recipes is seeing them come to life in *your* kitchens. Don’t be a stranger when you pull that gorgeous, golden loaf out of the oven!
This recipe is an absolute staple for me, and I hope it finds its way into your rotation too. If you’ve been searching forever for that foolproof, never-dry banana bread, this is it, and I’d love for you to let the community know what you think!
How to Leave Feedback and Connect
The biggest compliment you can give is a quick rating right here on the page, but I adore reading the little stories you share in the comments section below. Did you use walnuts? Did one of the expert tips make all the difference for you? Let me know!
If you snap a picture of your perfectly browned, tender loaf, please tag me on social media! Seeing your results seriously makes my day. Nothing makes me happier than knowing I helped someone bake something delicious and easy.
- Take a picture: Use a good light setting so we can see that moist crumb!
- Tag me: Show off your success! I love seeing my recipes travel.
- Ask if you’re stuck: If you ran into a little snag, drop a question below. Chances are, someone else has the same question, and we can troubleshoot together. You can even find more troubleshooting tips in the article on the banana bread recipe everyone asks for!
Happy baking, and enjoy every single slice of that perfectly easy, melt-in-your-mouth banana bread!
World’s Best Banana Bread
Ingredients
Equipment
Method
- Preheat your oven to 350°F (175°C). Grease and flour a 9×5 inch loaf pan.
- In a medium bowl, whisk together the flour, baking soda, salt, and cinnamon.
- In a separate large bowl, cream together the softened butter and sugar until light and fluffy.
- Beat in the eggs one at a time, mixing well after each addition. Stir in the vanilla extract.
- Add the mashed bananas to the wet ingredients and mix until just combined.
- Gradually add the dry ingredients to the wet ingredients, mixing on low speed or by hand until just incorporated. Do not overmix.
- Pour the batter into the prepared loaf pan.
- Bake for 55 to 65 minutes, or until a wooden skewer inserted into the center comes out clean. If the top browns too quickly, loosely tent it with foil.
- Let the bread cool in the pan for 10 minutes before turning it out onto a wire rack to cool completely before slicing.


