You know those days, right? You’re trying to stay on track with your clean eating habits, but suddenly 3 PM hits, and you feel like you’ve run into a brick wall. You need a serious energy boost, but the thought of another heavy meal or a sugary snack just makes you feel sluggish afterward. That’s exactly when I turn to things that are ridiculously easy, packed with good stuff, and give me that quick ‘lift’ without any guilt.
Forget complex baking or waiting forever for something to set—we’re talking about the magic of a chilled, satisfying treat that supports your wellness goals. Seriously, this recipe is my secret weapon for staying energized through those afternoon slumps. I present to you the gorgeous, simple, and unbelievably refreshing Protein Coffee Jell.
It takes practically no time to put together, and honestly, who doesn’t love coffee flavor in dessert form? Plus, it’s loaded with protein to keep you full and focused while you crush the rest of your day. If you’re looking for a quick, no-fuss indulgence, this is it. Check out how easy this Protein Coffee Jell is to make; you’ll be shocked!
If you’re trying to find more high-protein ideas that aren’t eggs every single morning, you should absolutely take a look at my rundown of high-protein breakfast ideas for 2025. But for now, let’s get this jelly chilling!
Why This Protein Coffee Jell Recipe Fits Your Clean Living Goals
When I started shifting my focus to clean living, the biggest hurdle wasn’t cutting out the bad stuff—it was finding things that actually felt satisfying and kept working *with* my body, not against it. This Protein Coffee Jell is one of those game-changers. It fits right into our philosophy here at Melt It Clean: nourish, support, don’t restrict!
It’s honestly perfect for fitting into a busy schedule. You spend maybe 10 minutes assembling it, and then your fridge does all the heavy lifting. I’ve started making a batch every Sunday so I have easy, guilt-free snacks ready for the week. Look, if you ever need more ideas for simple, tasty clean meals, definitely peek at my latest post on healthy meals recipes meal prep tastes great.
Here are the main wins you get with this recipe:
- Protein Powerhouse: That Greek yogurt base means you get a solid protein punch to curb cravings and stabilize your energy.
- Minimal Cooking Effort: Seriously, you heat a few liquids, whisk, and chill. It’s almost too easy!
- Ingredient Control: You choose your sugar, your milk—it keeps things totally clean and customizable to your needs.
Essential Equipment for Making Your Protein Coffee Jell
Okay, let’s talk tools. One of the best things—besides how delicious it is, obviously—about making this Protein Coffee Jell is that you seriously don’t need anything fancy. I’m keeping this recipe beginner-friendly, so you won’t need to haul out every single gadget you own!
If you’ve got the basics, you’re already halfway there. We’re relying on simple transfers and whisking. Trust me, putting this together feels less like cooking and more like assembling a super delicious science project that sets up perfectly in the fridge.
Here’s the short list of everything I use when I whip this up:
- Mixing bowl: You need somewhere to combine the cool yogurt with the warm liquid mixture, so a good sturdy bowl is key.
- Saucepan: Just a small one is plenty for heating up your milk and sugar mixture. Nothing huge needed here!
- Whisk: This is crucial! You need to whisk until everything is completely smooth, especially when incorporating that gelatin.
- Measuring Cup: Precision matters a little bit with gelatin, so make sure your measuring cup is handy for liquids.
That’s it! Four simple items. See? Totally achievable, even if you’re new to making healthy desserts. No immersion blenders required, thank goodness.
Ingredient Clarity for Perfect Protein Coffee Jell
Okay, assembling the Protein Coffee Jell batch is where we make sure we’ve got the best flavor foundation. Remember, clean living means knowing exactly what you’re putting into your body, and these simple ingredients let you do just that. I’ve broken this down into the essential base and the fun add-ins we can play with later.
For the base, you need a cup of milk—I usually go for unsweetened almond milk, but use what you love! We’re adding just a quarter cup of raw cane sugar, which gives a nice rounded sweetness, but please tweak that amount if you’re keeping sugar low. The real stars here are the 2 tablespoons of gelatin powder; this is what makes it set beautifully. And of course, the coffee kick comes from 1 tablespoon of espresso powder. Don’t forget the vanilla, the pinch of salt to make those coffee notes pop, and that rich cup of plain Greek yogurt!
My personal expert tip, especially if you’re new to gelatin, is to let the powder sit in the cold milk for just five minutes *before* you add heat. It’s called blooming Gelatin, and it makes sure you don’t get any weird gummy bits floating around later—we want a silky smooth Protein Coffee Jell!
The Base Ingredients
These form the backbone of the dessert. Everything gets heated gently together!
- Milk: 1 cup. Use whatever milk works for your lifestyle; it won’t change the structure much.
- Raw Cane Sugar: 1/4 cup, but taste as you go!
- Gelatin Powder: 2 tablespoons. Remember to bloom it!
- Espresso Powder: 1 tablespoon. This is the coffee flavor powerhouse.
- Plain Greek Yogurt: 1 cup. Essential for the creamy, high-protein body.
- Vanilla and Salt: 1 teaspoon vanilla and just a tiny pinch of salt.
Optional Boosts for Customization
If you need this even *more* protein-packed, or you just want to jazz it up before it sets, these are your buddies. I sometimes throw in a scoop of vanilla protein powder right when I mix the yogurt, but I usually have to add an extra splash of milk because protein powder tends to drink up liquid fast. If that sounds like too much fuss, save the extras for later!
- Vanilla Protein Powder: 1 scoop. Adjust milk slightly if you add this!
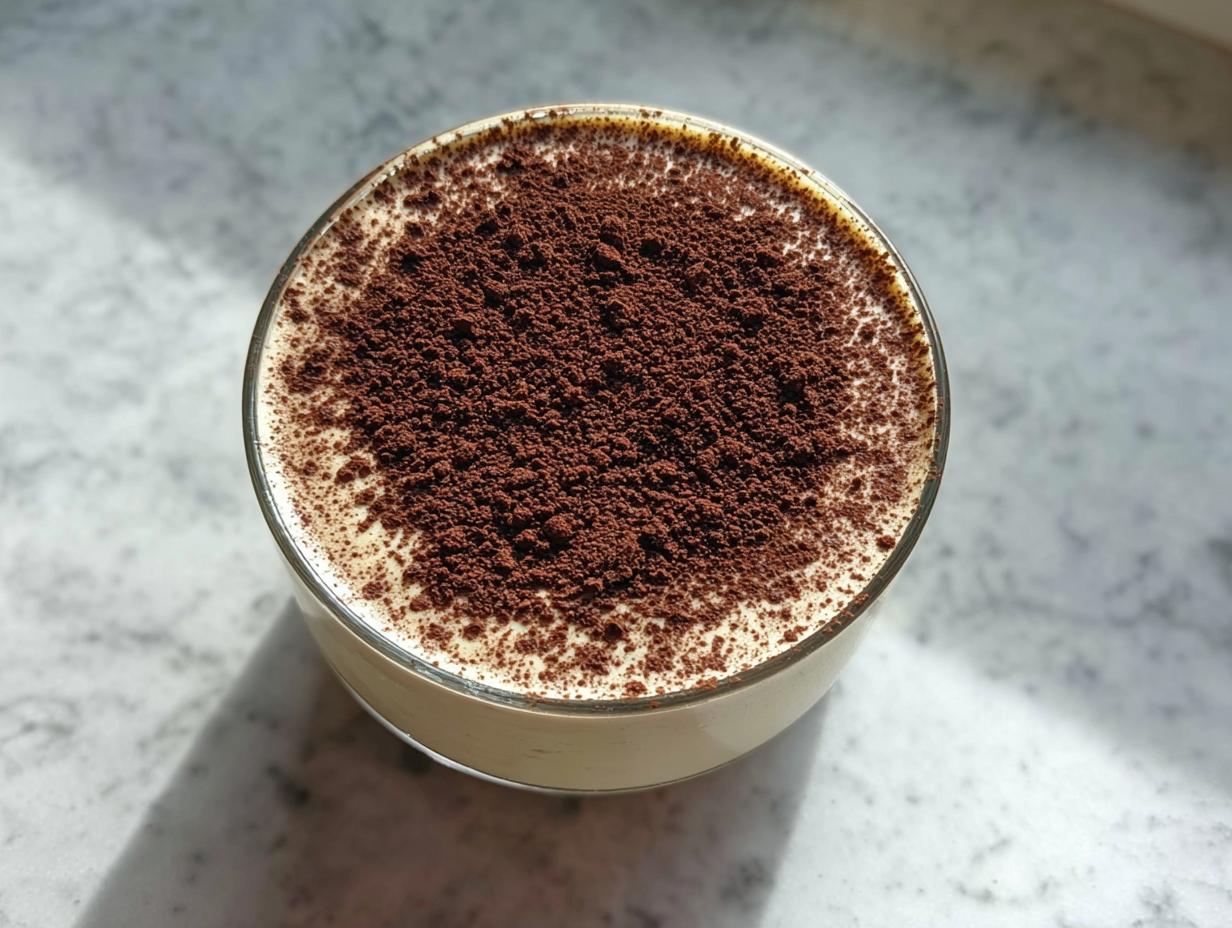
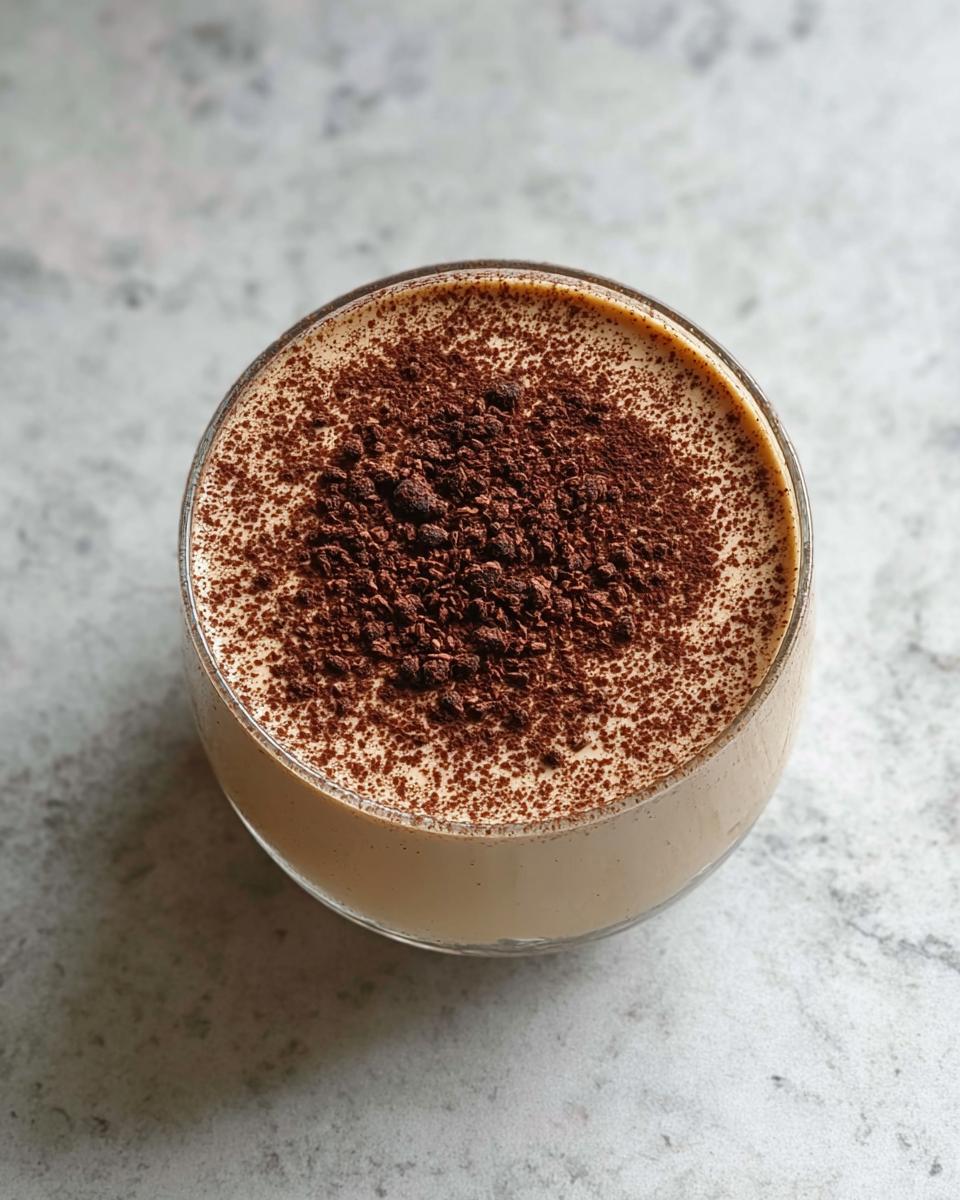
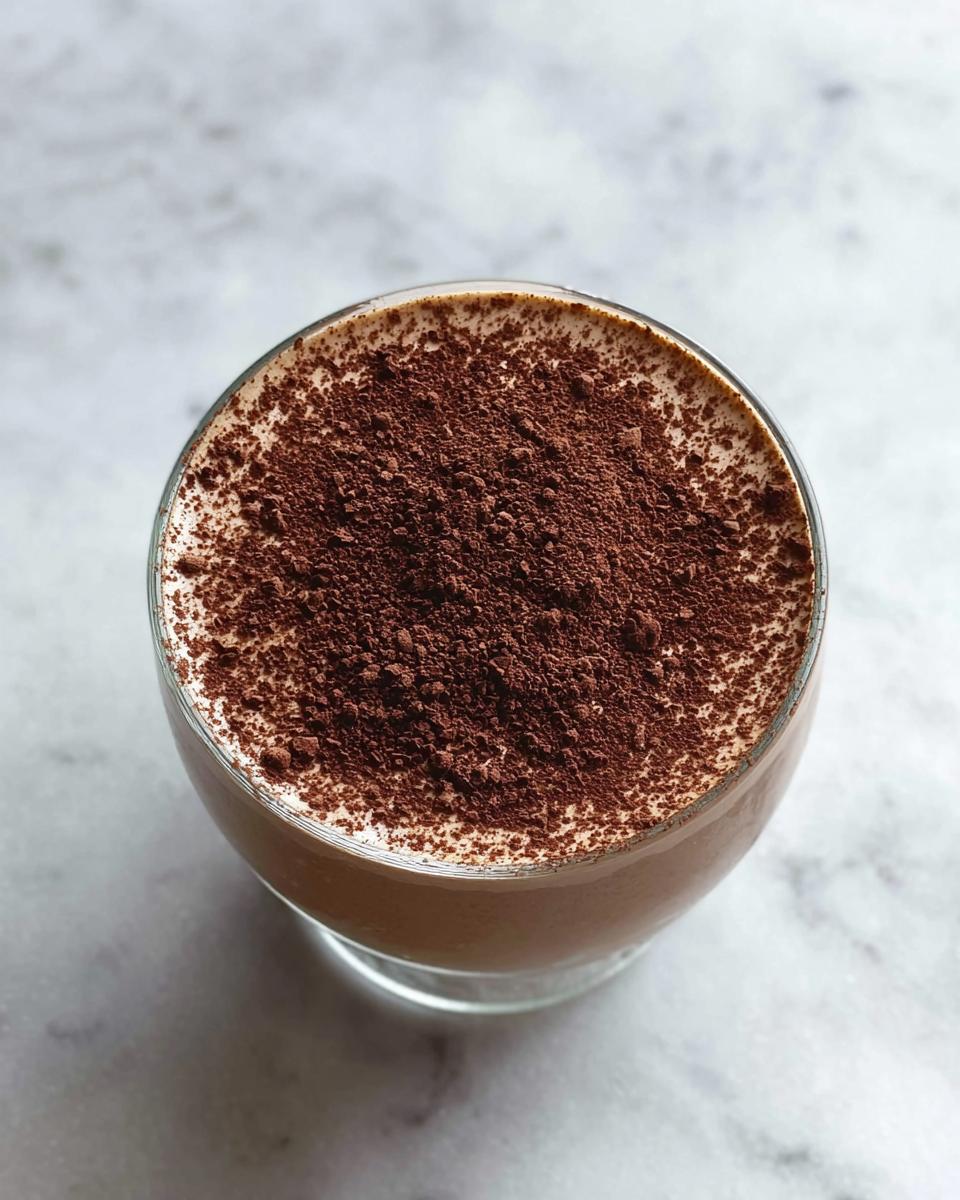
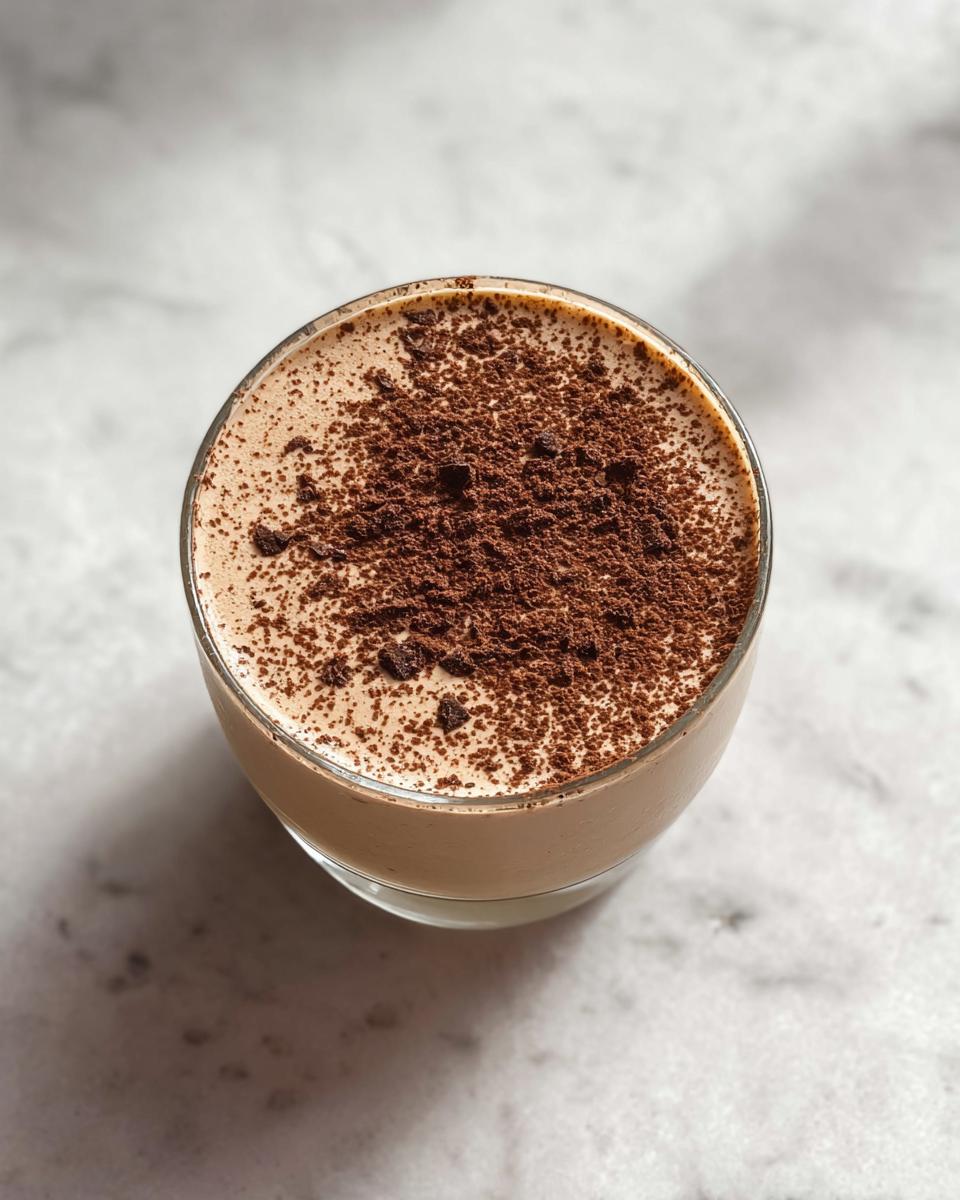
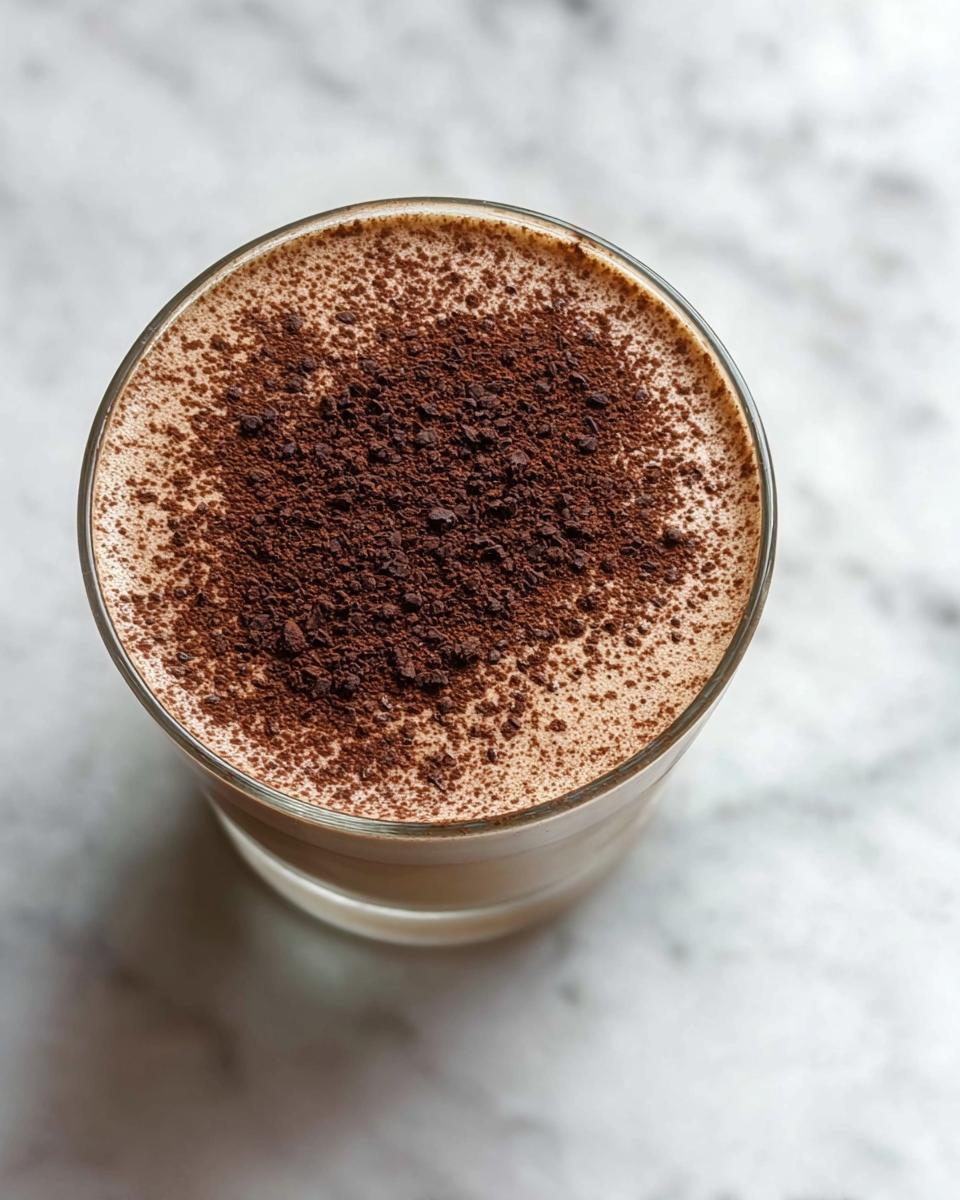
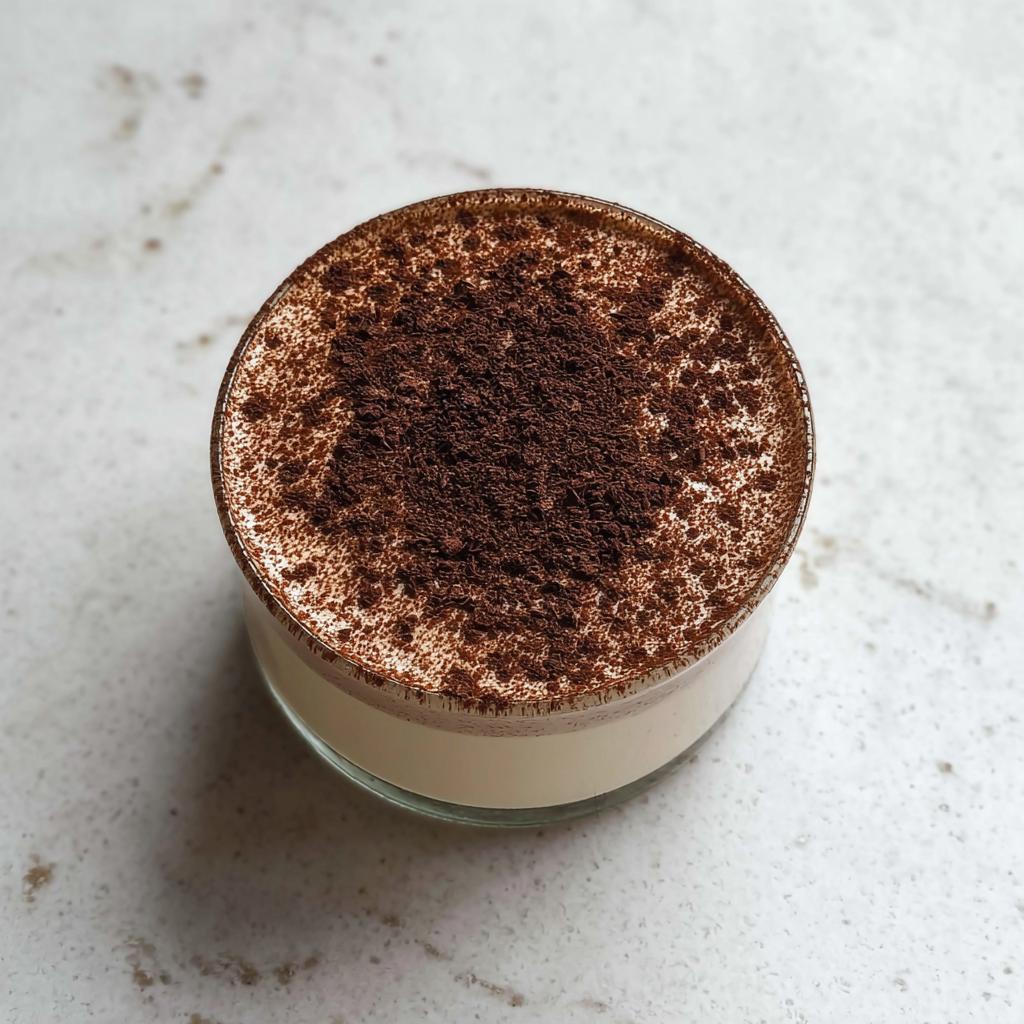
- Cacao Powder or Shaved Chocolate: Sprinkle this on top right before serving—it’s the perfect finish.
For more great high-protein ideas that skip the sugar crash, check out my guide on high-protein overnight oats. They are another amazing make-ahead win!
Step-by-Step Instructions to Prepare Your Protein Coffee Jell
This is the easy part, truly! We’re taking minimal steps to make the most satisfying Protein Coffee Jell you’ve ever tasted. My goal here is to keep any chance of lumps or curdling completely away from your beautiful dessert. Pay attention to that tiny cooling window—it’s the secret to a smooth finish!
First things first, grab your Greek yogurt. Get that full cup measured out and into your large mixing bowl. I like to take a spoon and just smooth out the top layer; it helps the next step go much smoother. You want that yogurt base ready to go.
Next up is our warming phase. In your saucepan, gently combine the milk, your raw cane sugar, the gelatin powder, espresso powder, vanilla, and that tiny pinch of salt. You need to heat this up until it just starts to simmer, stirring constantly with your whisk. We need that gelatin completely dissolved, so don’t rush the stirring!
Now, this is the moment you can’t skip! Take the saucepan completely off the heat and let that warm coffee mixture cool down for exactly three minutes. Seriously, set a timer if you have to! If it’s too hot when it hits the yogurt, it can curdle a little, and we definitely don’t want that grainy texture in our smooth Protein Coffee Jell.
Once those three minutes are up, slowly pour that warm-but-not-too-hot liquid into your yogurt bowl. Whisk enthusiastically, but gently, making sure everything incorporates until it looks creamy and totally uniform—no white streaks allowed! If you are adding protein powder, this is when you incorporate it now, adjusting your milk slightly if things look too thick.
Finally, pour the blended mixture evenly into your four chosen glasses or ramekins. Then, cover them loosely and tuck them into the refrigerator. You need to let this set completely, which usually takes between three to four hours. Patience is a virtue, especially when it leads to delicious, high-protein coffee jelly!
If you want some tips on making sure your healthy recipes come together like a pro, check out my guide on how to make healthy meals recipes like a pro in 2025. It covers general habits that will make this Protein Coffee Jell and everything else a breeze!
Expert Tips for the Best Protein Coffee Jell Texture and Flavor
Even though this Protein Coffee Jell is incredibly simple, I always have a few tricks up my sleeve to make sure the texture is absolutely perfect every single time. When you’re focused on clean eating and maximizing protein, you need results you can rely on, right?
Here are my top three ways to make sure your coffee jelly sets beautifully and tastes exactly how you want it:
Adjusting Texture When Adding Protein Powder
If you decide to toss in that extra scoop of protein powder for a bigger boost—and I totally encourage it!—you might find your jelly is a little too firm once it sets. Protein powder, especially whey, loves to absorb moisture. My fix? Add just one extra tablespoon of milk for every scoop of protein powder you incorporate. It keeps the resulting Protein Coffee Jell soft and slightly creamy, instead of rubbery. Always mix the powder into the warm liquid *before* adding it to the yogurt, just to ensure it dissolves fully.
Fine-Tuning Your Sweetness Level
Sweetness is so personal, especially when dealing with plain Greek yogurt, which can sometimes be tart. If you’re watching your sugar intake closely, don’t just dump the full quarter cup of cane sugar in. Instead, start with half that amount, heat it, and then whisk in a tiny bit of liquid stevia or monk fruit sweetener *after* it comes off the heat. That way, you can taste the warm mixture (carefully!) and adjust the sweetness level to your exact preference before it even hits the fridge. Always remember, a little salt goes a long way to enhancing the coffee flavor!
Ensuring a Truly Seamless Set
The key to a flawless-looking Protein Coffee Jell is making sure two things happen: no lumps and no scum on top. To guarantee that smooth set, after you pour the warm yogurt mixture into the glasses, I always use a spoon to skim off any little tiny bubbles that cling to the surface while the mixture is still liquid. This seems fussy, but trust me, removing those bubbles before chilling results in a perfectly pristine, glossy top layer when it’s done. Nothing beats that clean look!
For more ways to optimize your simple recipes for maximum impact on your wellness journey, check out my favorite healthy recipes collection. They’re all built around simplicity and clean ingredients!
Serving Suggestions for Your Protein Coffee Jell Dessert
Once the Protein Coffee Jell has set up perfectly—and I mean *perfectly* firm—the fun really begins! This recipe is designed to be simple fuel, but that doesn’t mean we can’t eat beautifully. Presentation makes such a difference, especially when you’re trying to stay mindful about what you’re eating. A little extra effort here turns a quick snack into a delightful little dessert moment.
I usually stick to serving mine right out of the little ramekins I set them in—it keeps the portion controlled, which is helpful when I’m tracking macros. But if you’re having guests or just want to elevate your Monday night snack, here are a few ways I like to dress it up:
Layering for Visual Appeal
To make this a showstopper, try using clear glassware so you can really see those distinct layers. If you have the time, you can make a slightly thicker batch of coffee mixture (maybe use a touch less milk) and let that set for about an hour first. Then, gently pour the Greek yogurt layer on top. You create this beautiful two-toned effect where the darker coffee layer sits nicely beneath the creamy white yogurt layer once everything chills completely. Wow, does that look fancy!
Texture Toppings Are Non-Negotiable
Remember those optional cacao powder sprinkles we talked about? You absolutely have to use something textural on top. Don’t just leave it plain! I love taking a vegetable peeler and shaving a little bit of high-quality dark chocolate right over the top. It melts just slightly from the ambient temperature, giving you that luxurious mouthfeel. You could also crush up a few almonds or walnuts if you need a quick crunch, but watch those portions if you’re counting calories.
A Dollop of Clean Whipped Cream
If you’re looking for something super indulgent but still mindful, grab some heavy cream, a tiny splash of vanilla, and whip it up until soft peaks form. Put just a small spoonful of that homemade, lightly sweetened whipped cream right on top of the chilled jelly. It adds richness without soaking into the jelly too much, keeping that lovely firm texture intact. It’s great for a weekend treat when you feel like you’ve earned a little extra indulgence after staying on track all week!
Storage and Reheating Guidelines for Leftover Protein Coffee Jell
Good news! Since this Protein Coffee Jell relies on gelatin and yogurt, it is absolutely fantastic for make-ahead prep. I usually aim to make enough for four servings, but if you have extra, sealing them tightly is crucial. Just make sure each glass or ramekin is covered—plastic wrap pressed lightly against the surface works best to prevent it from absorbing any fridge smells.
You can safely keep your leftovers in the refrigerator for about three to four days. Don’t even dream about reheating this, though! It’s a chilled dessert through and through. Any heat will just turn your perfectly set jelly back into a disappointing liquid mess. Keep sipping that energy boost cold, straight from the fridge, or check out my ideas on make-ahead healthy lunch and dinner ideas for totally different meal prep success!
Frequently Asked Questions About Protein Coffee Jell
I always get questions when I post this recipe because people aren’t used to combining coffee jelly with protein powder! It seems like such a huge leap for beginners, but trust me, once you master this, you open up a whole new world of easy, clean sweets. Here are the top things people ask me about making their very first batch of Protein Coffee Jell.
How long does it actually take to set?
This is the big one everyone worries about! While the active prep time is only about 10 minutes, you must dedicate 3 to 4 hours for setting time in the refrigerator. That chilling time is non-negotiable if you want that beautiful, firm texture. If you’re planning for dessert, make it right after lunch!
Can I easily make this vegan or dairy-free?
Absolutely, you can modify this! If you need to skip the dairy, just swap that plain Greek yogurt for a firm coconut-based yogurt or even a high-protein soy/almond yogurt alternative. You’ll also need to use a non-dairy milk (oat or almond works great). Just be a bit more careful with the sweetness, as different yogurts absorb sugar differently. It still creates a wonderful Protein Coffee Jell!
What happens if I forget to let the hot mixture cool before adding yogurt?
Oops! If your warm coffee mix is too hot, it can cause the yogurt proteins to seize up, resulting in a slightly grainy or curdled texture instead of that perfectly smooth body. If this happens, don’t panic—just grab your whisk and whisk like crazy! Often, if you stir vigorously for a full minute, you can smooth it out. If it’s still a bit chunky, run it through a fine-mesh sieve before pouring it into your setting cups.
My Protein Coffee Jell tastes a little bland. What did I do wrong?
Nine times out of ten, it’s the salt or the coffee! Make sure you are using a decent quality espresso powder; instant coffee can sometimes be dull. The pinch of salt I put in the recipe isn’t there just for fun; it really balances out the sweetness and makes the coffee flavor robust. If you still need a boost, try adding a few drops of vanilla or even a tiny amount of cinnamon to the warm liquid next time. The more flavor you pack in, the better this becomes!
For more foundational knowledge on building amazing, filling meals that support your wellness journey, I always recommend diving into my comprehensive guide on the ultimate breakfast ideas recipes guide. It’s a great place to start!
Nutritional Estimates for Protein Coffee Jell
I know when we’re focusing on clean living and wellness goals, tracking our macros and calories helps keep us accountable and focused. It’s so empowering to see what you’re fueling your body with! Because this Protein Coffee Jell is so customizable—maybe you used coconut milk instead of almond, or perhaps your protein powder is denser—these numbers below should really be treated as a ballpark estimate.
These figures come from using standard unsweetened almond milk and plain 2% Greek yogurt, without adding the optional protein powder scoop. Always check the labels on your specific ingredients—especially your yogurt and any additives—to get your precise counts. Even small swaps can change things!
This is why I love recipes like this; they fit right into the structure of mindful eating without feeling restrictive. For more inspiration on meals that support your fitness goals, you can always browse my dedicated section on high-protein meals.
Here is a breakdown based on the standard recipe measurements for one serving:
- Calories: 150
- Protein: 16g (A fantastic result!)
- Fat: 4g
- Carbohydrates: 12g
- Sugar: 8g
- Fiber: 1g
- Saturated Fat: 2g
- Cholesterol: 15mg
- Sodium: 75mg
- Potassium: 200mg
- Calcium: 150mg
- Iron: 0.5mg
- Vitamin A: 200IU
Remember, having a clear picture of what you eat is supportive, not restrictive! This dessert keeps you feeling full and satisfied, which is the whole point of building clean, intentional habits.
Share Your Protein Coffee Jell Creations
We did it! You’ve successfully navigated the simple steps to create your own batch of nourishing Protein Coffee Jell. Now that you’ve tasted how good clean fuel can be, I truly want to see what you’ve made! This isn’t just about getting a recipe to work; it’s about building a supportive community where we share what genuinely helps us stay on track when life gets hectic.
If this recipe helped you conquer that afternoon slump or provided a guilt-free sweet ending to your day, please take a moment to share your experience. Your feedback is what keeps me inspired to create more real-life wellness solutions here at Melt It Clean.
Did you use coconut yogurt? Did you experiment with cinnamon? Did you top it with cacao nibs instead of powder? Drop a rating below—even three stars helps me understand how the recipe is landing for others!
Rate This Recipe
Let me know how much you loved this easy protein treat! Just click the stars below to leave your rating.
Connect and Tag Online
When you post photos of your perfectly set Protein Coffee Jell on Instagram or Facebook, please tag me! I absolutely love scrolling through and seeing your beautiful, clean creations. Use the hashtag #MeltItCleanEats so I can easily find your post and give it a big heart. If you’re looking for even more inspiration on habits and inspiration that fit your life—not the other way around—head over to the main Melt It Clean blog!
A Note From Emilia on Fueling Your Wellness Journey
When I look back at the journey that led me to create Melt It Clean, it wasn’t about complicated diet plans or deprivation. It was about finding simple, honest fuel that made me feel powerful—like this easy Protein Coffee Jell does! We don’t need to restrict joy or sanity to feel great; we just need support, not restriction, in our daily habits.
Recipes like this are a testament to that philosophy. They show you that when you choose intentional, nourishing ingredients, you can satisfy a craving while nailing your wellness goals. This coffee jelly is proof that the easiest things are often the most sustaining.
You’ve got the tools now to integrate quick, clean energy into your routine. If you want to dive deeper into the habits and mindset that support real, lasting change without the overwhelm, please visit my main page. I built this space for exactly that!
By Hi, I’m EMILIA, the founder of MeltItClean.com – your digital space for natural weight loss, real wellness habits, and clean-living inspiration that actually fits your life.
For years, I struggled with the ups and downs of dieting. I tried everything — juice cleanses, low-carb crazes, fitness challenges — but I always ended up back where I started: tired, bloated, and frustrated. I didn’t just want to “lose weight” — I wanted energy, mental clarity, glowing skin, and confidence without sacrificing my joy or sanity.
After years of experimenting, learning, and unlearning, I discovered a simple truth: your body is already powerful — it just needs support, not restriction. That’s when I created Melt It Clean — a site dedicated to real transformation through clean, intentional, and nourishing daily habits that anyone can follow.
My goal was simple: build a place where people could feel informed, supported, and empowered without being overwhelmed by wellness fads. Learn more about how we approach wellness over at my About Me page!
Protein Coffee Jell
Ingredients
Equipment
Method
- Measure Greek yogurt into a large mixing bowl or measuring cup, smoothing it down to ensure it is lump-free.
- Mix milk, raw cane sugar, gelatin powder, espresso powder, vanilla extract, and a pinch of salt in a medium saucepan. Heat until it simmers, stirring gently.
- Remove from heat and let cool for 2-3 minutes to prevent curdling the yogurt.
- Pour the warm mixture into the Greek yogurt bowl and whisk until completely incorporated and creamy.
- Pour the blended mixture into four glasses or ramekins. Refrigerate for 3-4 hours or until set.
- Once set, sprinkle with cacao powder or shaved chocolate before serving.