

Oh my goodness, are you tired of the 5 PM panic? I know I used to be! Trying to get a healthy, delicious dinner on the table when you’ve been running around since 7 AM with kids feels impossible sometimes. You need something fast, something everyone will actually eat, and something that doesn’t leave you scrubbing burnt pans until bedtime. Trust me, I’ve been there!
That’s why I guard this recipe like gold. I’m sharing my secrets for the ultimate Melt In Your Mouth Chicken for Busy Moms. We’re talking about tender, juicy chicken that tastes like you spent hours on it, but it’s genuinely ready in about 30 minutes total. This is my go-to weeknight-friendly chicken solution. It’s so simple, yet the flavor payoff is huge. Seriously, this recipe changed my weeknights!
The magic isn’t some complicated sauce; it’s all in the quick sear and the gentle steam afterward. You’ll be amazed how fast you can pull off this incredible texture. It’s my secret weapon for when I need dinner done fifteen minutes ago!
Why This Melt In Your Mouth Chicken for Busy Moms is a Weeknight Win
When you’re juggling school pickups, work emails, and general house chaos, you need dinner to be an ally, not an antagonist! This Melt In Your Mouth Chicken for Busy Moms is hands-down my favorite because it checks every single box you have scribbled on your mental to-do list. It’s fast, it barely dirties anything, and the kids always ask for seconds. Win, win, and triple win!
Here is why this recipe is the MVP of my rotation:
- It’s lightning fast—I mean, less time than it takes to fold a load of laundry.
- Cleanup is a breeze because we are only using one skillet. Hello, easy weeknight!
- The texture is always perfect; no dry, disappointing chicken here.
It’s the best kind of weeknight-friendly chicken because it delivers real flavor without demanding real time. If you want more ideas for smashing your dinner goals, check out my list of quick dinner ideas for busy weeknights!
Speed and Simplicity: The Weeknight-Friendly chicken Promise
Let’s talk numbers, because as a busy mom, I live by my clock! The entire process, from grabbing the chicken out of the fridge to setting it on the table, is only about 30 minutes total. Prep is maybe ten minutes—it’s just smashing spices on the meat. That’s it!
Because we’re cooking this quickly in a specific way—browning first, then covering—we don’t have tons of messy steps involved. This truly is the definition of weeknight-friendly chicken. You can whip this up right after you get home and still have time to help with homework or finally sit down for five minutes before bedtime chaos hits!
Essential Ingredients for Melt In Your Mouth Chicken for Busy Moms
The best part about this recipe is that the ingredients list is ridiculously short but packs a huge flavor punch! You aren’t digging through a pantry for specialty powders; you’re using what you probably already have on hand. I always prioritize good, solid chicken breasts for this because we count on that texture so much.
Here’s what you need to pull off this magic dinner:
- Four boneless, skinless chicken breasts (Make sure they are about 6 ounces each).
- Salt and pepper for basic seasoning—you can’t go wrong!
- Just a touch of garlic powder to bring out the savory flavor.
- Two tablespoons of good olive oil to get that beautiful golden crust going.
Don’t skimp on the quality here; since there are so few ingredients, each one really shines through. When I see my kids smiling eating dinner, I know these simple components worked their magic!
Ingredient Notes and Substitutions
Now, let’s get down to the serious stuff: making sure your chicken cooks evenly! If you have breasts that look like one end is paper-thin and the other is gigantic, you have to fix that. The recipe note mentioned this, and seriously, trust me: take a meat mallet (or even the bottom of a heavy saucepan) and gently pound the thickest end until the breast is fairly even in thickness.
This technique is crucial for getting that truly tender, melt-in-your-mouth result without having one side overcooked and dry while the other is still pink. If you don’t have olive oil, any neutral cooking oil works fine—like avocado or canola—but I love the little flavor lift olive oil brings to the pan.
Equipment Needed for Your Melt In Your Mouth Chicken for Busy Moms
The biggest perk of this recipe, besides how tasty it is, is that you don’t need a million fancy gadgets! Seriously, this is about as low-fuss as it gets in the kitchen. Having the right tools helps things go smoothly, especially when you are racing against the clock!
You honestly only need two main things to nail this recipe perfectly every single time:
- A good sturdy skillet. Make sure it’s big enough to hold all four pieces of chicken without them being totally stacked on top of each other! If they’re crammed in, they steam instead of sear, and we want that lovely golden crust, right?
- A meat thermometer. Now, I know some people like to eyeball it, but if you want truly melt-in-your-mouth tender chicken—not sometimes-tender, sometimes-dry chicken—you need this. Checking the temperature is the only way to guarantee safety and tenderness at the 165°F mark. It takes the guesswork out completely!
That’s it! No immersion circulators, no stand mixers, just simple tools for a super simple dinner. See? I told you this was designed for busy moms!
Step-by-Step Instructions for Perfect Melt In Your Mouth Chicken
Okay, you’ve got your ingredients ready and your skillet heating up. This is where the magic happens super fast, so pay attention! We aren’t messing around with long cooking times here. Follow these steps exactly, and you’ll see why this is the best weeknight-friendly chicken around.
- First things first, you need maximum surface contact for browning! Grab those chicken breasts and pat them—and I mean really pat them—dry with paper towels. Skipping this step is why chicken sometimes steams instead of searing.
- Next, grab your little seasoning bowl. Mix up that salt, pepper, and garlic powder. Sprinkle this lovely blend evenly over all sides of your prepped chicken.
- Get your skillet hot! Add the olive oil and wait until you see it shimmer on the surface. That means it’s ready for that beautiful golden-brown crust.
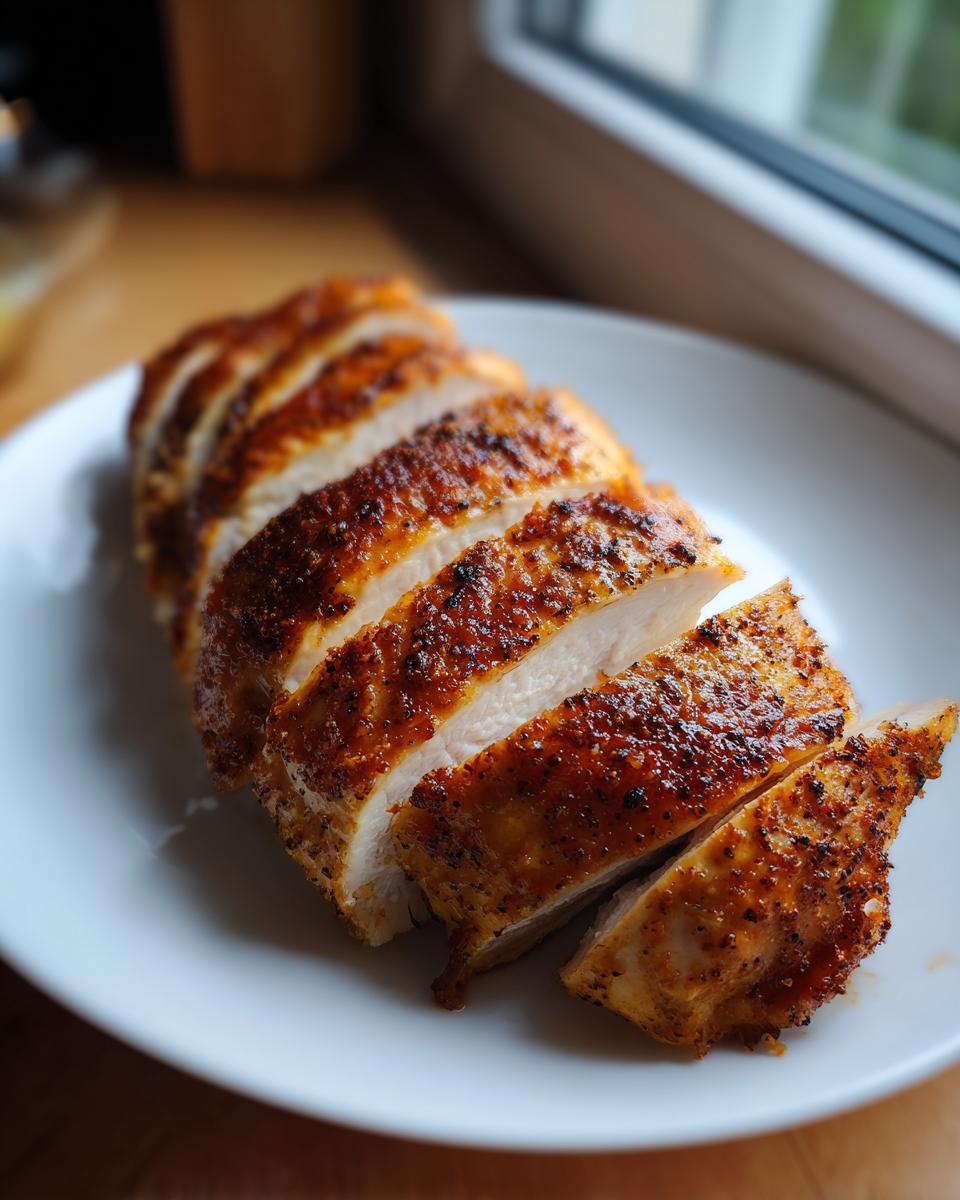
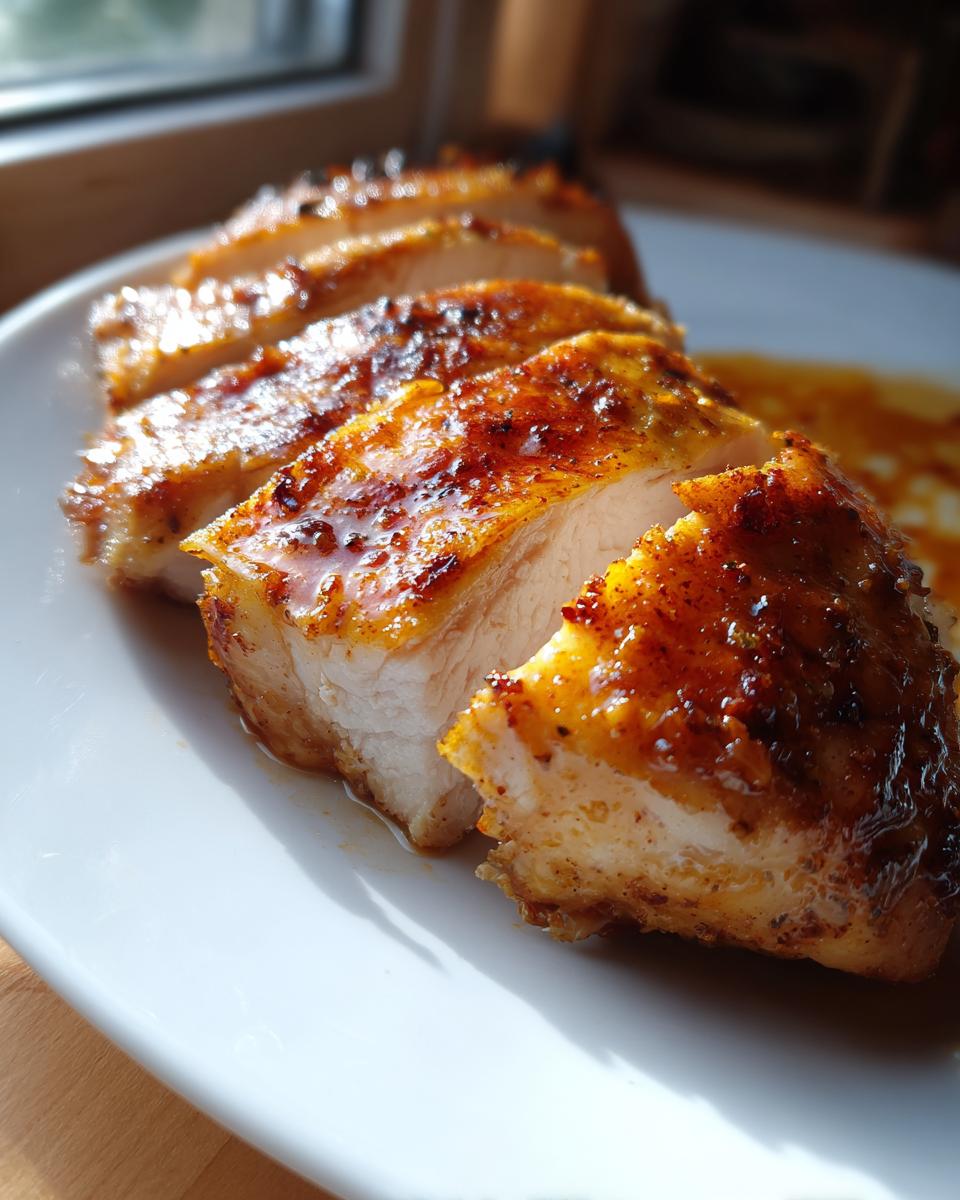
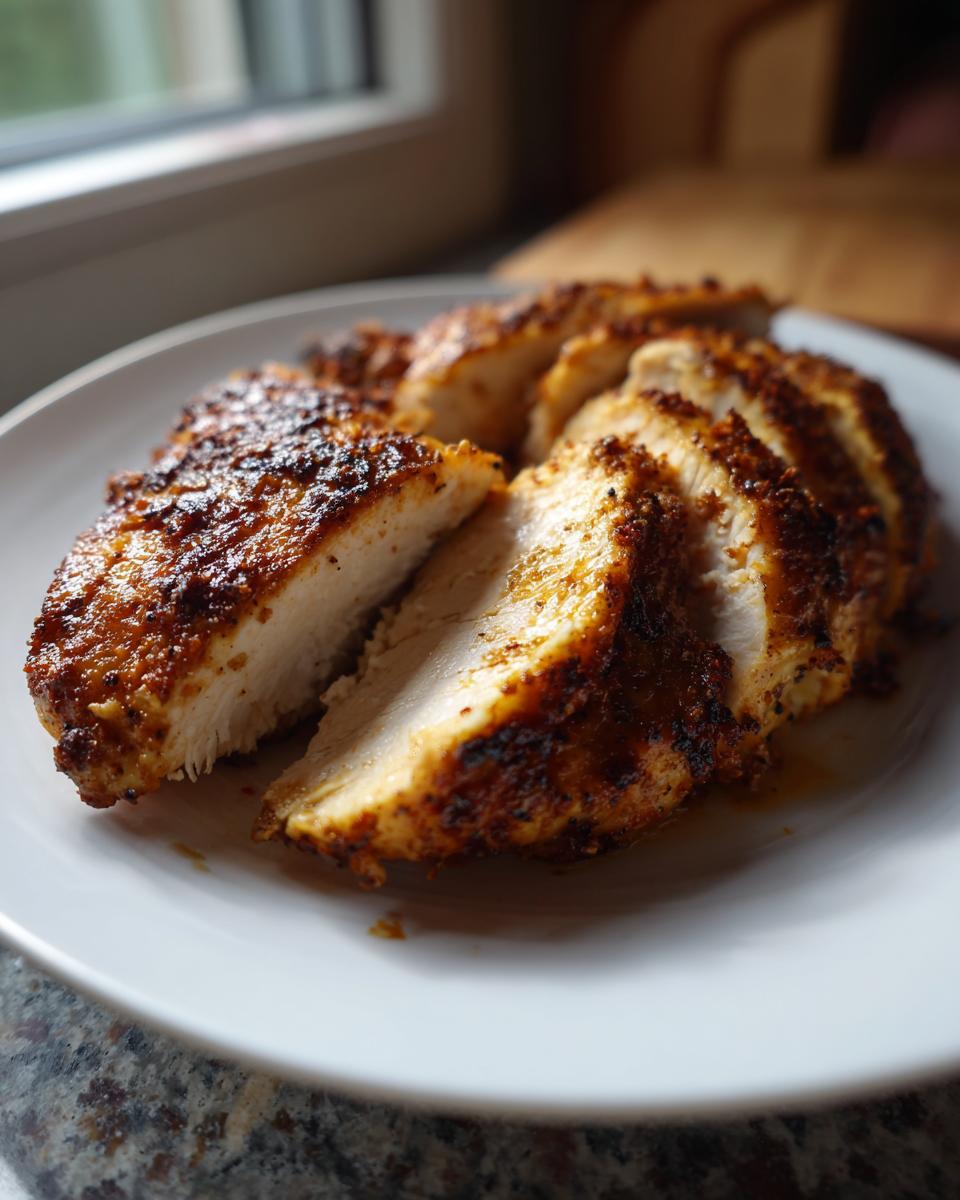
- Carefully lay the seasoned chicken breasts into the hot oil. Don’t jam them in there! If needed, cook them in two batches so they have space—crowding the pan is a disaster. You want to cook them for 5 to 7 minutes on this first side until that gorgeous color shows up.
- Flip them gently! Once flipped, immediately reduce your heat down to medium-low. This is super important! Cover the pan tightly and let them gently finish cooking for another 8 to 10 minutes.
- Use that thermometer! Check that internal temperature—it absolutely must read 165 degrees Fahrenheit for safety.
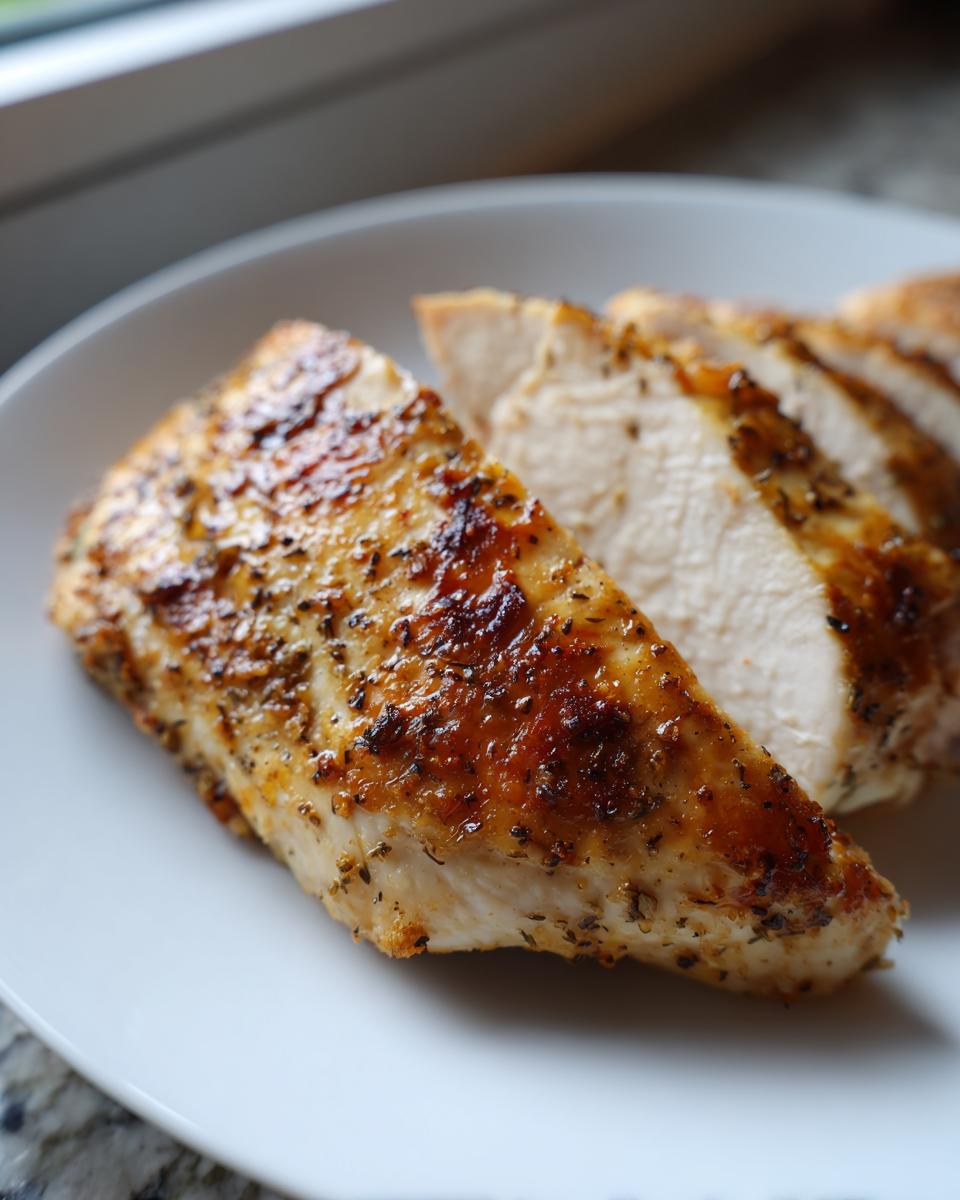
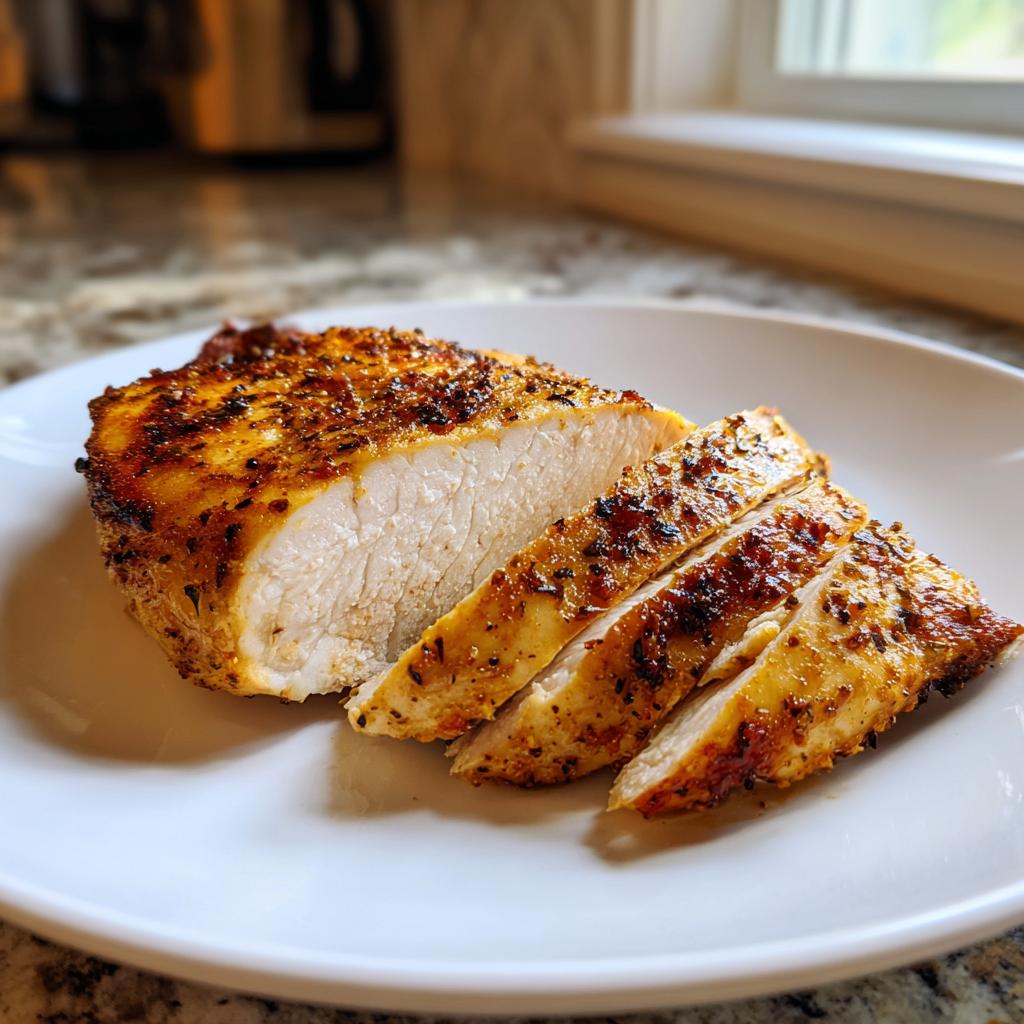
- Last but not least, pull the chicken out of the pan and let it rest on a cutting board for a solid 5 minutes. This locks all the juices inside, guaranteeing that melt-in-your-mouth texture. Don’t slice it right away, or all the moisture leaks out!
If you love quick skillet meals like this, you might want to try my easy lemon garlic chicken skillet next week for variety!
Pro Tips for Achieving Tender Melt In Your Mouth Chicken for Busy Moms
I’ve made this recipe hundreds of times, usually while multitasking, so I’ve learned a few things the hard way so you don’t have to! Remember step one? Patting the chicken dry isn’t just a suggestion; it’s mandatory. It allows the Maillard reaction to happen, giving you that lovely flavor crust instead of pale, steamed meat.
Also, the heat drop after flipping is key to getting that “melt in your mouth” quality. High heat gets it brown fast, but medium-low heat covered gently finishes the job without drying out the interior. If you skip the mandatory 5-minute rest on the cutting board, you waste all that effort locking in the moisture. Seriously, walk away, unload the dishwasher—just don’t touch that chicken for five full minutes!
Serving Suggestions for Your Weeknight-Friendly chicken Meal
So, you’ve nailed the Melt In Your Mouth Chicken! Fantastic! Now comes the easiest part of the whole process: figuring out what to put next to it on the plate. Since we’re aiming for maximum efficiency for busy-mom dinners, we aren’t going to bother with elaborate side dishes that require their own recipes, okay?
We want quick, colorful, and things that don’t require constant stirring. Think of this chicken as the perfect, tender main event that lets the sides be super low-effort. It pairs beautifully with almost anything you can steam, microwave, or toss together in five minutes flat.
Here are my absolute favorite, zero-stress pairing ideas for our weeknight-friendly chicken tonight:
- Frozen Steamed Veggies: Seriously, buy the bags of broccoli florets or green beans that you steam right in the bag in the microwave. Five minutes, done. Sprinkle a little salt and maybe some pepper right when they come out. Done!
- Pre-Washed Salad Kits: These exist for a reason, people! Open the bag, dump the mix and toppings into a big bowl, drizzle on your favorite bottled dressing, and toss. Instant color and crunch.
- Quick Carb Fix: If you need something starchy, go for minute rice or even those microwave pouches of brown rice or quinoa. They take about 90 seconds and don’t require you to watch a pot on the stove.
- Roasted Carrots (The Easy Way): If you do have an extra 20 minutes while the chicken rests, you can actually throw some carrots in the oven with a little oil and salt. You can find my simple recipe for roasted garlic-parmesan carrots if you want to up the flavor with minimal effort!
The goal is to get dinner on the table without stressing yourself out. This chicken is so good, even if you serve it with nothing but steam and a smile, the kids will be happy!
Storage and Reheating Melt In Your Mouth Chicken for Busy Moms
We all know the secret to true weeknight success is having leftovers. If you can make this Melt In Your Mouth Chicken for Busy Moms once and have a second dinner ready to go, you’ve won the week! The good news is that this simple skillet chicken reheats beautifully, provided you remember one little trick.
Once you pull the chicken off the cutting board after that crucial 5-minute rest, let it cool completely on a plate before you try to store it. Trying to put hot meat into an airtight container basically creates a sauna in there, and nobody wants weirdly textured leftovers!
When it’s totally cooled down, tuck those tender pieces into a good quality airtight container. Plastic or glass—doesn’t matter to me, so long as the seal is tight. This will keep it fresh and juicy in the fridge for about three to four days. If you’re planning ahead for the whole week, you can always pop some into the freezer for up to two months. Check out my tips for freezing and thawing chicken for busy weeknights if you go that route!
Reheating Secrets for Keeping That Melt-In-Your-Mouth Texture
Here’s the make-or-break moment for leftovers: reheating! If you just throw a piece of this chicken in the microwave on high for two minutes, you run the huge risk of turning it back into dry cardboard. We fought too hard for that tenderness to let that happen!
I have two favorite methods that work perfectly for this weeknight-friendly chicken:
- The Stovetop Method (Best for 1-2 servings): This is my preferred method. Add just a splash—maybe a teaspoon—of broth or water (or even just a tiny bit of oil) to your skillet over medium-low heat. Place the chicken in the skillet and cover it right away. Let it heat up slowly for about 3 to 5 minutes. The steam trapped under the cover gently warms the chicken through, preserving all that moisture we created during the initial cook.
- The Microwave Method (Fastest): If you truly only have 60 seconds, put the chicken on a microwave-safe plate. Add just a few drops of water to the plate *next* to the chicken (not directly on it). Cover the plate loosely with a paper towel. Microwave on 50% power in 30-second bursts until just warmed through. The partial power and steam cover keep it from hardening up!
If you use the freezer method, thaw it overnight in the fridge first, and then use either of these reheating techniques. Slow and low is always the rule for juicy leftovers!
Frequently Asked Questions About Melt In Your Mouth Chicken
I get so many great questions about this recipe because everyone wants that consistently tender chicken result! It’s a staple for a reason, and I want to make sure you get that perfect, delicious bite every single time you serve this quick chicken dinner. Here are some of the most common things people ask me when they make this Melt In Your Mouth Chicken for Busy Moms.
Can I use chicken thighs instead of breasts for this recipe?
Oh, absolutely! Chicken thighs are more forgiving than breasts, which means they are even harder to dry out! If you use boneless, skinless thighs, you can definitely skip worrying about pounding them to an even thickness. They cook up beautifully in that skillet.
The only thing you might need to adjust is the timing slightly. Thighs are often a little thicker right in the middle, so keep that meat thermometer handy! Start checking them around the 10-minute covered mark, but they might take an extra minute or two to hit that safe 165°F internal temperature. Thighs usually render a bit more fat, which makes for an amazing pan sauce if you decide to whip one up!
What if I really don’t want to use a meat thermometer? How do I know it’s done?
I totally understand! Sometimes you’re grabbing dinner ingredients in a whirlwind and the thermometer isn’t within reach. If you absolutely must skip the thermometer for this quick chicken dinner, you have to rely on sight and touch. The goal is 165°F, so we need to be careful.
First, look at the juices when you pierce the thickest part with a fork. If they run completely clear—not pink at all—that’s a good sign. Second, slice just a tiny sliver into the very thickest part. If the meat inside is opaque white all the way to the center, you are likely safe. But listen, for truly reliable, tender chicken results, that thermometer is your best friend, promise!
Can I easily double this recipe for meal prep?
Yes, you can double it, but with one important caveat that I learned the hard way early on! This Melt In Your Mouth Chicken for Busy Moms relies on those ingredients not being overcrowded in the pan so they sear properly. If you double the recipe, you might need to use two larger skillets or cook it in two distinct batches.
If you cram too much chicken into one pan, that internal temperature won’t rise correctly. You’ll end up with chicken that’s gray and steamed instead of golden brown and tender. So, if you double it, use two pans! You’ll have even more delicious leftovers for easy weeknight dinners later in the week.
Can I add vegetables to the pan while cooking the chicken?
You absolutely can add veggies, but you need to be strategic about it! If you throw in raw onions or peppers right when you add the chicken breasts, they will burn during the first 5-7 minute sear before the chicken is even halfway done. And you certainly don’t want that bitter taste in your dinner!
Instead, try this: when you flip the chicken to the medium-low heat to cover and finish cooking, toss in some quick-cooking veggies like sliced mushrooms or thin zucchini slices around the chicken. They will steam nicely under the cover along with the chicken, soaking up all those delicious seasoned pan drippings created by your Melt In Your Mouth Chicken for Busy Moms!
Estimated Nutritional Snapshot for Melt In Your Mouth Chicken
Look, when you’re making a recipe this fast and focusing on simple ingredients, I’m not whipping out my lab equipment to calculate every micro-gram of fiber—I wish! But I do want to give you a general idea of what you’re putting on the table for your family so you can feel good about serving this delicious dish.
This is what you can generally expect per serving, based on four equal servings using roughly 6 oz chicken breasts and the olive oil listed:
- Calories: Approximately 280-310 calories
- Protein: About 40 grams (Yes! That’s a great meal for filling up hungry growing kids!)
- Fat: Around 12-14 grams (Mostly healthy fats from the olive oil)
- Carbohydrates: Less than 2 grams (This is just the chicken and seasoning, so super low carb!)
Now, here’s the important bit: I need to be super clear here, just like I am with my family about oven temperatures. This is just an estimate based on standard, average ingredients. If you use chicken breasts that are closer to 8 ounces each, or if you use a different kind of oil, those numbers change!
This snapshot should give you peace of mind that you’re serving up a lean, high-protein, weeknight-friendly chicken meal that fits perfectly into a balanced plate—especially since we talked about pairing this Melt In Your Mouth Chicken with veggies and whole grains!
Share Your Success Making This Weeknight-Friendly chicken
Okay, now that you’ve tried my secrets for making the most tender, satisfying Melt In Your Mouth Chicken for Busy Moms, I really, really want to hear about it!
This recipe is such a lifesaver for me when my schedule is packed tight, and honestly, seeing what a difference it makes in other busy moms’ kitchens is the best part of sharing these recipes. Did your family devour it? Was it on the table faster than you thought possible? Don’t keep that success story to yourself!
I put my heart into detailing every step—especially that part about resting the chicken—and I’m dying to know if that trick worked its magic for you, giving you that perfect, juicy result every time. If this truly turned into your new favorite weeknight-friendly chicken, I’d be so grateful if you’d do two things for me!
Leave a Quick Star Rating!
Right down below the recipe card—you know the spot—there’s a little rating system. If this recipe saved your sanity on a tough Tuesday night, give it five stars! Those little stars tell other busy parents that this recipe gets two thumbs up from real families. It helps them decide to trust the recipe when they’re staring down the clock at 5:30 PM!
It takes literally two seconds, but it means the world to me and to other cooks trying to find dependable, fast dinners. If you felt it earned those stars, please leave them!
Show Me Your Chicken Dinner Success!
If you snapped a picture of your perfectly seared, juicy chicken breasts—maybe alongside those quick veggies we talked about—I absolutely want to see it! Seriously, I love connecting with you all!
Snap a photo and tag me on social media! Seeing your beautiful plates of delicious, stress-free dinner makes my day. It proves that simple, quality cooking is totally achievable, even when you’re running around like a whirlwind. Let’s celebrate those easy dinner victories together!
And hey, if you’re just planning ahead, feel free to browse my ideas for even more dinner ideas for busy weeknights!
Melt In Your Mouth Chicken
Ingredients
Equipment
Method
- Pat the chicken breasts dry with paper towels. This helps them brown better.
- In a small bowl, mix together the salt, pepper, and garlic powder. Sprinkle this mixture evenly over both sides of the chicken breasts.
- Heat the olive oil in a large skillet over medium-high heat until the oil shimmers.
- Carefully place the seasoned chicken breasts into the hot skillet. Do not overcrowd the pan; cook in batches if necessary.
- Cook for 5 to 7 minutes on the first side until golden brown. Flip the chicken.
- Reduce the heat to medium-low. Cover the skillet and cook for another 8 to 10 minutes, or until the internal temperature reaches 165 degrees Fahrenheit when checked with a meat thermometer.
- Remove the chicken from the skillet and let it rest on a cutting board for 5 minutes before serving.


