
When life gets hectic—and doesn’t it always?—you need meals that hit the spot without demanding an hour over the stove. Truly satisfying food shouldn’t feel like a chore! That’s why I’m obsessed with these simple, utterly delicious Cheesy Beef Quesadillas. They come together so fast, they’re the perfect solution for a busy weeknight or even a late afternoon energy boost.
For me, eating clean doesn’t mean refusing comfort food; it means making smart choices quickly. These quesadillas prove you can have that gooey, cheesy goodness layered over perfectly seasoned beef on a crispy tortilla, all while keeping things focused. Trust me, these are about to become your new go-to Easy Snack Dinner.
Why You Will Love These Cheesy Beef Quesadillas (Quick Lunch and Easy Snack Dinner)
Honestly, these are going to fly off the plate faster than you can flip them! We used to resort to boring sandwiches when time was tight, but now? It’s this recipe every time. Here’s why these beauties are a lifesaver in my kitchen:
- They are ridiculously fast! We’re talking about getting dinner on the table in under 40 minutes total. Perfect for that pre-soccer practice rush or when you just need a Quick Lunch.
- That seasoning blend? It’s robust! We use a mix of cumin and chipotle that turns boring ground beef into something you actually crave.
- Pure, unadulterated comfort food. The gooey, melted cheese is what makes these the ultimate Kids Favorite. Don’t tell them how simple the ingredient list is!
- You cook them right in one Cheesy Skillet, which means cleanup is super easy—my favorite kind of meal!
- They store and reheat like a dream, meaning leftovers are perfect for taking for lunch the next day. Check out some quick lunch ideas here: quick low-carb lunches!
- These are totally flexible. I’ve swapped out the beef for ground turkey on occasion when I needed a change-up for our Beef Quesadillas night.
- It’s a solid, high-protein meal that feels indulgent but supports your real wellness goals. Filling, satisfying, and guilt-free!
Essential Ingredients for Perfect Cheesy Beef Quesadillas
Okay, building flavor from the ground up is my absolute favorite part of cooking, whether it’s a big Sunday roast or something super quick like these Cheesy Beef Quesadillas. You can’t just toss a packet of seasoning in and call it a day, right? We need layers here! I always look for high-quality basic ingredients because they make the biggest difference, even when we’re making an Easy Snack Dinner.
For the best results and better support for your daily wellness goals, I reach for lean stuff when possible. You can find some of my go-to ground beef picks over here for inspiration: ground beef recipes!
For the Flavorful Beef Filling
This is where we build the backbone of the taste! Everything goes into the pan together to bloom those spices and create this beautiful, rich meat base. Using lean ground beef really helps you keep that grease down, so you don’t have to blot as much later.
- Olive Oil: Just a half tablespoon to get things started.
- Ground Beef: We use 1 pound—I strongly recommend extra lean so we don’t end up with a greasy mess in the Cheesy Skillet!
- Spices Galore: Don’t skip the chipotle! You need 1 teaspoon each of chili powder and chipotle, plus oregano, cumin, garlic powder, onion powder, salt, pepper, and a tiny kick of cayenne.
- Tomato Paste and Stock: Just a tablespoon of paste and two tablespoons of beef stock to keep the mixture luscious, not dry.
For Assembly and Cooking the Cheesy Beef Quesadillas
This part is all about the melt! You need the right type of tortilla that can stand up to the beef filling without ripping when you fold it.
- Flour Tortillas: You need six of the 7-to-8-inch ones. Enough surface area for a good crisp!
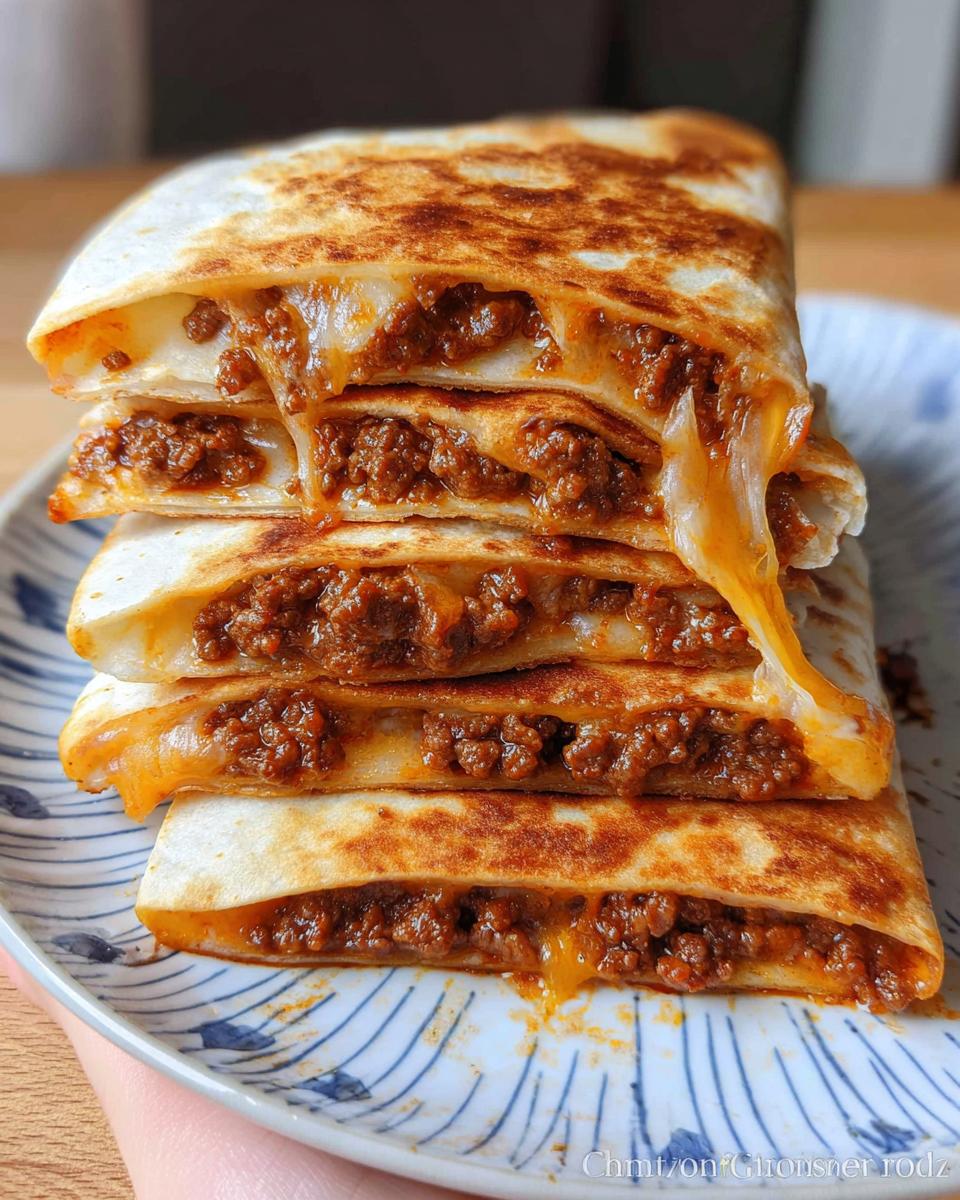
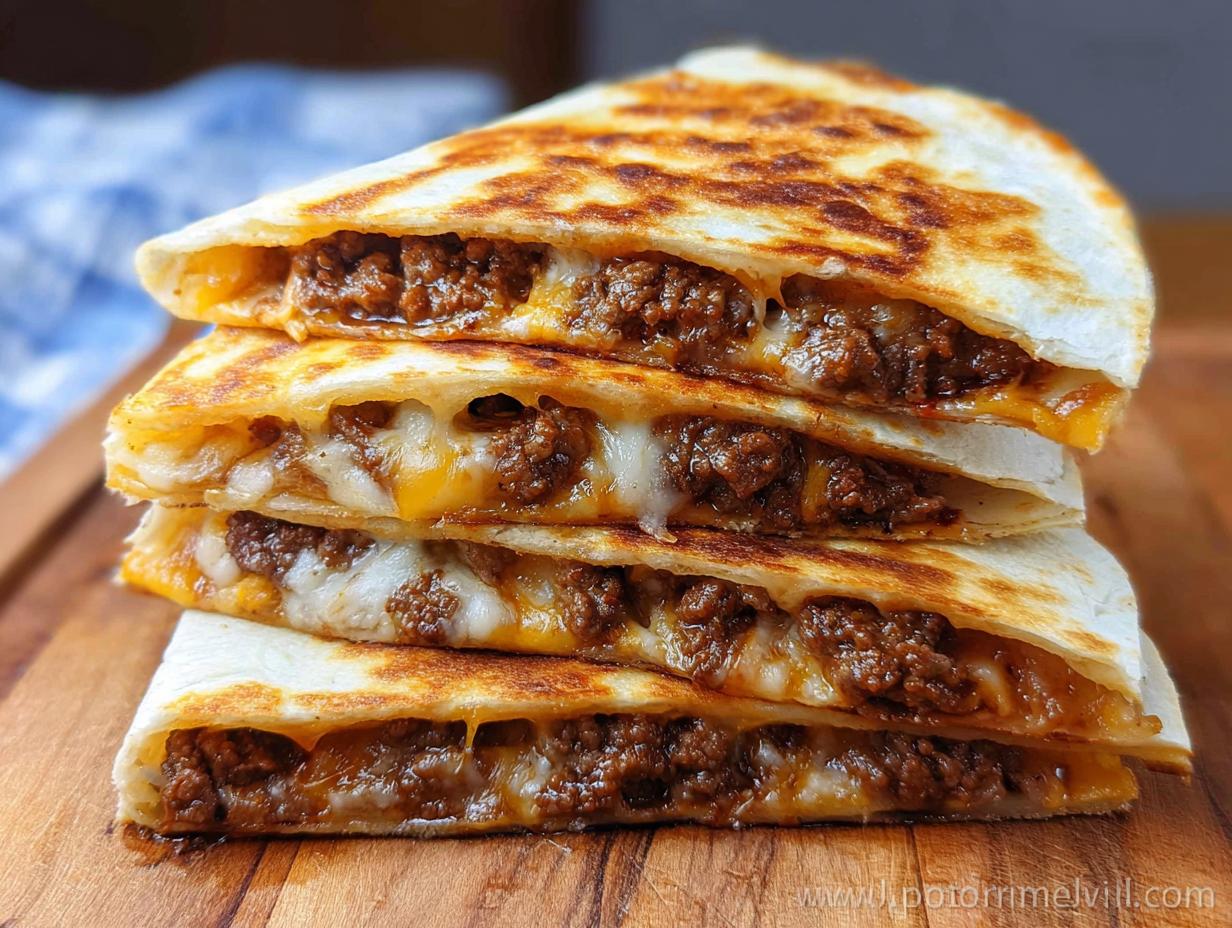
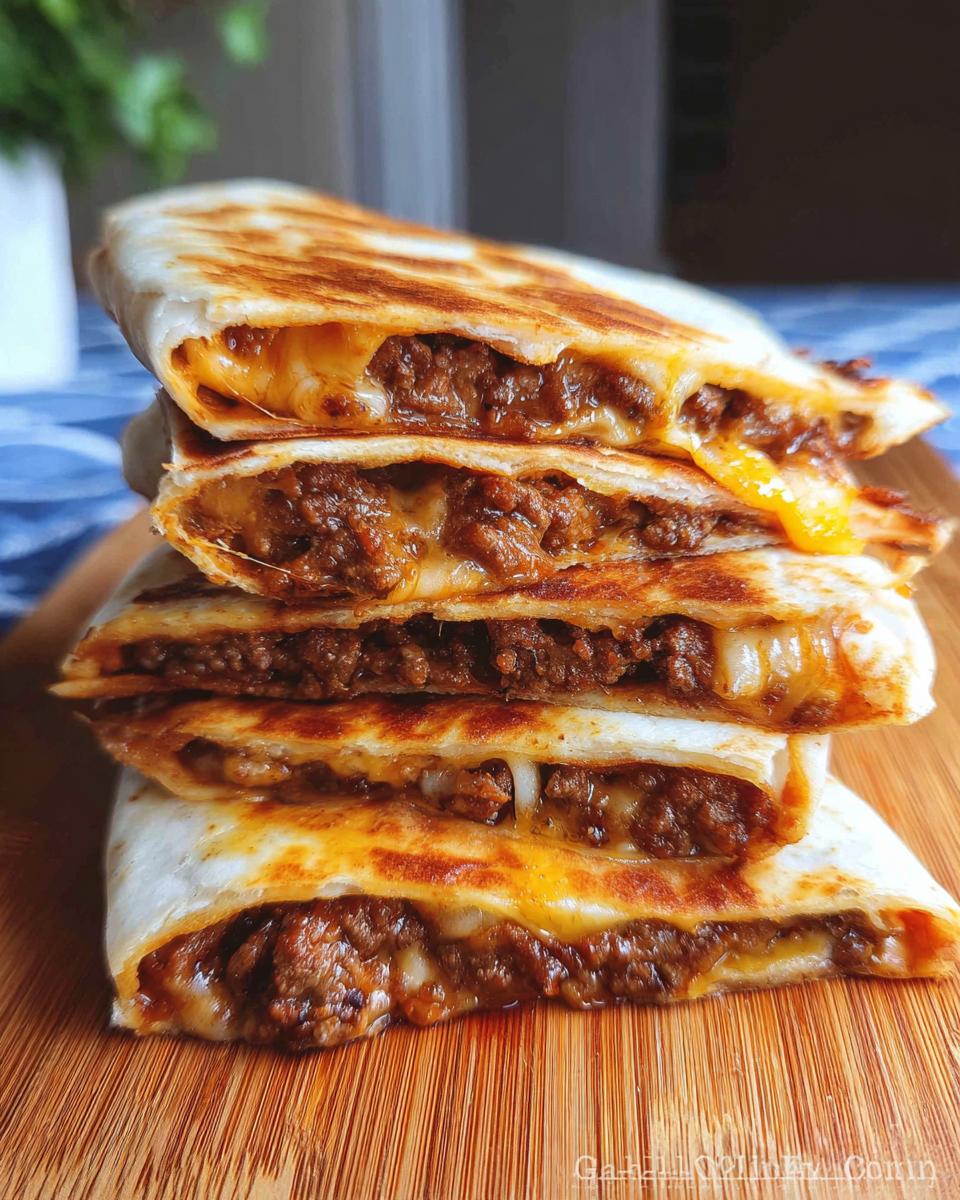
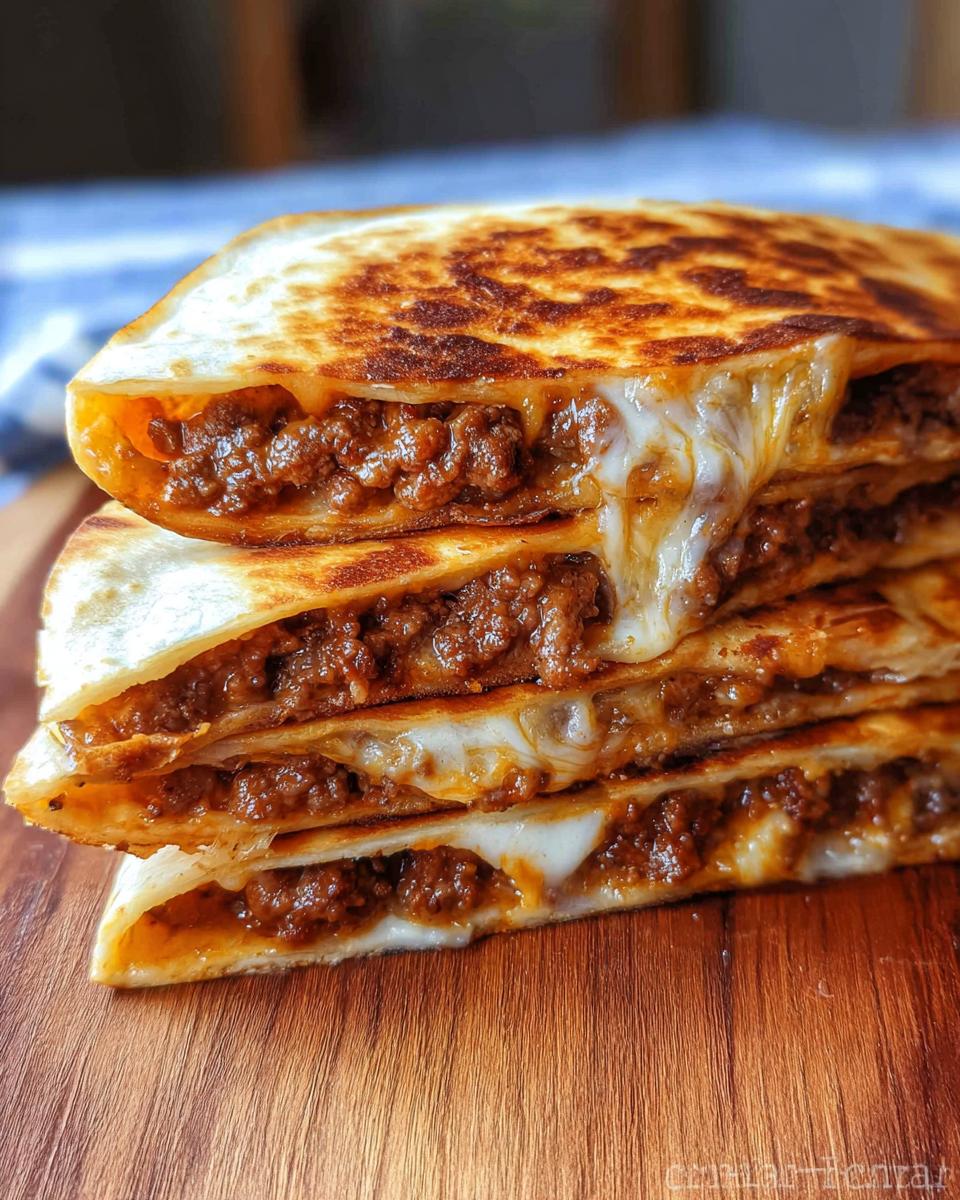
- The Best Cheese Blend: This is huge! I use about 12 ounces total, divided. My personal favorite blend is three parts cheddar to one part Monterey Jack, with a little pizza mozzarella thrown in for that epic stretchiness.
- Vegetable Oil: Only about 2 teaspoons per batch to get that perfect, golden, crispy exterior.
Step-by-Step Instructions for Making Cheesy Beef Quesadillas
Now that we have all our amazing ingredients ready, let’s put this quick lunch together! Time management is everything when you are trying to fit real, nourishing food into a hectic schedule. Don’t rush the meat, but definitely keep an eye on the clock! We want everything perfectly seasoned before we start layering.
For even more inspiration on fitting these fast meals into your busy life, check out my thoughts on easy dinner recipes!
Preparing the Seasoned Beef
First things first, get your oven preheated to 200 degrees Fahrenheit. This is my trick to keep the first few batches of your Cheesy Beef Quesadillas warm while you finish the rest. Don’t skip this step!
Heat that olive oil in your big non-stick pan over medium heat. Toss in the ground beef and all those glorious spices—chili powder, cumin, oregano, everything! Cook this, breaking it up really well, for about 8 to 10 minutes until the beef is completely browned. Now, this is critical: stir in the tomato paste and beef broth/stock and let it simmer for just one or two minutes more. Take it off the heat and move it to a bowl. Make sure you drain off any excess grease you see sitting at the bottom of that bowl!
Assembling Your Cheesy Beef Quesadillas
This layering technique ensures maximum melt and keeps the tortilla from getting soggy! Grab your six tortillas. You need to divide roughly two cups of your cheese blend evenly across only *one side* of each tortilla. Don’t go right to the edges, leave a little border.
Next, spoon the seasoned beef right on top of that layer of cheese. Then? Sprinkle the remaining cup of cheese right on top of the beef. This little top layer acts like glue! Carefully fold the empty half of the tortilla over the filling to create a nice half-moon. Try not to smash it down flat right now; we do that in the pan!
Cooking to Golden Perfection in the Cheesy Skillet
Wipe out your pan super well, or grab a clean one—no beef residue allowed! Heat about 2 teaspoons of vegetable oil over medium-low heat. Seriously, medium-low! If the heat is too high, the tortilla burns before the cheese melts, and nobody wants a crunchy, cold center.
Cook your quesadillas in batches, probably two at a time. Let them sit for about two minutes until they’re beautifully golden brown on the bottom. Flip them gently—be careful!—and cook the other side for another two minutes until it’s golden too, and you can see that beautiful cheese pull inside. Pop the finished ones onto that warm sheet pan in the oven while you fry the next batch. This is the secret to serving a full batch hot!
Expert Tips for Next-Level Cheesy Beef Quesadillas
Okay, so you’ve got the basic recipe down, but you want them to taste like they came from your favorite spot downtown? That’s where the little details come in. Making these Cheesy Beef Quesadillas is simple, but perfecting them takes just a tiny bit of insider knowledge. I’ve learned these tips the hard way over many, many batches!
If you are looking to make these a ‘cleaner’ version without sacrificing that great flavor, check out my posts on slimmed-down favorites for great swaps!
My biggest early mistake? I used paper towels to pat down the cooked tortillas. Whoops! Big mistake. The paper towel sticks halfway to the tortilla, and then you get zero crispness. Stick to the warming oven method; it keeps them pliable and warm without sticking.
Here are the must-know tricks I use every time I make these for the family:
- The Cheese Must Be Shredded By You: I know it’s tempting to buy the pre-shredded bag because it seems faster for a Quick Lunch, but that bag cheese is coated in anti-caking agents. Those agents stop the cheese from getting that beautiful, silky, gooey melt we love. If you are using these for an Easy Snack Dinner, take the extra three minutes to shred your cheddar and jack blend fresh. It melts like butter!
- Low Heat is Your Best Friend: I mentioned medium-low, but I can’t stress this enough. If your heat is too high, the tortilla browns instantly, but the center cheese is still cold. You want the heat gentle enough that the tortilla turns golden brown and crisp right around the same time the cheese hits that perfect lava consistency.
- Butter vs. Oil for the Finish: If you want richer flavor, which I occasionally indulge in, use clarified butter or ghee instead of vegetable oil for cooking the assembled tacos. It browns faster and adds a depth that oil just can’t match. Just watch it closely, because butter burns quicker!
- Don’t Overstuff! This is key for folding and flipping. If you pour too much beef mixture on, the cheese won’t seal all the way around, and you’ll end up with spillage in your Cheesy Skillet. Leave about an inch border clear around the edge before you fold it over.
Variations for Your Cheesy Beef Quesadillas Filling
Just because the recipe calls for ground beef doesn’t mean you’re locked in forever! That’s the beauty of homemade food, right? We love these Cheesy Beef Quesadillas, but changing up the protein keeps things interesting, especially if you’re trying to cycle through different clean-eating staples throughout the week. You don’t want dinner boredom to wreck your groove!
If you’re looking to explore more options centered around beef, I have a great list of my favorite ways to prepare it over on my recipe page. You can see tons of different flavor profiles there: 10 best ground beef recipes!
When thinking about swapping out the standard ground beef in this recipe, try these proven winners for your next batch of Beef Quesadillas:
- Lean Ground Turkey: This is an easy 1-to-1 swap! You might need to add just a tiny splash more broth when you add the tomato paste, since turkey is naturally leaner than beef, but the spice mix will carry all the flavor beautifully.
- Shredded Chicken: This one requires a slight change in *how* you cook it, obviously. You’d skip the browning step and just warm up 1.5 cups of pre-cooked, shredded rotisserie or baked chicken breast with the spices, tomato paste, and broth until it’s piping hot and coated.
- Vegetarian Power-Up: For a meatless option, skip the beef entirely and sauté one can of rinsed and drained black beans along with the onions and peppers (if you add them). Be generous with the seasoning here to make sure those beans really soak up the spice!
- A Veggie Boost: If you want to bulk up the filling without adding more meat, chop up half a small red onion and maybe a half-cup of red bell pepper fine. Sauté those first until they soften up, *then* add your ground beef. It adds great color and texture to every bite!
Ingredient Substitutions for Cheesy Beef Quesadillas
One of the best parts about relying on these kinds of quick meals is how adjustable they are. In the world of clean living and fitting things into *your* unique schedule, substitutions aren’t just okay—they’re necessary! If you’re out of something specific, don’t panic and ditch the plan. We can make quick fixes for these Cheesy Beef Quesadillas and keep that momentum going.
If you are looking at adjusting the whole meal to fit a different dietary approach, I’ve written a whole guide on the best ways to adapt recipes for various needs over at my diet recipes hub. You can check out some tips here for different diet recipes!
Here are the swaps I make most often when I’m missing an ingredient or trying to adjust the flavor profile:
- Taco Seasoning Swap: If you don’t have the full list of chili powder, cumin, and chipotle handy, you can absolutely use 2 to 3 tablespoons of your favorite pre-made taco seasoning blend instead. Just add that seasoning in place of the specific spices listed, and you might need to skip the tomato paste since most taco blends are already tomato-forward.
- The Cheese Dilemma: I sang the praises of the three-cheese blend, but I totally get it if you only have one type in the fridge! If you only have plain Sharp Cheddar, go for it! If you only have Mozzarella, that will give you an amazing, stretchy texture—just maybe add a pinch more salt or cumin to the beef mixture to compensate for the flavor depth you lose without the cheddar.
- Tortilla Talk: If you are trying to keep things lower in refined carbs, you can often get away with using 100% whole wheat tortillas, or even low-carb/keto-friendly wraps. Just remember that the lower-carb options tend to brown faster, so really keep that heat low when cooking them in the Cheesy Skillet.
- Oil for Cooking: If vegetable oil isn’t your first choice for cooking those crispy bottoms, you can easily substitute it with avocado oil or ghee. They both have higher smoke points, which means less chance of burning while you wait for that cheese to melt perfectly around the edges.
See? No reason to stress! These little tweaks ensure you can always pull together a satisfying Quick Lunch or a hearty Easy Snack Dinner whenever hunger strikes.
Storing and Reheating Your Leftover Cheesy Beef Quesadillas
The true sign of a great recipe is how well it performs the next day, right? I mean, who doesn’t love having ready-made lunch waiting for you when you need a boost? Since these Cheesy Beef Quesadillas are so hearty, you’re probably going to have some leftovers, even if you’re serving a big crowd. We always aim for leftovers for lunch the next day!
But we have to be careful how we store and reheat them. Nobody wants a soggy tortilla when they thought they were getting a crispy, golden-brown masterpiece for their next Quick Lunch. If you want to keep the flavor profile strong for your next reheat, check out some of my favorite dinner prep ideas here: dinner recipes!
Here is my exact process for storing them so they stay at their best, and the one method I use for reheating that keeps them almost as good as fresh.
Storing for Maximum Crispness
The number one rule for storing almost any fried or griddled food is this: let it cool down completely first! Don’t ever try to seal up hot food in a container, even if you’re in a rush to put it away. Sealing warm food creates steam, and steam equals sogginess for anything crispy, which instantly ruins these Cheesy Beef Quesadillas.
Once the quesadillas are totally cool—and I mean room temperature—wrap each one individually tight in plastic wrap or foil. Then, place the wrapped pieces into an airtight container. If you stack them without wrapping, they tend to stick together, and you risk tearing the tortilla when you try to separate them later. Stored this way in the refrigerator, they are good to go for about 3 to 4 days. That’s a solid four days of easy meals!
The Best Way to Reheat
I know we all reach for the microwave when we’re hungry, but if you use the microwave for these, you are going to end up with soft, chewy, sad tortillas. We are serious about getting that crispy texture back!
The oven is your absolute best friend here. Preheat your oven to about 350 degrees Fahrenheit. You can use a baking sheet, but if you have a wire rack that fits over a sheet pan, use that! Place the cooled quesadillas directly on the rack. This allows the heat to circulate underneath them, making sure the bottom gets just as crispy as the top.
Bake them for about 8 to 10 minutes. Keep an eye on them after the 7-minute mark, because if your cheese blend had a lot of mozzarella, it might melt out and get a little burny on the pan underneath. This method brings back that lovely golden-brown crunch and gives you that perfect, gooey, pull-apart cheese center all over again. They’ll be ready to serve with fresh salsa or guacamole in no time!
Frequently Asked Questions About Making Cheesy Beef Quesadillas
It happens to the best of us! When you’re trying to stick to healthy habits and get dinner on the table fast, you’re going to have questions. These Cheesy Beef Quesadillas are so simple, but sometimes the little details make the biggest difference between a good meal and an *amazing* one that fits right into your routine. Here are the things I get asked most often about assembly and keeping them perfect when serving a crowd!
If you’re looking for more ideas on fitting these simple meals into your week, check out my resources on lunch prep!
Can I make the beef filling ahead of time for Cheesy Beef Quesadillas?
Oh, absolutely! That’s one of my favorite weekend meal prep cheats! You can definitely make the entire seasoned beef and tomato paste mixture ahead of time. Cook it all up according to the instructions, let it cool completely, and store it in an airtight container in the fridge for up to four days. This makes pulling together a Quick Lunch on a busy workday totally painless.
When you’re ready to assemble, just warm the beef filling up slightly—you don’t want it piping hot, but definitely not cold—before layering it onto the tortillas with the cheese. If it’s too cold, it can actually slow down the melting process in the Cheesy Skillet!
What is the best cheese for Beef Quesadillas?
My favorite answer here is always: whatever melts well and tastes great! While you can use any single cheese you like, the true secret to those restaurant-style pulls is using a blend. We use three parts sharper cheese to one part stretchier cheese.
For instance, using only Cheddar is deep on flavor, but it can sometimes get oily when it melts. Using only Mozzarella is great for the stretch, but it’s mild. By mixing them—like the cheddar/jack/mozzarella combo listed in the recipe—you get the best of both worlds: great savory flavor from the cheddar and that beautiful, silky, gooey texture that makes these shine as an Easy Snack Dinner or party food.
Don’t be afraid to experiment, but always shred your own for maximum meltiness!
By EMILIA, the founder of MeltItClean.com – your digital space for natural weight loss, real wellness habits, and clean-living inspiration that actually fits your life.
For years, I struggled with the ups and downs of dieting. I tried everything — juice cleanses, low-carb crazes, fitness challenges — but I always ended up back where I started: tired, bloated, and frustrated. I didn’t just want to “lose weight” — I wanted energy, mental clarity, glowing skin, and confidence without sacrificing my joy or sanity.
After years of experimenting, learning, and unlearning, I discovered a simple truth: your body is already powerful — it just needs support, not restriction. That’s when I created Melt It Clean — a site dedicated to real transformation through clean, intentional, and nourishing daily habits that anyone can follow.
My goal was simple: build a place where people could feel informed, supported, and empowered without being overwhelmed by wellness fads.
Sharing Your Cheesy Beef Quesadillas Creations
I truly hope these Cheesy Beef Quesadillas become a staple in your rotation the way they have in mine! There is nothing better than hearing how a simple, clean recipe made your hectic week a little bit easier or satisfied a serious craving without derailing your wellness goals.
When you nail that perfect golden-brown crispness on the tortilla while the filling stays hot and gooey, you absolutely have to shout it from the rooftops! That interaction is what building a real health journey is all about—sharing successes and supporting each other.
So, please, let me know what you think! Once you whip up a batch of these, jump down to the comments section. Tell me how the seasoning worked for you, or if you tried one of my recommended protein swaps! I read every single comment when I have a moment.
- Rate the Recipe: Give these quesadillas a star rating right below this section so other busy folks know they can trust this recipe for a Quick Lunch or Easy Snack Dinner!
- Snap a Photo: If you took a gorgeous photo of your crispy, cheese-filled half-moons, tag me on social media! Seeing your creations is genuinely the highlight of my day. You can find all my latest tips and posts here on the main blog page: the main blog page.
- Ask Away: If you ran into a snag or needed a substitution while making these Beef Quesadillas, drop your question in the comments! We are building a community here, and we all learn when one person asks a tricky question.
Happy cooking, everyone! I can’t wait to see what you create.
By EMILIA, the founder of MeltItClean.com – your digital space for natural weight loss, real wellness habits, and clean-living inspiration that actually fits your life.
For years, I struggled with the ups and downs of dieting. I tried everything — juice cleanses, low-carb crazes, fitness challenges — but I always ended up back where I started: tired, bloated, and frustrated. I didn’t just want to “lose weight” — I wanted energy, mental clarity, glowing skin, and confidence without sacrificing my joy or sanity.
After years of experimenting, learning, and unlearning, I discovered a simple truth: your body is already powerful — it just needs support, not restriction. That’s when I created Melt It Clean — a site dedicated to real transformation through clean, intentional, and nourishing daily habits that anyone can follow.
My goal was simple: build a place where people could feel informed, supported, and empowered without being overwhelmed by wellness fads.

Cheesy Beef Quesadillas
Ingredients
Equipment
Method
- Preheat oven to 200 degrees Fahrenheit to keep quesadillas warm while cooking batches.
- Heat olive oil in a large non-stick frying pan over medium heat. Add ground beef, chili powder, chipotle pepper, oregano, cumin, garlic powder, onion powder, salt, black pepper and cayenne pepper. Cook, breaking the ground beef into small pieces and stirring occasionally, until the ground beef is fully cooked through, about 8 to 10 minutes.
- Stir in tomato paste and beef stock/broth and cook for 1 to 2 minutes more. Remove beef from the pan and place into a bowl. Drain/remove any excess grease.
- Distribute about 8 ounces (or 2 cups) of cheese among all tortillas on one side of them.
- Distribute ground beef on top of cheese. Then sprinkle the remaining 1 cup (or 4 ounces) of cheese on top of ground beef. Fold over each tortilla so it forms a half-moon shape.
- Heat about 2 teaspoons of vegetable oil in a large non-stick frying pan over medium-low heat. Gently swirl the oil around the pan to coat. Wipe out the pan if you used it for the ground beef.
- Cook the quesadillas in batches, two quesadillas at a time, adding more oil to the pan between batches as needed. Place two quesadillas in the pan. Cook quesadillas for about 2 minutes on one side.
- Carefully flip quesadillas to the other side and continue to cook for another 2 minutes or until they are golden brown and crispy on the outside and the cheese is melted inside. Transfer cooked quesadillas to a sheet pan and place into your preheated oven to keep warm while you cook the remaining quesadillas.
- Repeat the process to cook the remaining quesadillas.
- Once done, cut each quesadilla in half so you have 12 pieces. Serve with salsa, guacamole and/or sour cream.


