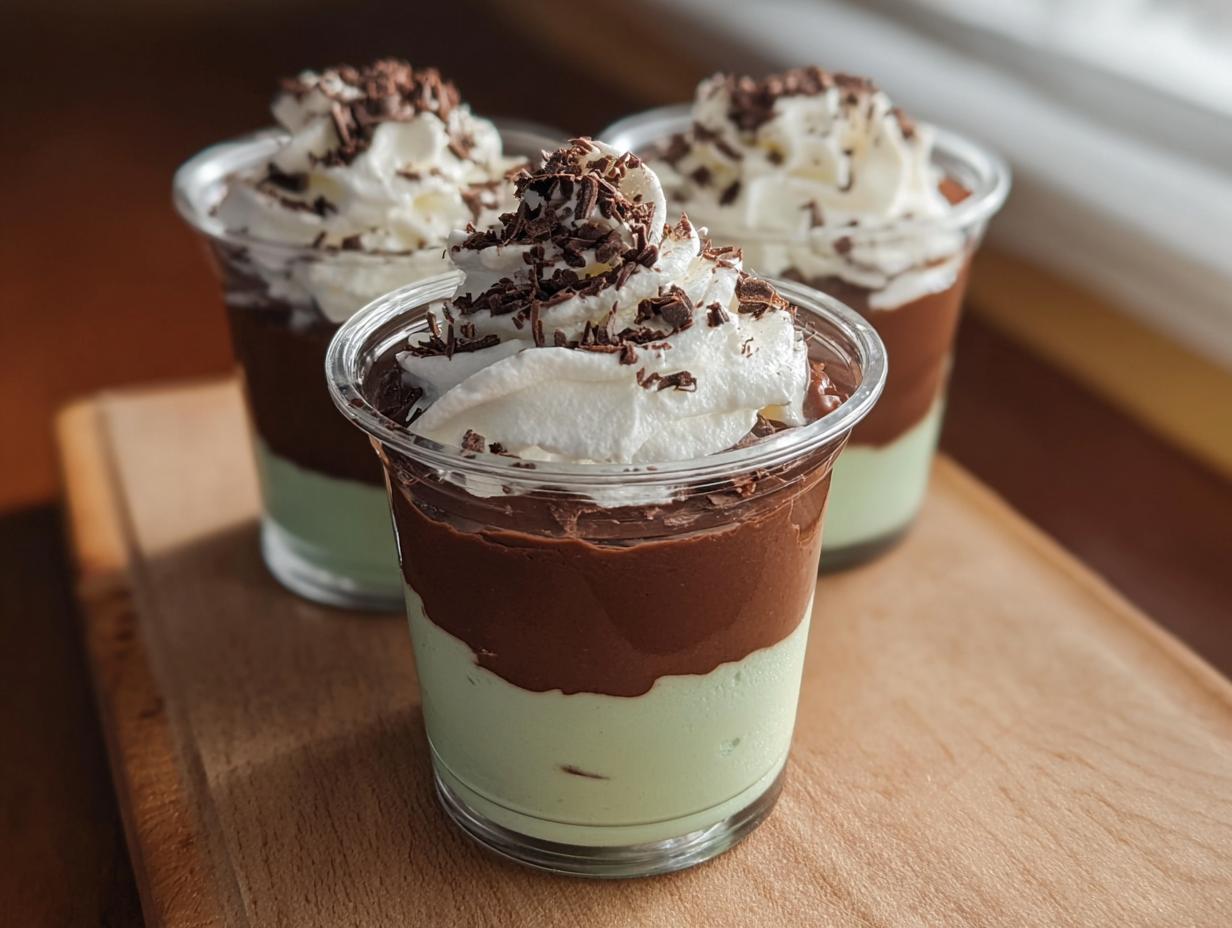
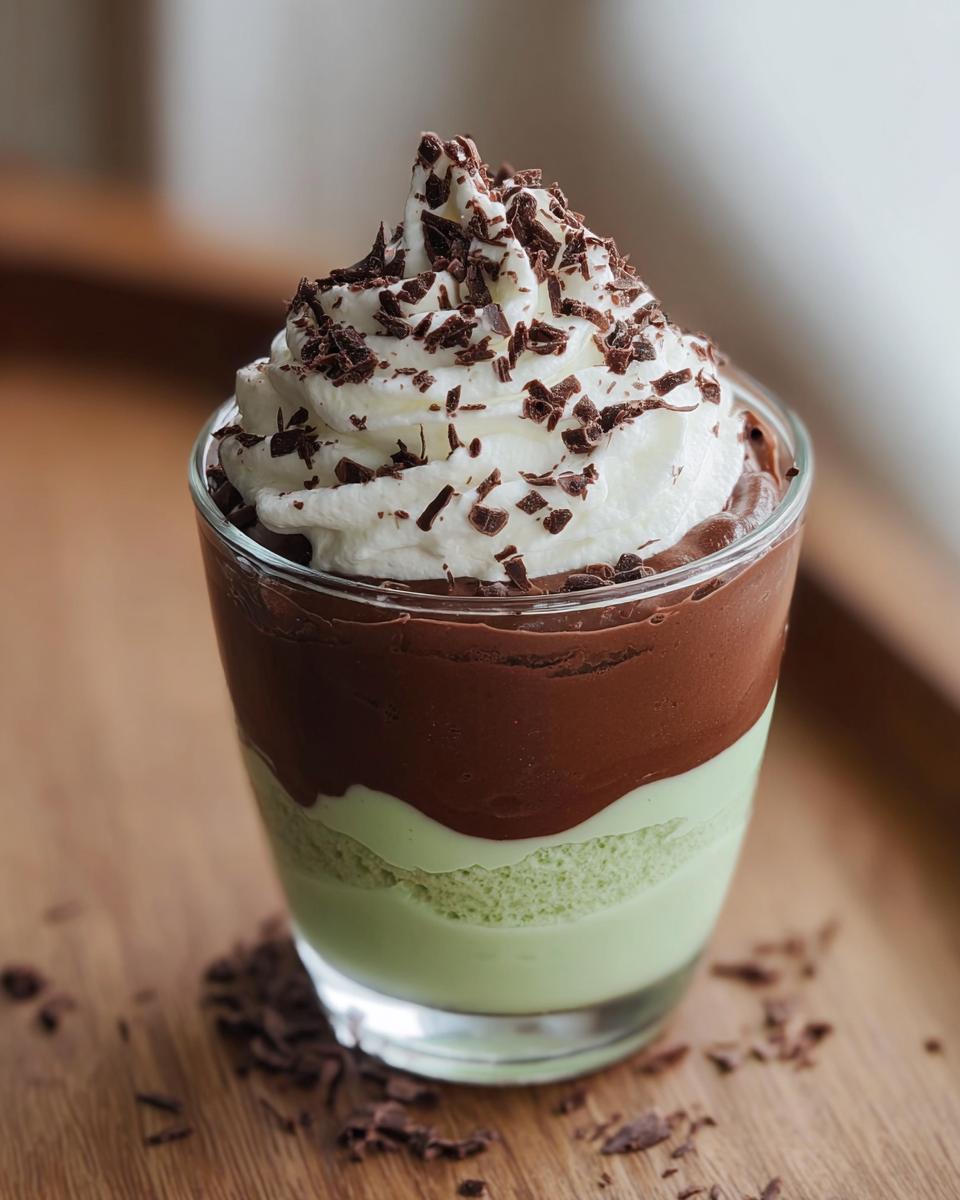
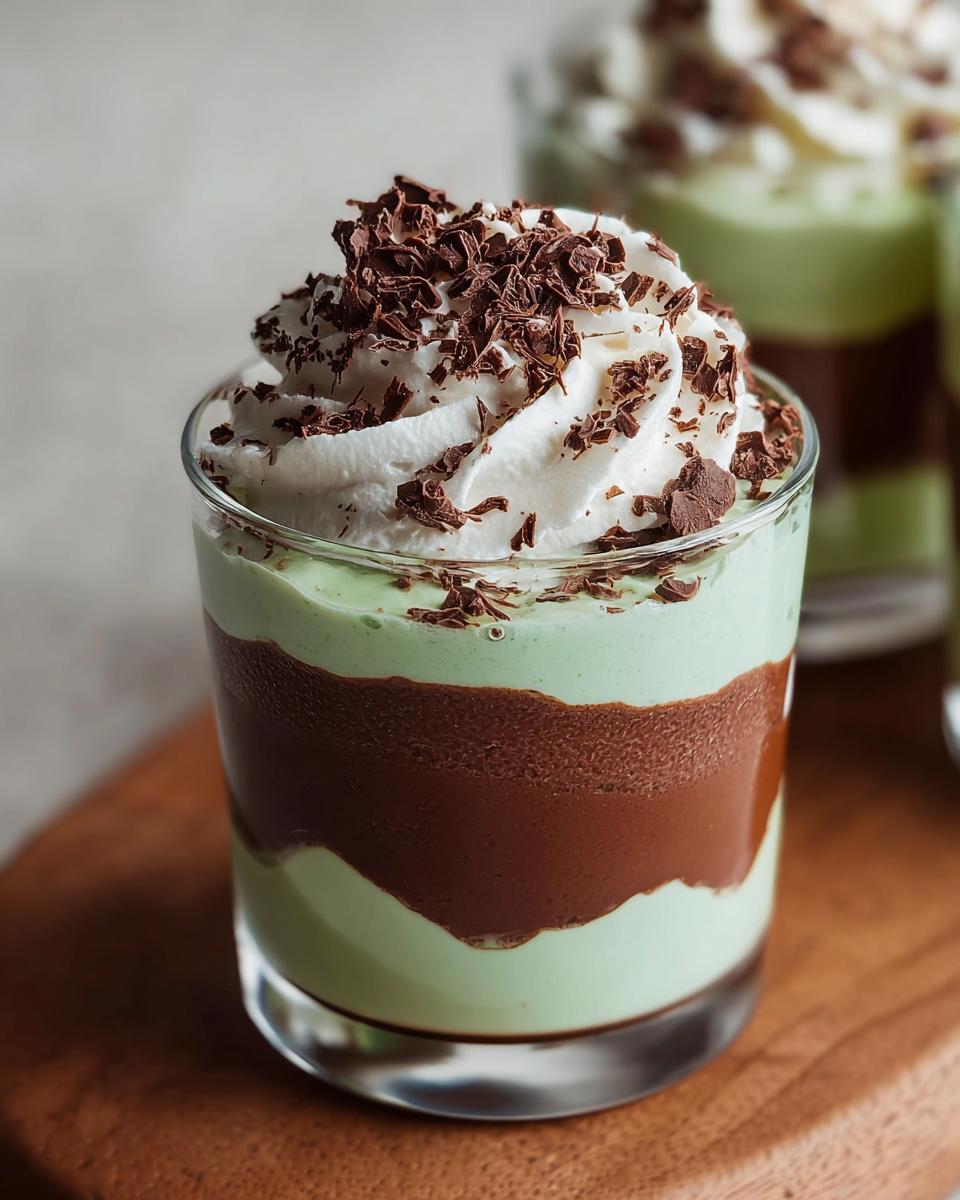
Oh, St. Patrick’s Day! It brings back such fun memories. And you know what’s a HUGE part of that fun? The Shamrock Shake! I’ve always loved that creamy, minty goodness, but sometimes you just want something a little different, right? That’s where these Shamrock Shake Pudding Cups come in. They’re my playful twist on the classic, layering that perfect chocolate and mint flavor into cute little cups. Trust me, as a busy mom who loves a good sweet treat (and a quick cleanup!), these are a total winner for any celebration or just a Tuesday.
Why You'll Love These Shamrock Shake Pudding Cups
Seriously, these little cups are a dream for so many reasons:
- Super Easy Peasy: We’re talking instant pudding here, folks! You can whip these up in minutes.
- Tastebud Party: That classic chocolate and mint combo? Yep, it’s all here and totally delicious.
- Festive Fun: They look SO cute and green, perfect for St. Paddy’s Day, spring parties, or just when you need a little green cheer.
- Perfect Portions: Individual cups mean no fuss, no mess, and everyone gets their own sweet delight.
Gather Your Ingredients for Shamrock Shake Pudding Cups
Alright, let’s get our shopping list ready! You don’t need anything fancy, which is the best part. Here’s what you’ll need to whip up these fun pudding cups:
For the Pudding:
- 1 box (3.4 oz) instant chocolate pudding mix
- 1 box (3.4 oz) instant mint pudding mix (or vanilla if you prefer!)
- 4 cups cold whole milk, divided
- 1/2 tsp peppermint extract (only if you’re using vanilla pudding)
- Green gel food coloring (as needed for that perfect shamrock vibe)
For Garnish:
- 1 cup whipped topping (or freshly whipped cream, yum!)
- Chocolate shavings or crushed mint candies (for that final flourish!)
Crafting Your Shamrock Shake Pudding Cups: Step-by-Step
Alright, let’s get these fun little cups made! It really is super simple, but taking your time with each step makes a big difference. Trust me on this! You can find more dessert recipes like this one on our site!
Preparing the Pudding Layers
First things first, we need our pudding! Grab two separate bowls. In one, whisk your chocolate pudding mix with 2 cups of cold whole milk for a good 2 minutes until it’s all smooth and no lumps are hiding. Let that sit for about 5 minutes to get nice and thick. Now, do the same with the mint pudding mix (or vanilla if you’re going that route) and the other 2 cups of cold milk. If you used vanilla, now’s the time to add that little splash of peppermint extract! And for that gorgeous shamrock green, add a few drops of green gel food coloring and whisk it in. You want a nice, vibrant minty green! Let this one thicken up for 5 minutes too.
Assembling Your Shamrock Shake Pudding Cups
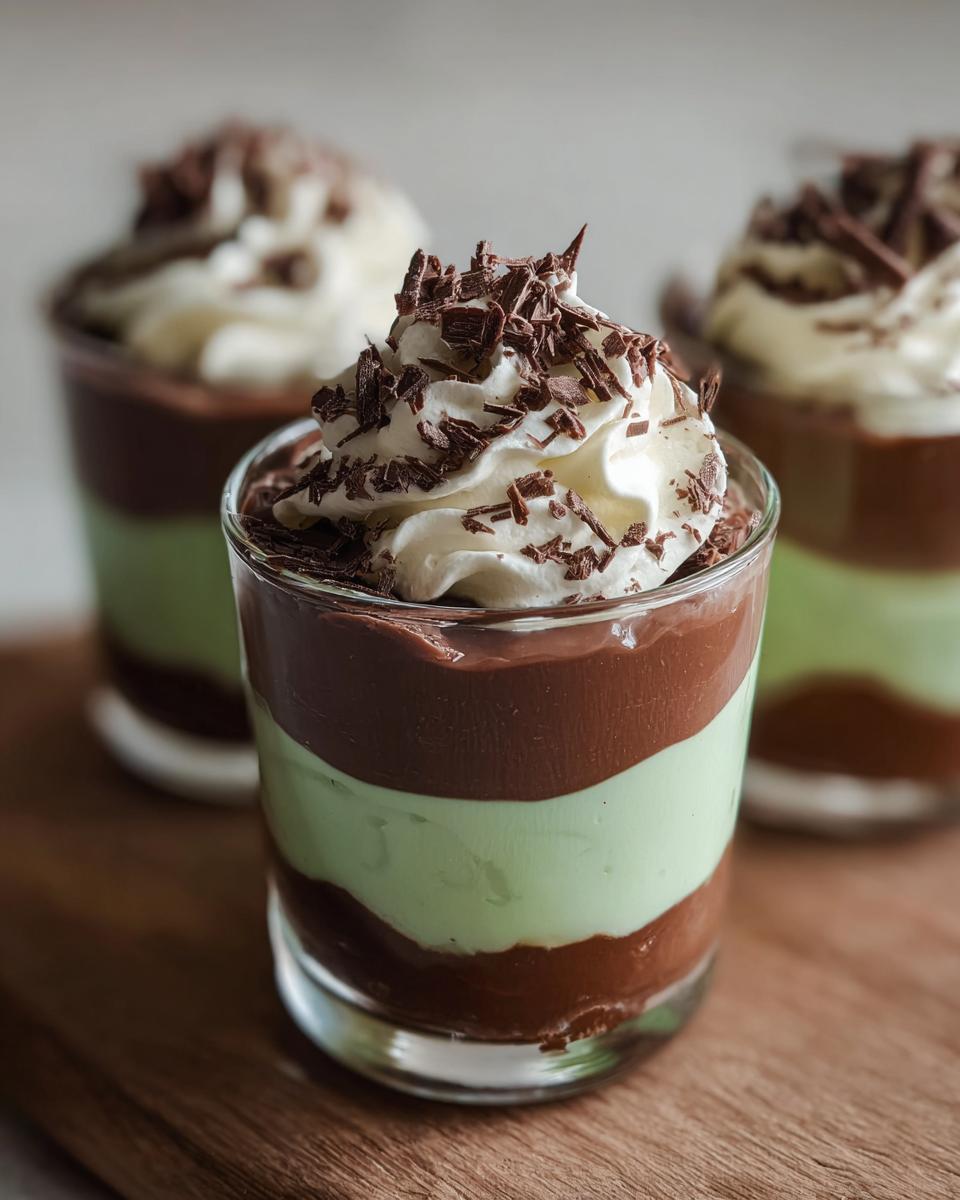
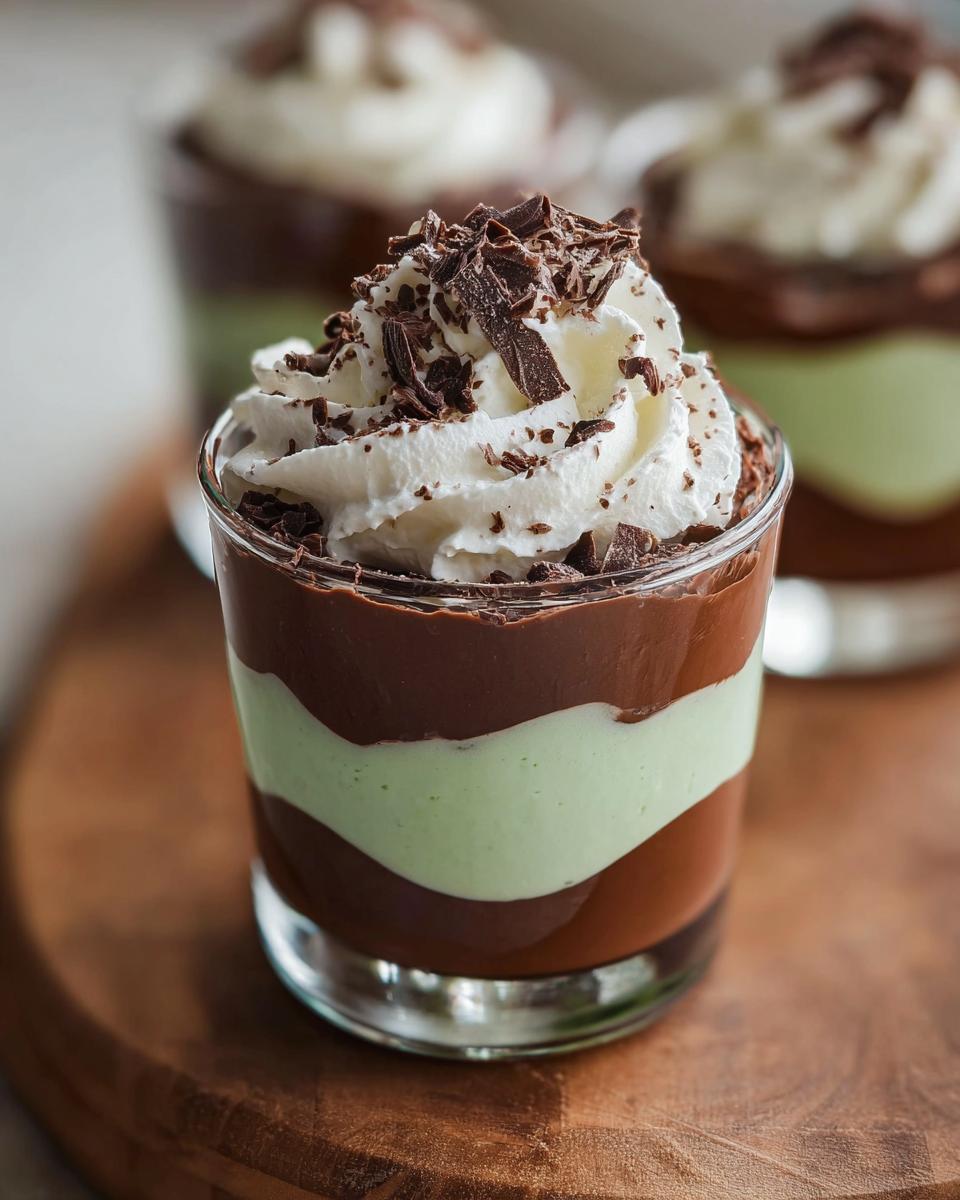
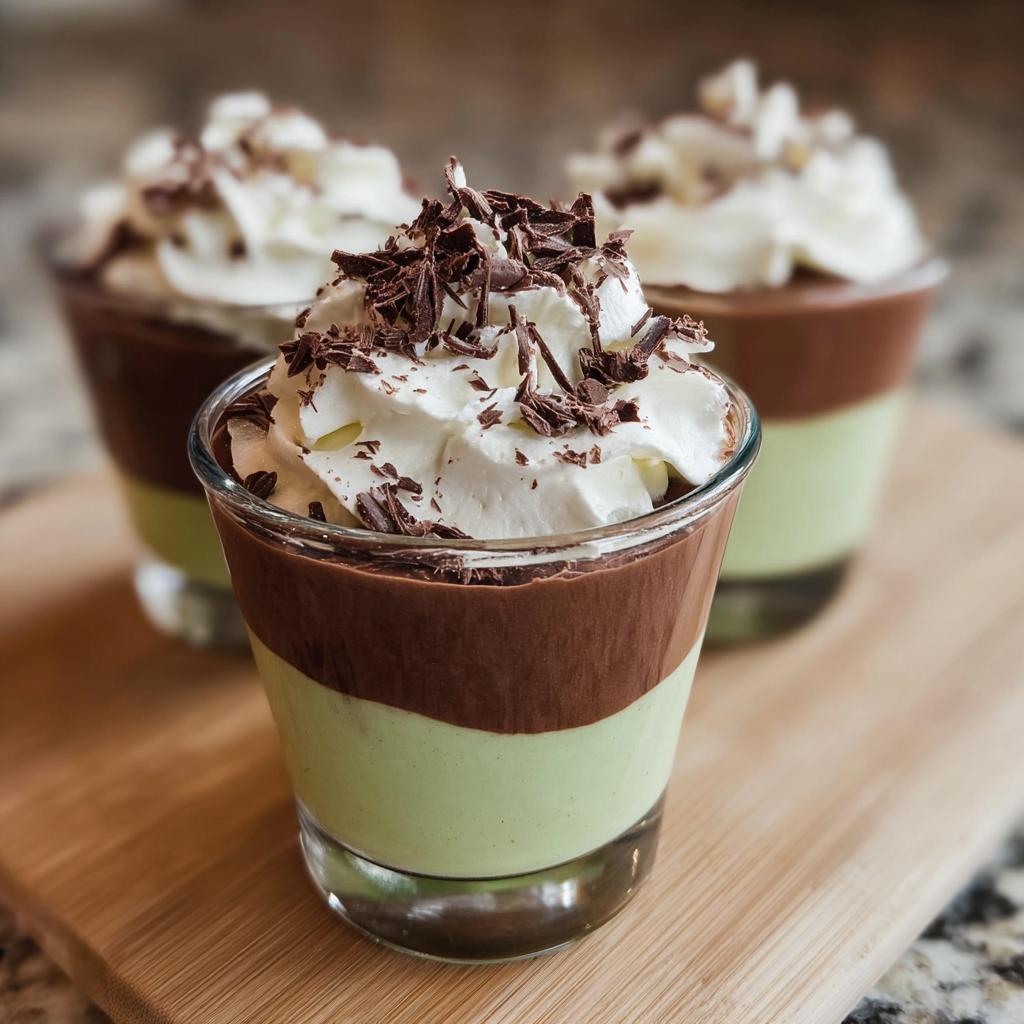
This is where the magic really happens! For the neatest layers, you’ll want to use piping bags. If you don’t have them, you can just carefully spoon it in, but piping bags give you those clean, distinct lines we’re going for. So, snip the corner off your piping bags (or just use a ziplock bag with a corner snipped off!) and fill one with chocolate pudding and the other with mint. Start by piping a layer of chocolate pudding into the bottom of each of your 8-ounce dessert cups. Then, pipe a layer of mint pudding right on top. You can go back and add another layer of chocolate, then mint, to fill them up!
Chilling and Garnishing
Okay, our pretty layers are in the cups! Now, they need a little chill-out time to firm up. Pop them into the fridge for at least 30 minutes. This is important so they don’t all get mixed up when you add your toppings. Once they’re nice and set, take them out. Time for the best part – the garnish! Dollop or pipe a swirl of whipped topping (or fresh whipped cream if you’re feeling fancy!) on top. Finish them off with a sprinkle of chocolate shavings or some crushed mint candies. They look so professional, don’t they?
Tips for Perfect Shamrock Shake Pudding Cups
Making these pudding cups is pretty foolproof, but a couple of little tricks can really take them from good to *gorgeous*. First off, the pudding mix matters! Always go for the instant kind – the regular kind just won’t set up right in the short time we need. And when you mix it, make sure that milk is super cold. Like, straight-from-the-back-of-the-fridge cold. That helps it thicken up beautifully. If your layers look a little muddy, don’t sweat it! Just piping them in slowly means they won’t get all mixed up. And remember, a good 30 minutes in the fridge before topping is key so everything stays put!
Ingredient Notes and Substitutions
Okay, let’s talk ingredients for a sec, because sometimes you need to make a little tweak or you’re just plain curious! Using instant pudding is seriously the trick here; it sets up fast and perfectly like we need for these layers. If you’re not a fan of mint, or can’t find it, no worries at all! Just grab a box of instant vanilla pudding and add that 1/2 teaspoon of peppermint extract. It gives you that same classic minty flavor without the mint pudding itself. And while you can technically use 2% or skim milk, whole milk really makes the pudding richer and holds its shape so much better. It’s worth grabbing the whole milk if you can!
Frequently Asked Questions about Shamrock Shake Pudding Cups
Got a few lingering questions? I get it! Here are some things folks often ask me. If you’re looking for more yummy ideas, don’t forget to check out all the dessert recipes on our site!
Can I make these ahead of time?
You totally can! They’re actually even better if they’ve had a good chill. Just make them up to day before you plan to serve them. Keep them covered in the fridge. The only thing is, I’d wait to add the whipped topping and garnishes until right before serving so they stay looking fresh and pretty.
Can I use regular milk instead of whole milk?
So, while you *can* technically use 2% or skim milk, the pudding might not set up quite as firmly. Whole milk really gives it that classic, creamy texture and helps it hold its shape, especially with the layering. If you do use lower-fat milk, just be extra sure to let it chill that full 30 minutes (or even a bit longer!).
How do I get really distinct layers?
The secret is all in the piping! Using piping bags, or even just sturdy ziplock bags with a small corner snipped off, lets you control the flow of the pudding. Start with a gentle stream and pipe in a circular motion for each layer. Also, make sure your pudding has had a chance to thicken up properly after mixing – that makes a huge difference in keeping those layers crisp!
Can I make this dairy-free?
You sure can adapt it for dairy-free! Use a dairy-free chocolate and vanilla pudding mix made with plant-based milk (like almond or oat milk – just make sure it’s unsweetened and cold!). For the whipped topping, there are great dairy-free whipped creams available now, or you can whip up some coconut cream. It’s totally doable!
Nutritional Information
Just a little heads-up on the nutrition front! These fun Shamrock Shake Pudding Cups are estimated to be around 290 calories per serving. This can totally vary depending on the brands of pudding mix, milk, and whipped topping you use, but it gives you a general idea. Enjoy them as the sweet treat they are!
Share Your Creations!
I absolutely LOVE seeing your culinary adventures! If you whip up these Shamrock Shake Pudding Cups, please, please, please tell me all about it in the comments below! How did they turn out? Did you add any fun twists? And if you snap a pic, tag me on social media – I’d be thrilled to see your festive creations!
Shamrock Shake Pudding Cups
Ingredients
Equipment
Method
- Prepare clear 8-ounce dessert cups and wipe the inside clean for neat presentation.
- Whisk the chocolate pudding mix with 2 cups of cold milk for 2 minutes until smooth. Let sit for 5 minutes to thicken.
- Whisk the mint (or vanilla) pudding mix with 2 cups of cold milk. Add peppermint extract if needed and tint with green gel food coloring. Let thicken for 5 minutes.
- Transfer puddings to piping bags. Pipe a layer of chocolate pudding into each cup, followed by mint pudding. Repeat for multiple layers.
- Refrigerate pudding cups for at least 30 minutes to set.
- Top with whipped cream and garnish with chocolate shavings or mint candies just before serving.