If you are like me, you’ve probably had moments of pure despair staring at baked chicken thighs—pale skin, rubbery texture, and just… sad. I used to think true crispiness was only possible by deep frying or spending hours under the broiler. But I spent two years fiddling with oven temperatures and techniques figuring out the secret. Seriously, the payoff is huge when you nail it. That’s why I’m telling you right now, Why Crispy Baked Thighs with Herb Butter Is the Only chicken thigh recipes Recipe You Need. This herb butter magic creates meat that melts in your mouth while the skin crackles like the best roast chicken you’ve ever had. Forget everything you thought you knew about baking chicken!
Why Crispy Baked Thighs with Herb Butter Is the Only chicken thigh recipes Recipe You Need: The Secret to Crispy Skin
Okay, so what makes this recipe the only chicken thigh recipe you’ll ever need? It boils down to two things that sound simple but make all the difference: temperature control and strategically applied fat. Most people bake chicken thighs too low, which just steams the skin into something rubbery. We crank the oven up to 400°F because we want a fast, hot blast to render that skin fat quickly. That’s where the herb butter swoops in!
The real game-changer, though, is what we do *before* the butter even touches the skin. You have to attack that moisture! If the skin isn’t bone-dry, the heat energy goes into evaporating water instead of crisping up that beautiful layer of skin. Trust me on this one; this is the step that separates amateur bakes from what you get at a fancy restaurant. You absolutely must pat those thighs down until they feel velvety dry.
I learned this the hard way, dealing with soggy failures for months! Once they’re dry, rubbing the herb butter mixture *under* the skin helps season the meat deep down and promotes a more even cook, while slathering the rest *on top* helps crisp it to golden perfection. If you want to see more about getting that perfect crunchy skin texture, check out some other great baked chicken recipes—but remember, ours has the aromatic butter!
Gathering Ingredients for Why Crispy Baked Thighs with Herb Butter Is the Only chicken thigh recipes Recipe You Need
See? I told you this was easy! We only have 15 minutes of prep time, which means we’re practically done before the oven even finishes heating up. When it comes to this recipe being the only one you need, it’s because we use standard pantry stuff to create something spectacular. You don’t need fancy imported spices or ten different things to chop. Just good quality chicken and the right aromatic fat mixture.
I always make sure to assemble everything right on the counter while the oven preheats. It keeps the flow going and prevents any accidental skipping of steps once the action starts. Let’s look at what you need to pull this magnificent crispy chicken bake off!
For the Chicken Thighs
- Four bone-in, skin-on chicken thighs. Make sure they weigh about 6 to 8 ounces each—consistency matters here!
- One teaspoon of Kosher salt. Don’t skimp on this; it helps pull moisture, too!
- Half a teaspoon of Black pepper. Freshly ground is always best, obviously.
For the Aromatic Herb Butter
This butter is the heart and soul of this whole operation. It’s what seasons the meat under the skin *and* creates that beautiful golden crust on top. The most important thing here is that your butter needs to be softened. Don’t melt it in the microwave! It needs to be pliable enough to rub around.
- Four tablespoons of Unsalted butter. Softened until it’s creamy.
- One tablespoon of Fresh rosemary, finely chopped. The smell alone is worth it!
- One tablespoon of Fresh thyme leaves. Pull them right off the stem—it’s therapeutic.
- Two cloves of Garlic, minced up tiny.
Step-by-Step Instructions for Why Crispy Baked Thighs with Herb Butter Is the Only chicken thigh recipes Recipe You Need
We’re finally getting to the fun part—turning those ingredients into dinner! Since we’ve got the dry skin down and the aromatic butter ready, the actual cooking process moves super quickly. You only need about 40 minutes in the oven, tops, which is fantastic for a weeknight meal. Just remember to have your baking sheet ready near the stove!
Preparation and Seasoning
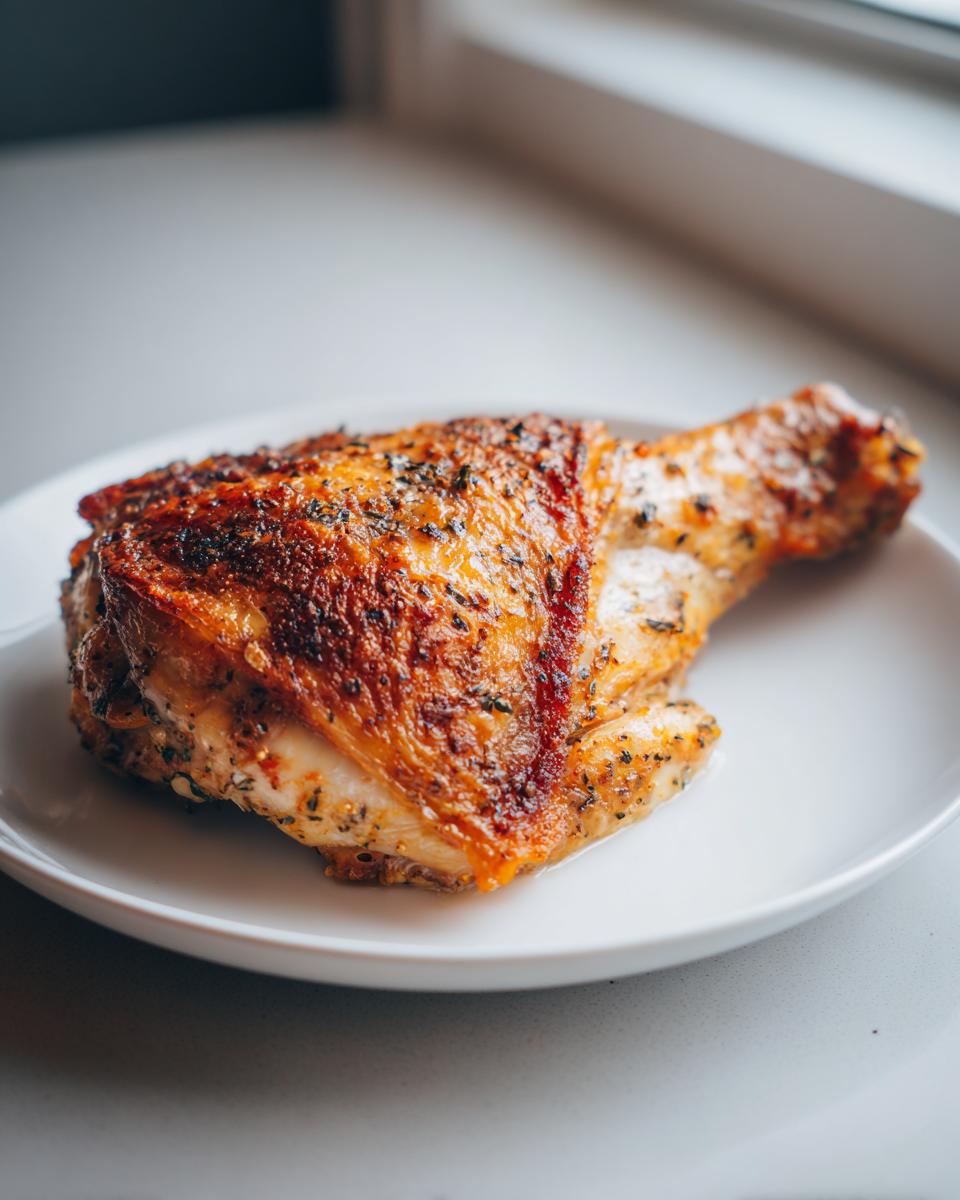
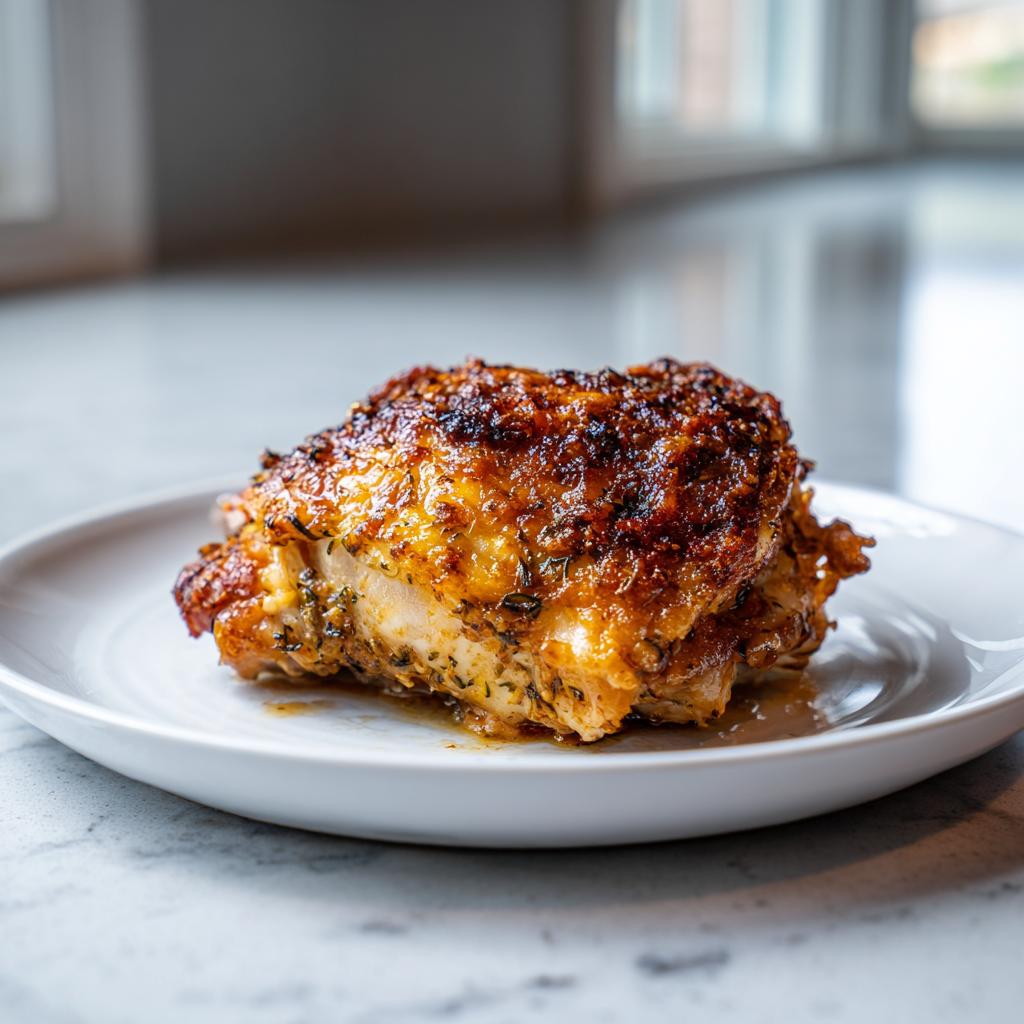
First things first, get that oven roaring! You need 400 degrees Fahrenheit—no lower! I line my baking sheet with foil or parchment because scraping off baked-on chicken grease is nobody’s idea of fun. Now, grab those paper towels. I mean it—use a whole stack until you can’t see any more moisture coming off those thighs. They need to come out looking dusty and dry. Once they are perfectly dry, go heavy with the salt and pepper all over everything. Don’t be shy!
Creating and Applying the Herb Butter Mixture
By now, your herb butter should be looking glorious and fragrant in that little bowl. This next part is critical to becoming a chicken thigh master. You have to carefully wiggle your fingers between the skin and the meat to create a little pocket—just enough room for the butter. Push about a quarter of that herb butter mixture right under the skin of each thigh. Then, take the rest of the butter and just smear it all over the tops of the skin. It’s going to melt down and baste everything perfectly while baking.
I remember the first time I tried pushing butter *under* the skin instead of just slathering it on top—I actually gasped when I cut into it later! The flavor was infused right into the meat. It felt like cheating! If you want to check out some other ways to incorporate awesome flavors into your chicken dishes, take a peek around the site!
Baking and Resting for Optimal Results
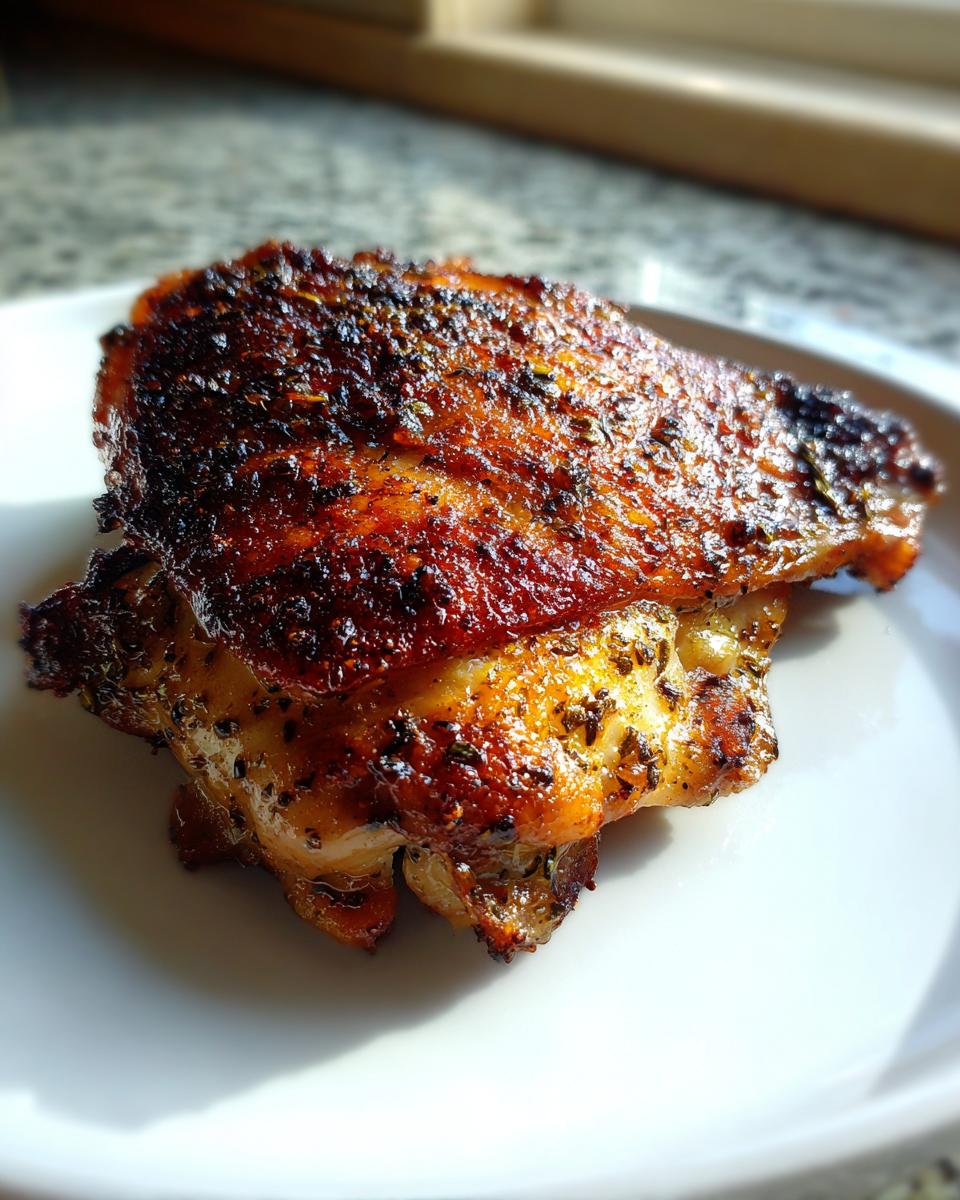
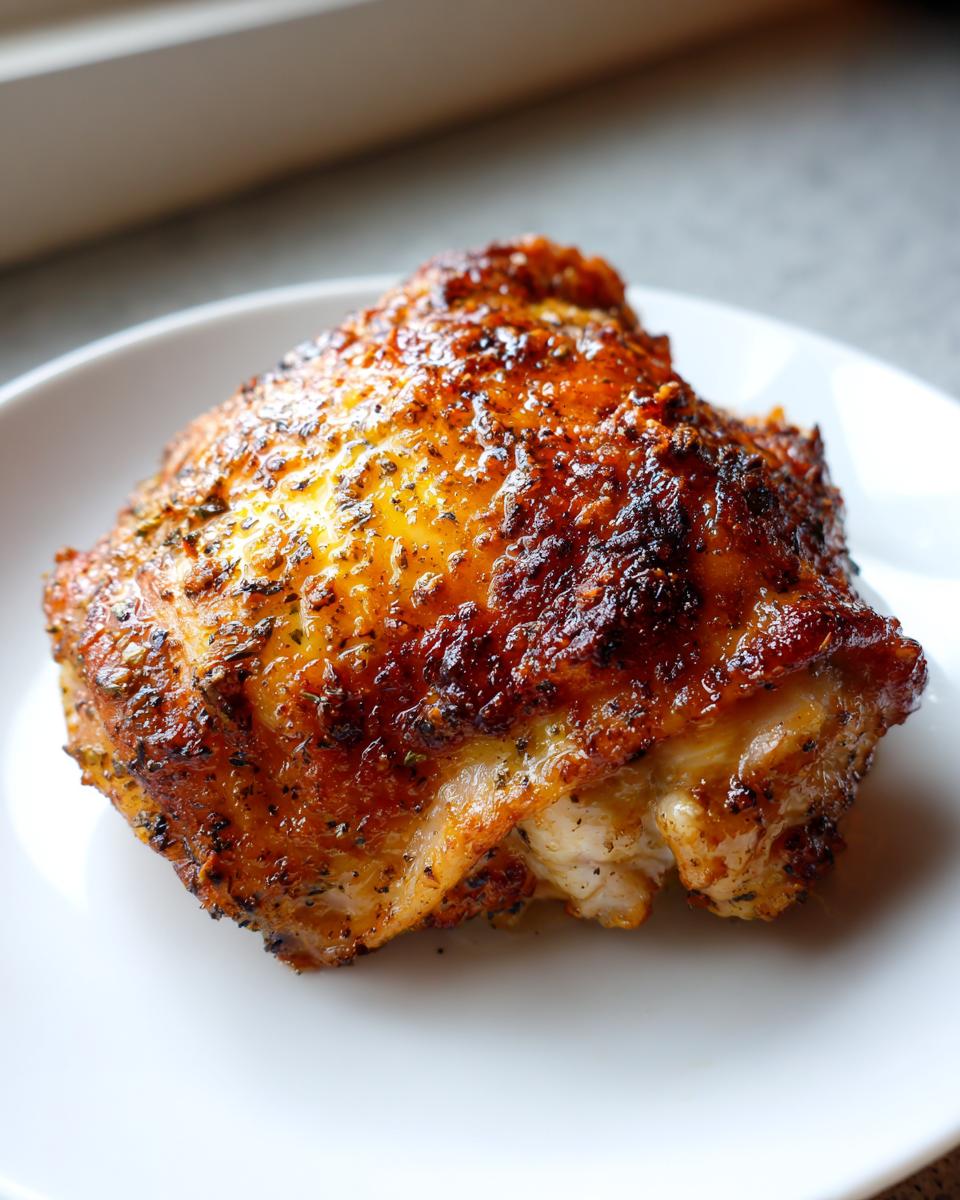
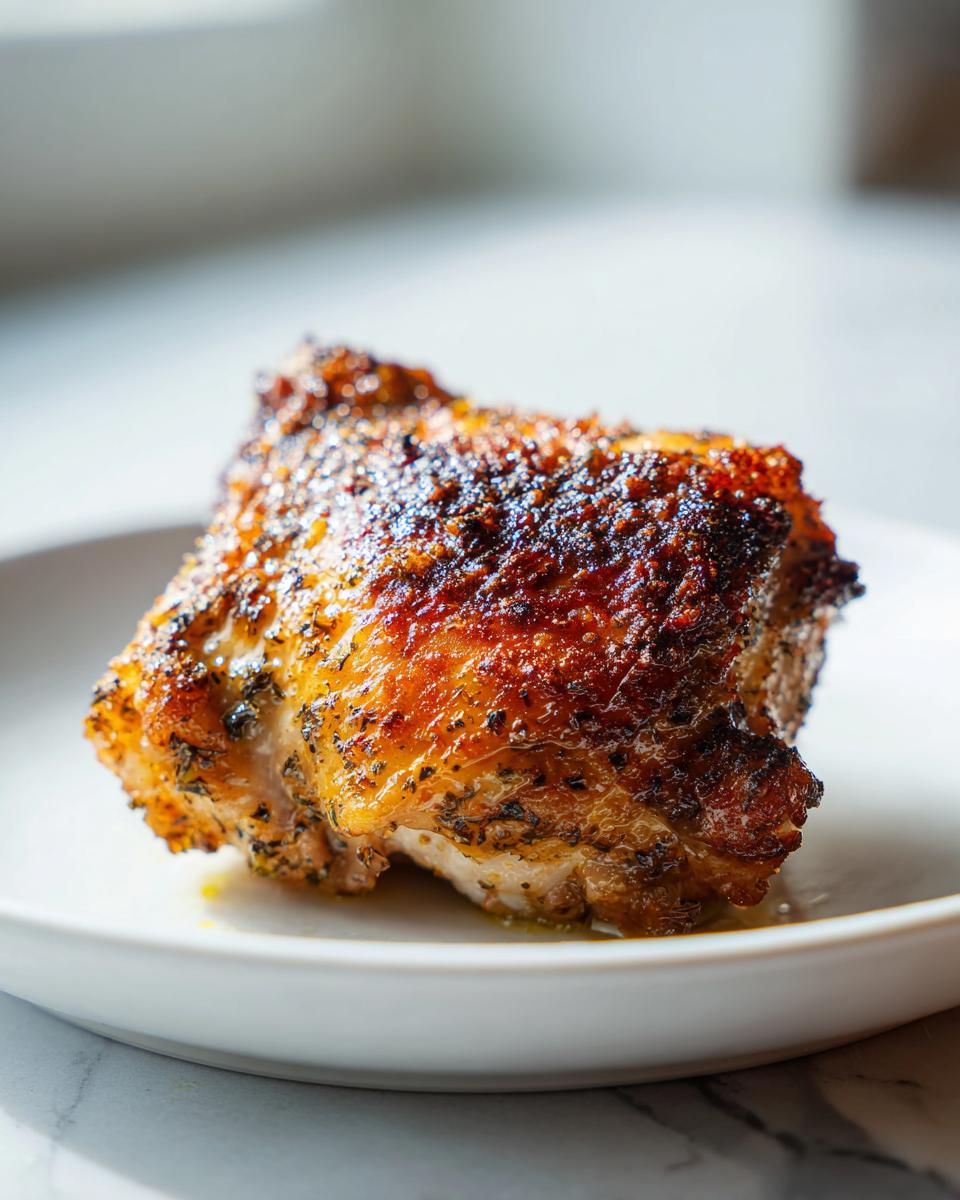
Lay your butter-coated thighs skin-side up on your prepared sheet. Now, slide them into that hot 400°F oven for about 35 to 40 minutes. You absolutely need a meat thermometer here to be sure; just poke it into the thickest part of the thigh without touching bone. We are aiming for 165°F internally. That’s how you get juicy meat and safe food!
When the thermometer sings that sweet song, pull them out. Here’s the final secret: let them rest on the pan for five minutes before you plate them. If you cut into them right away, all that beautiful juice runs out. Resting lets the meat relax and reabsorb everything. You want those crackly skins to stay crackly, and resting helps trap the moisture underneath for the tenderest meat.
Ingredient Notes and Substitutions for Your Chicken Thigh Recipes
One thing I love about this recipe being the best of the chicken thigh recipes is how forgiving it is once you understand the fundamentals. Since we’re using fresh rosemary and thyme, the flavor really pops, but what if you’re stuck with dried herbs in the pantry? It happens to the best of us!
If you need to substitute dried herbs, just remember the ratio: dried herbs are much more concentrated than fresh. So, use about one-third the amount. So, for one tablespoon of fresh rosemary, use just one teaspoon of dried rosemary. Do the same for the thyme.
Can you skip the garlic? Sure, but your chicken will miss that little bit of pungent warmth! If you’re out of fresh garlic, just use half a teaspoon of garlic powder mixed in with the butter instead. Also, please don’t think about using boneless thighs here—the bone keeps the meat from drying out, and you just can’t get that awesome skin crispiness without the bone underneath anchoring it all!
Tips for Making Why Crispy Baked Thighs with Herb Butter Is the Only chicken thigh recipes Recipe You Need Perfect
We’ve already covered the essential steps, right? Drying, butter application, and hitting that 400°F sweet spot. But if you want to move this recipe from “great” to “I might need to open a restaurant” territory, you need to leverage a few pro secrets I’ve picked up over the years testing every single variable.
My absolute favorite technique that guarantees show-stopping crispness involves planning ahead. This is how you make sure your skin is basically shatteringly crunchy when it comes out of the oven. For the best results, take those seasoned, buttered (or just seasoned, if you prefer to apply butter later) thighs and put them on a wire rack set inside your baking sheet. Then, stick that whole setup, uncovered, right into the refrigerator. Seriously, do this overnight if you can!
The cold, dry air of the fridge works wonders to desiccate the skin. When you bake it the next day, there’s virtually no surface moisture left to fight against those high oven temperatures. It is pure crisp heaven. You can see some other fantastic meal ideas on my dinner ideas page, but trust me, this prep step takes this chicken above and beyond.
Another quick tip that helps keep the skin dry, even if you don’t chill them overnight, is rack placement. Always use a wire rack if you have one! If you just place the chicken directly on the sheet pan, the bottom half steams sitting in its own rendered fat. The rack lets the air flow all around the thigh, ensuring three-sixty crisping action. If you don’t own a rack, at least flip them once halfway through baking, though you’ll lose a bit of that perfectly rendered top crisp.
Finally, when you are checking for doneness with that thermometer, don’t get impatient waiting for the resting period. That 5-minute rest is non-negotiable! It stops all the juices from flooding your cutting board the minute you slice into them. Just let them settle, and you’ll see the difference in every single bite of this amazing chicken thigh recipes.
Serving Suggestions for This Flavorful Chicken Thigh Recipes
So you’ve got this gorgeous, crispy, herb-smothered chicken thigh masterpiece sitting on your counter, smelling incredible. Now what? You can’t just eat chicken by itself, can you? Well, maybe you could, but this flavorful chicken deserves a proper entourage on the plate. Since the chicken itself is so rich with butter and savory herbs, I always stick to sides that offer a little bit of brightness or contrasting texture. That way, every bite of your meal is complex and interesting!
My go-to suggestion, which just sings right alongside this herby goodness, is something roasted and maybe slightly sweet. The first thing that comes to my mind is slow-roasted baby potatoes dusted with garlic and rosemary—it just echoes the thyme and rosemary in the butter itself! That way, the whole meal feels coordinated without being boring. If you happen to have some on hand, my recipe for roasted garlic Parmesan carrots would also be stellar right next to these thighs; they bring a nice sweetness and the Parmesan adds salinity.
But sometimes you need something green to cut through all that richness, right? When I serve this chicken, I always make sure there’s a big bowl of something vibrant on the table. A simple green salad dressed with a sharp lemon vinaigrette is perfection. The acid from the lemon is just what the palate needs after the richness of the butter-soaked chicken skin.
Another unexpected winner is some lovely creamy mashed potatoes or even some simple baked sweet potatoes. The soft, mild starch soaks up any of that buttery leftover pan juice beautifully. Honestly, once you nail the chicken, the sides are easy—just keep them simple, bright, or starchy enough to manage that amazing crisped skin!
Storage and Reheating Instructions for Why Crispy Baked Thighs with Herb Butter Is the Only chicken thigh recipes Recipe You Need
Even the best chicken thighs rarely last long in my house, but if by some miracle you have leftovers from this phenomenal meal, you need to treat them right! We want to preserve that beautiful tenderness we worked so hard to achieve while salvaging as much of that crispy skin as possible. Throwing them in the microwave is absolutely forbidden—it’s a guaranteed way to turn crispy skin into chewy rubber. You deserve better than that!
Storing these correctly is key to enjoying them again tomorrow. Make sure they are completely cool before you put them away. This prevents condensation in the container, which is the crispy skin’s worst enemy!
For storage, you have a couple of options, but they both rely on limiting air exposure. I usually go for an airtight container, layering the chicken between paper towels to absorb any residual surface moisture. If you’re following along, you can find some tips for lighter meals on my lightened-up dinner ideas page, but for reheating these thighs, we need serious heat!
When it’s time to bring them back to life, skip the microwave entirely. Microwaves heat the moisture in the meat, guaranteeing soggy skin. Instead, you want dry, high heat—that means the oven or, even better, the air fryer if you have one!
If you’re using the oven, set it to about 350°F. Place the cold thighs directly on a small baking sheet (you don’t even need foil, just let them sit there). Heat them for about 10 minutes. This gentle heat warms them through perfectly without overcooking the meat. If you want to try and bring some crisp back, you can blast them on the broiler for 1 minute at the very end, but watch them like a hawk because the butter and herbs can burn fast!
For the absolute best results, grab your air fryer. Set it to 375°F and cook them for about 4 to 6 minutes. The circulating hot air pulls moisture off the skin, recreating that initial crackle factor better than any oven can manage. They come out juicy, piping hot, and *almost* as crispy as the first time around. Honestly, reheating them this way makes me feel like I planned ahead perfectly every single time!
Frequently Asked Questions About Why Crispy Baked Thighs with Herb Butter Is the Only chicken thigh recipes Recipe You Need
I know that when you branch out into a new favorite recipe, especially one that promises to be the best of all the quick low-carb lunches or dinner ideas, you might have a few lingering doubts. Don’t worry! I’ve answered the questions I always get when I bring these crispy beauties to a potluck. These are the things that tripped me up when I was first perfecting this technique.
Can I use chicken breasts instead of thighs for this recipe?
Oh, honey, I really wouldn’t recommend it if your main goal is maximum crispiness. Chicken breasts are much leaner, and they are far more prone to drying out under the high heat we use (400°F). Plus, breasts don’t have that lovely layer of subcutaneous fat that allows you to rub butter *under* the skin to keep the meat juicy while the top crisps. If you absolutely must use breasts, lower your temperature to 375°F and keep checking the temperature obsessively—they cook much faster. But for this specific recipe, stick to the skin-on, bone-in thighs; they are the champions here!
What if I don’t have fresh rosemary or thyme? Can I use olive oil instead of butter?
You know, butter is my number one rule because the milk solids in butter help the skin brown beautifully and add that depth of flavor. But if you are out of butter or need a dairy-free option, you can substitute olive oil, but you have to change your technique a little. If you swap it for olive oil, you should skip putting it *under* the skin since oil melts right through. Just mix the oil with the herbs and gently brush it over the top skin surface. It will still get crispy, but it won’t have that incredible, rich mouthfeel that real butter provides in this specific chicken thigh recipes bake.
How do I know they are done without a meat thermometer?
I swear by my digital thermometer; it takes the guesswork out of everything! But if you’re in a pinch, you can use the clear-juice method. Pierce the thickest part of the thigh, avoiding the bone, with a sharp knife or a skewer. If the juices that run out are completely clear—no pink tint whatsoever—it’s probably done. If you see any hint of pink or cloudiness, pop it back in for another 5 to 8 minutes. Always remember the goal is 165°F, just trust your eyes and your instinct if the thermometer is hiding!
Can I use the herb butter on bone-out, skin-on thighs instead?
Yes, you can use boneless, skin-on thighs, and they will cook significantly faster, usually in 25 to 30 minutes depending on their thickness. The disadvantage is that the skin tends to shrink back a bit more when the bone isn’t there to anchor it, so you might not get that huge, uniform, bubbly crisp layer we are famous for with the bone-in version. If you do this, make sure you keep checking the internal temperature early, as they go from perfect to overdone in a flash!
Estimated Nutritional Snapshot
Now, listen up, because this part needs a big, bold disclaimer hanging over it like a warning sign at the bakery! We’re talking about estimates here. Chicken thighs aren’t refrigerator magnets; they vary wildly in size—one person’s 6-ounce thigh is another person’s half-pound monster! So, these numbers are based on the four average 6-8 ounce thighs we called for, plus the butter and seasoning. Please don’t use this for strict calorie counting unless you weigh everything yourself!
This recipe is certainly richer than a skinless breast, thanks to that glorious herb butter, but it’s really honest food. It’s satisfying, high in protein, and packed with flavor, which always makes me feel like I’m eating something nourishing. I love that this recipe is one of those calorie-smart recipes that doesn’t sacrifice flavor for fewer calories—it just gives you a great payoff for the richness!
For about four servings, here is the ballpark sketch of what you’re looking at per plate:
- Calories: Roughly 450 – 500 calories per serving if you use all the butter evenly.
- Fat: This is where the flavor lives! Expect around 32-38 grams. That’s the skin and the butter working their magic.
- Protein: Excellent source here, usually hovering around 35 grams per thigh.
- Carbohydrates: Very low, maybe 2-3 grams, mainly just coming from the herbs.
See? It’s a great balance of savory fat and satisfying protein. Since we’re recommending you keep the sides simple, like lemon salad or roasted veggies, you can easily keep the whole meal in a sensible zone. Enjoy the richness; you definitely earned that golden, crispy skin!
Crispy Baked Thighs with Herb Butter
Ingredients
Equipment
Method
- Preheat your oven to 400 degrees Fahrenheit (200 degrees Celsius). Line a baking sheet with parchment paper or aluminum foil for easier cleanup.
- Pat the chicken thighs completely dry using paper towels. This step is important for crispy skin. Season the chicken generously on all sides with kosher salt and black pepper.
- In a small bowl, combine the softened butter, chopped rosemary, thyme leaves, and minced garlic. Mix until all ingredients are evenly incorporated into the butter.
- Place the seasoned chicken thighs skin-side up on the prepared baking sheet. Rub about one tablespoon of the herb butter mixture under the skin of each thigh, and spread the remaining butter evenly over the top of the skin.
- Bake for 35 to 40 minutes, or until the internal temperature of the chicken reaches 165 degrees Fahrenheit (74 degrees Celsius) when checked with a meat thermometer inserted into the thickest part of the thigh, avoiding the bone.
- Remove the chicken from the oven. Let the thighs rest on the baking sheet for 5 minutes before serving. The skin will crisp up further as they rest.