
Oh, weeknights! Anyone else feel like they spend half their evening staring blankly into the fridge hoping the ingredients will magically assemble themselves into something satisfying? I used to dread dinner prep—I wanted great flavor, sure, but zero fuss. That’s exactly why I became obsessed with figuring out how to get maximum deliciousness out of minimal effort, usually while wrangling toddlers or trying to squeeze in an evening walk. Trust me, that hunt for the perfect simple meal led me straight to unlocking the power of chicken thighs.
If you feel the same way—like you need dinner on the table without needing 20 different spice jars out—then you absolutely need to see what I discovered about **20-Ingredient Chicken Thigh Recipes (No Fuss)**. We aren’t talking about complicated marinades or fancy techniques here! We’re talking about bone-in, skin-on perfection achieved with just five key seasonings. I promise, when I started simplifying how I cooked clean, intentional food, my evenings got so much calmer. This recipe is living proof that you don’t need a huge ingredient list to create something amazing. For more ideas like this, check out my guide on easy dinner recipes!
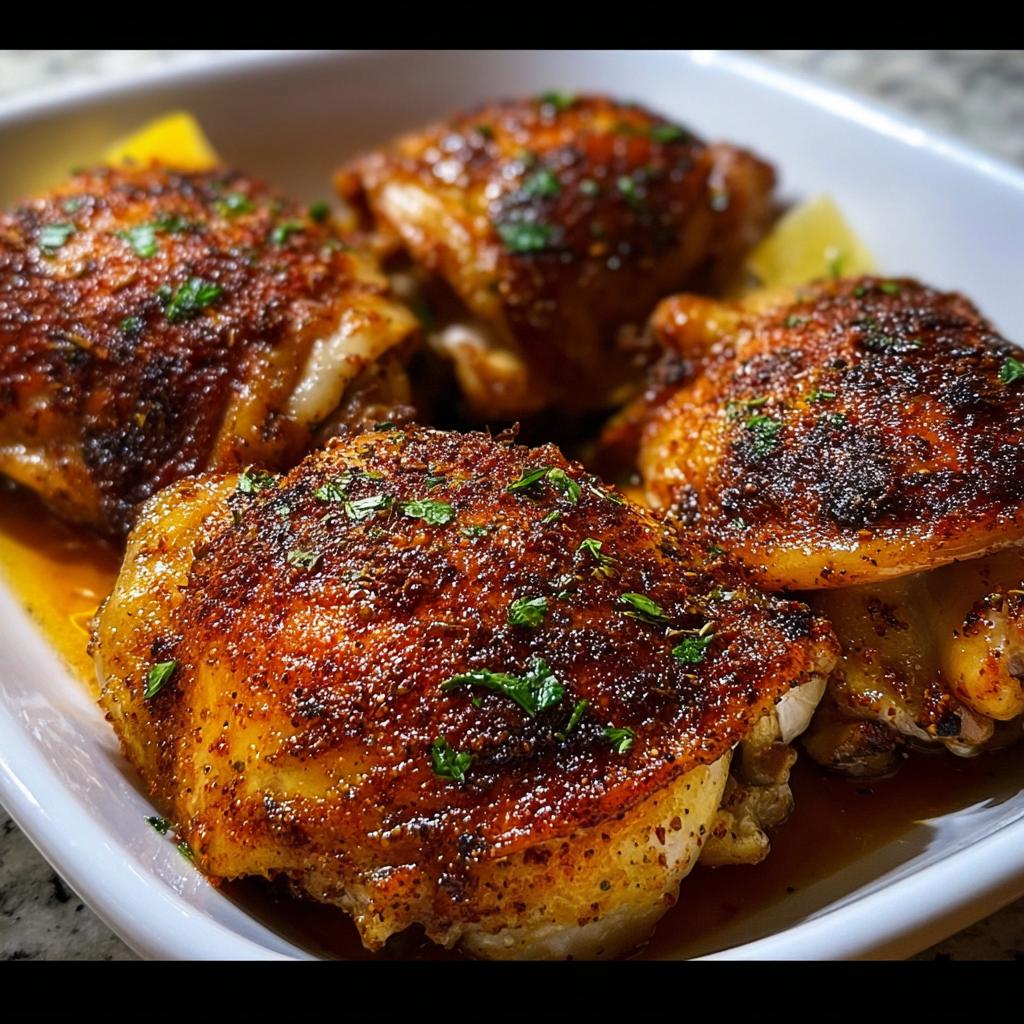
This baked chicken thigh method strips everything down to the essentials: super dry skin (the secret!), high heat, and a classic spice blend. It’s the perfect weeknight savior when you need that reliable, satisfying meal that tastes gourmet but takes about five minutes of actual work. Ready to ditch the stress and get perfectly crispy skin every single time?

Why You Need Simple 20-Ingredient Chicken Thigh Recipes (No Fuss) in Your Rotation
Seriously, why complicate things when weeknight dinner needs to happen fast? When I started focusing on clean living, I realized I couldn’t be spending an hour every night assembling meals. That’s why simple recipes—the real, no-fuss kind—are the MVP of my kitchen rotation. These **20-Ingredient Chicken Thigh Recipes (No Fuss)** deliver huge flavor without needing a laundry list of hard-to-find items.
Bone-in, skin-on chicken thighs are magic because they forgive you if you overcook them slightly, stay juicy, and frankly, they’re usually much less expensive than chicken breasts. Win-win!
Here’s why having a few ultra-simple chicken thigh recipes up your sleeve is non-negotiable for real life:
- Speedy Prep: We’re talking five minutes max to get these seasoned and into the oven. That’s less time than it takes to decide what to watch on TV!
- Minimal Cleanup: If you bake them right on a sheet pan (maybe lined with foil for extra ease!), cleanup is basically a rinse and wipe. Zero scrubbing required.
- Budget Friendly: Thighs are a fantastic, affordable protein source for feeding the family without breaking the bank.
- Meal Prep Powerhouse: These reheat beautifully! Cook four thighs on Sunday, and you have lunches set for Monday and Tuesday. Check out my meal prep guide for how I use them!
When life gets busy, these kinds of reliable, delicious meals keep you feeling nourished and in control, rather than reaching for takeout menus.
Essential Equipment for Perfect [20-Ingredient Chicken Thigh Recipes (No Fuss)]
You know I love a recipe that doesn’t require hauling out every single gadget we own. For these wonderfully simple chicken thighs, the equipment list is blessedly short. You honestly don’t need much to achieve that restaurant-quality crispy skin we’re after!
The must-haves for this meal are incredibly basic:
- A sturdy Baking Sheet: Make sure it’s big enough to lay all four thighs in a single layer without them touching. Crowding traps steam, and steam is the enemy of crispy skin!
- A set of Paper Towels: Seriously, this is possibly the most important tool here, even more so than the oven itself.
- A Wire Rack (Optional, but highly recommended!): If you have one, this is where you use it!
Here is my pro-tip about that wire rack. It’s honestly the key to unlocking next-level crispiness. When you place the chicken on a rack set over the baking sheet, it elevates the skin away from any rendered fat or moisture dripping off the chicken. This allows the hot air in the 400-degree oven to circulate all the way around the thigh, including underneath! If you skip the rack, you end up with nice brown skin on top but slightly soggy skin on the bottom surface where it sits in its own juices. Trust me, if you want to see the magic happen without needing to flip them halfway through, get that rack in there. It saves so much effort later! For more one-pan ideas that minimize cleanup, check out my favorites here.
Ingredient Deep Dive for Your [20-Ingredient Chicken Thigh Recipes (No Fuss)]
Okay, let’s talk about the stars of the show! Even though we’re aiming for **20-Ingredient Chicken Thigh Recipes (No Fuss)**, the few ingredients we *do* use have to be spot on. Quality matters, especially when there’s nowhere for subpar flavors to hide!
For this simple baked chicken, we need just four seasonings for four thighs. That is the beauty of it—simple ratios that equal maximum payoff. When you look at my full list, you’ll see we stick to the absolute basics for a foundation meal you can build on later. You can find more inspiration for meals using everyday ingredients on my site, but here’s what you need for this specific bake:
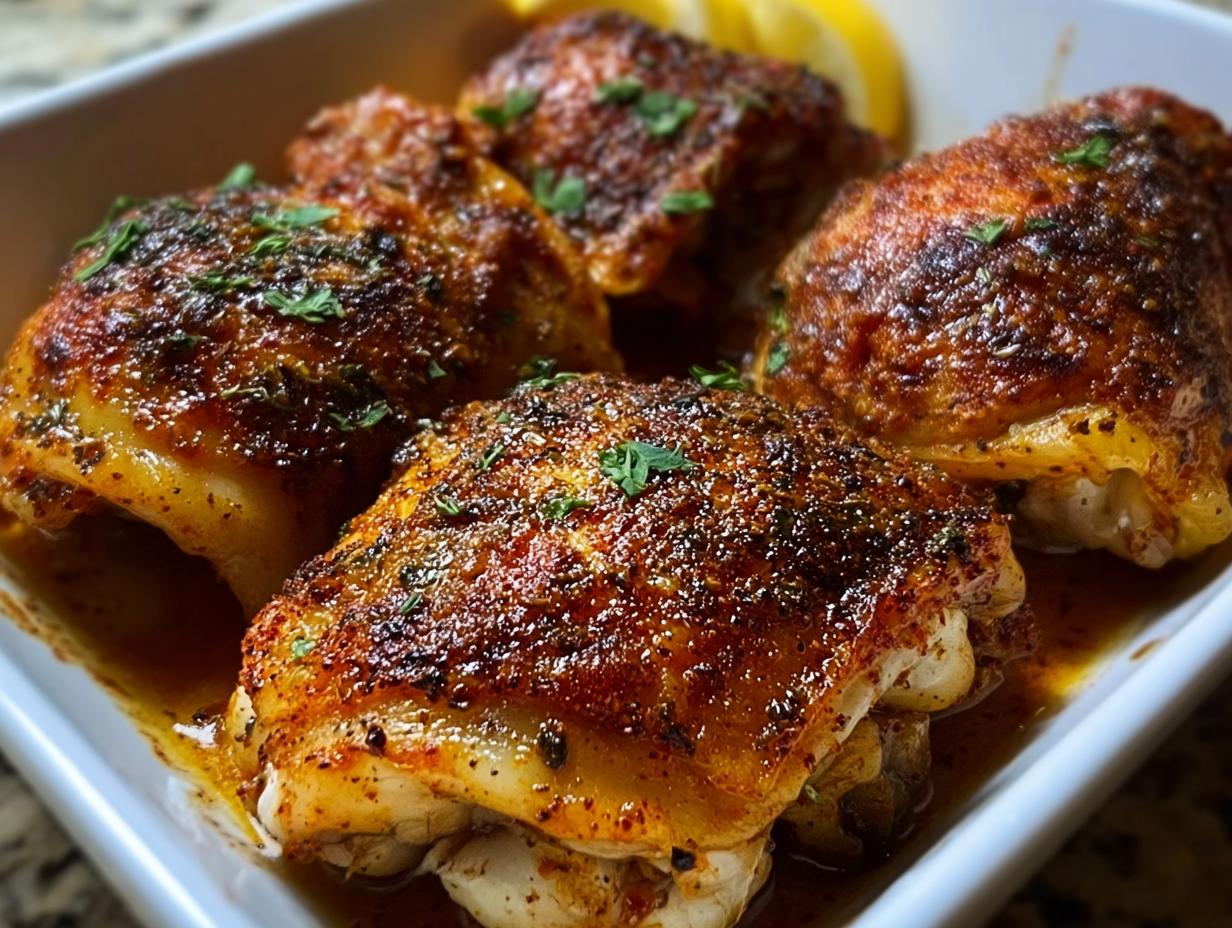
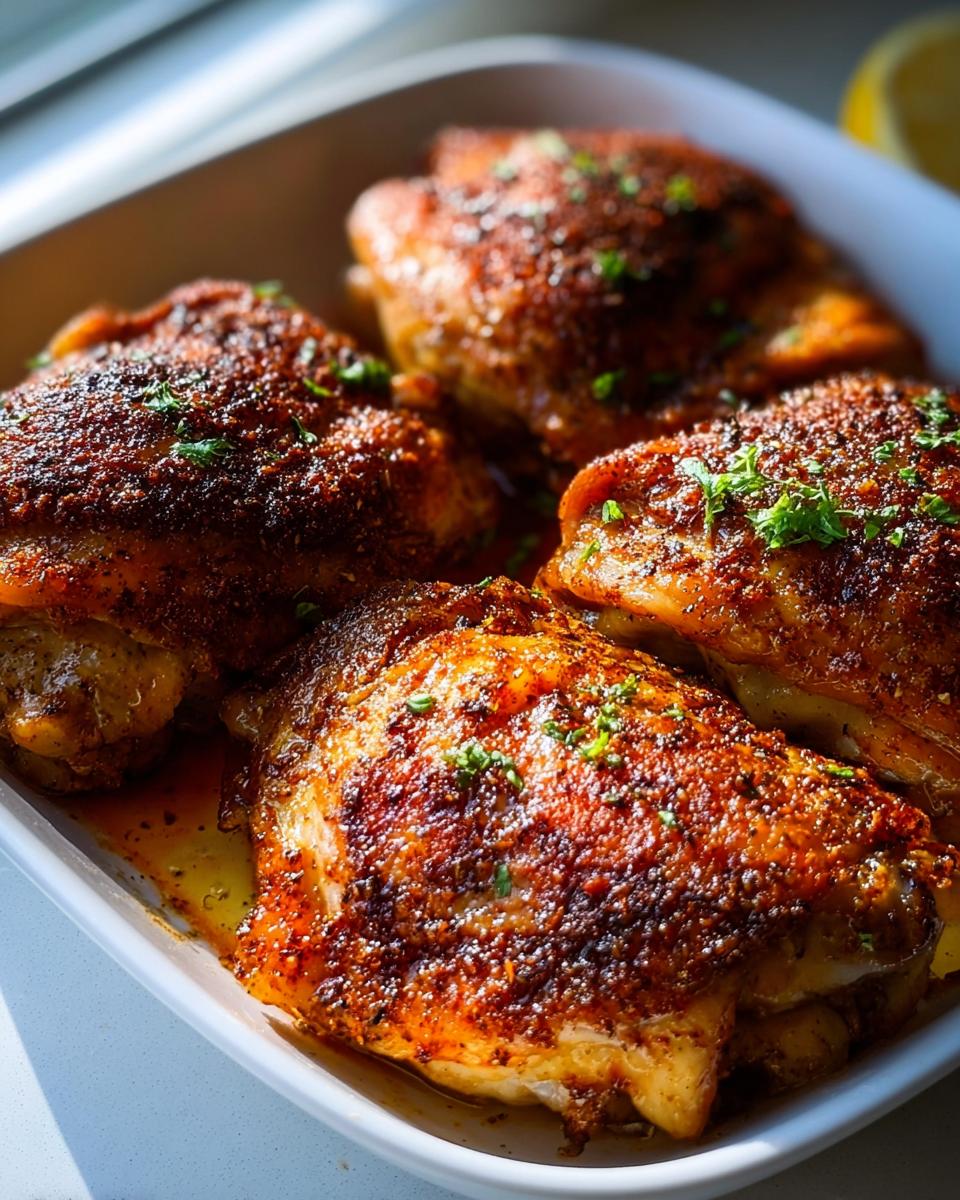
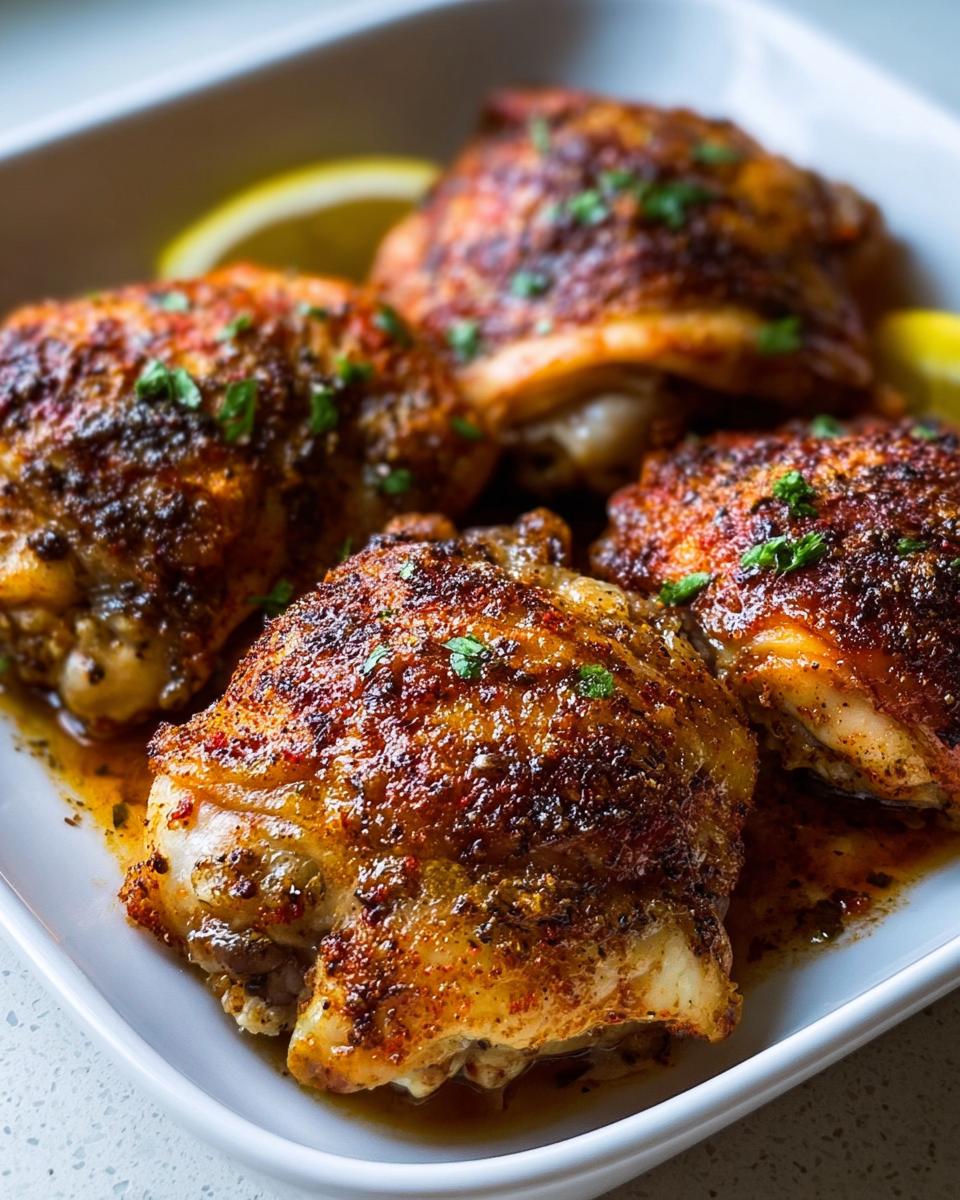
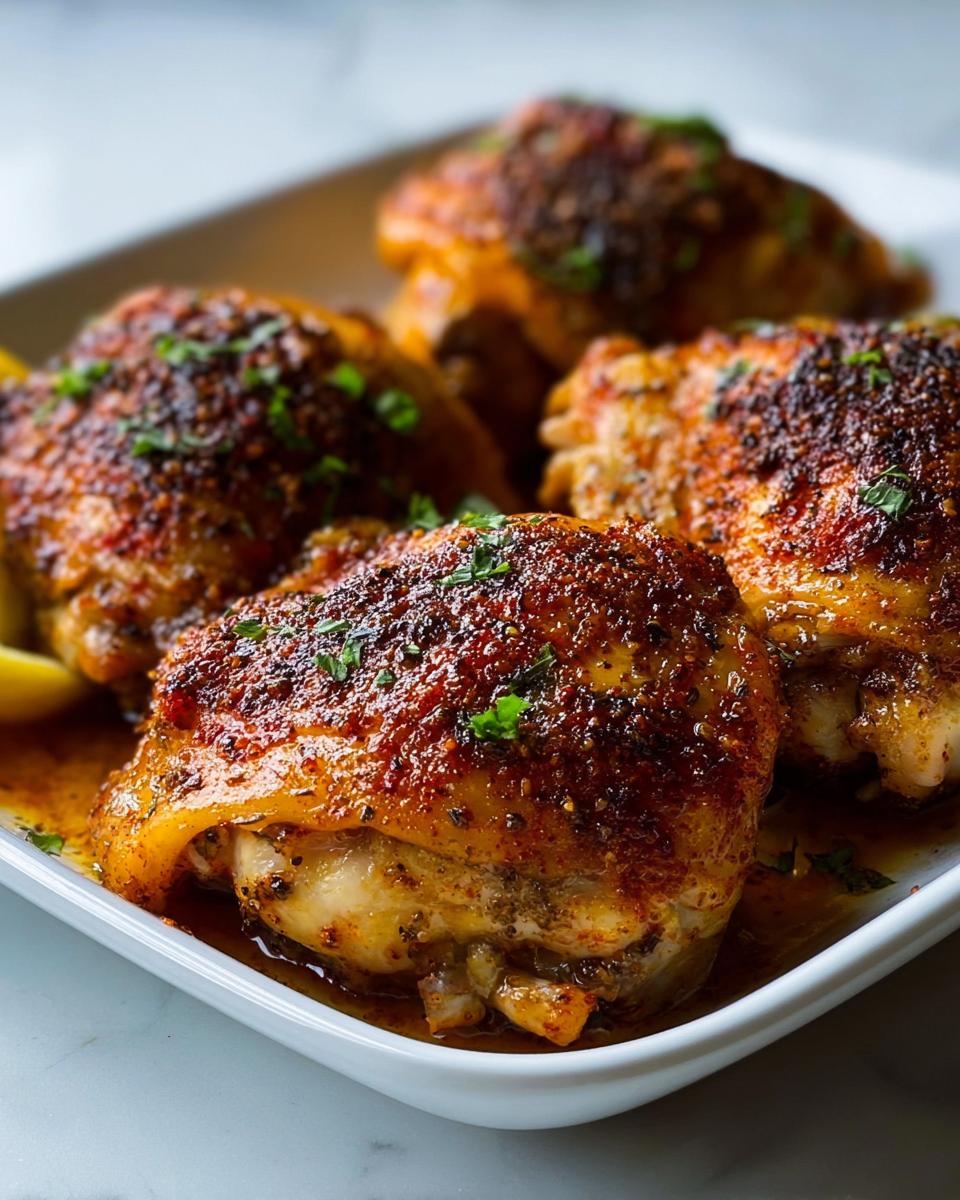
First and foremost, the chicken itself. You absolutely must use bone-in, skin-on chicken thighs. I get asked all the time if boneless/skinless works, and while you *can* use them, you miss out on so much moisture and flavor when you keep the bone in. Plus, that skin renders down fat while it bakes, which essentially self-bastes the meat, keeping the dark meat incredibly tender. It’s nature’s little cooking hack!
Then we move to the seasoning blend. It’s intentionally simple so you always have what you need on hand:
- Kosher Salt: Make sure it’s kosher salt, not table salt! Kosher salt has larger, flakier crystals, which means you get better overall coverage when you sprinkle it. Use exactly 1 teaspoon.
- Black Pepper: Freshly ground is always better, but pre-ground is fine here since we don’t need fancy texture.
- Garlic Powder: This is crucial for that savory depth. Skip the fresh minced garlic for this particular recipe because it can burn under the high heat before the chicken is done.
- Paprika: I use regular paprika, not smoked or hot, just for that beautiful color and mild sweetness.
Ingredient Substitutions and Notes for [20-Ingredient Chicken Thigh Recipes (No Fuss)]
I know plans change, and sometimes you just don’t have a spice jar on hand. Don’t panic if you need to make a swap! That’s what being a flexible cook is all about—supporting your body’s needs without stressing over perfection.
If you are missing something, here are my trusted swaps:
- If you only have Boneless, Skinless Thighs: You can absolutely use these! Reduce your cooking time significantly—I’d start checking them around the 25-minute mark. Be aware the texture will be softer, and you won’t get that signature crispy skin.
- On Spices: If you are out of garlic powder, you can use 1/4 teaspoon of onion powder instead, but try to keep the salt and pepper! Also, if you happen to have onion powder, adding just 1/2 teaspoon of that alongside the garlic powder adds a nice dimension, but it’s not essential for the “no fuss” mandate.
- A Little Heat? If you like a tiny kick, swap out 1/4 teaspoon of your paprika for cayenne pepper. Just be cautious; a little goes a long way, especially when you’re aiming for clean, simple flavors.
The main takeaway here is that these few ingredients, when correctly applied to the right cut of chicken, make this recipe so repeatable. You can trust this simple combination will always yield great results!
Step-by-Step Instructions for [20-Ingredient Chicken Thigh Recipes (No Fuss)]
Getting dinner on the table fast doesn’t mean rushing the critical steps! If you follow these instructions exactly, you’ll have juicy, flavorful chicken every single time. We’re timing this perfectly so that by the time you’ve set the table, the oven is ready to go.
First things first: Heat things up! You want your oven preheated to 400 degrees Fahrenheit (200 degrees Celsius). If you’re using that wire rack trick I mentioned earlier—and you totally should be!—go ahead and set that right on top of your baking sheet before you pop it into the preheating oven. Getting the rack hot helps crisp the bottom skin right away.
Now comes the absolute most crucial moment, and I learned this the hard way years ago when I was trying to serve dessert right after dinner. I was so excited that I just threw some seasonings on slightly damp thighs and popped them in. Disaster! The result was pale, rubbery skin. Ugh! You *must* pat your chicken thighs completely, utterly, aggressively dry using paper towels. Seriously, take the time to blot them until they feel almost dry to the touch. This removes surface moisture, which is what steams the skin instead of letting it brown and crisp up.
While the oven is finishing its preheat cycle, mix up your seasoning. It’s just salt, pepper, garlic powder, and paprika in a tiny little bowl. Then, get your hands in there and rub that seasoning blend all over the chicken. Don’t just dust the tops! Get it under the skin if you can manage it, and make sure the sides are coated too. Because we used kosher salt, you’re going to get great coverage.
Place the seasoned thighs skin-side up on your prepared sheet pan or wire rack. They should have some breathing room between them. Now, they go into that hot 400-degree oven. Set a timer for 35 minutes to start.
The total bake time totally depends on the exact size of your thighs, but generally, you’re looking for 35 to 45 minutes. You know they are done when the internal temperature reaches 165 degrees Fahrenheit (74 degrees Celsius) right in the thickest part of the meat, away from the bone. Resist the urge to cut into it immediately, though! After you pull them out, let them rest on the cutting board or pan for a good 5 minutes. Resting lets all those wonderful juices redistribute into the meat. If you skip resting, the juices just run right out onto the plate. This short rest is what keeps the meat tender! For more reliable cooking techniques for chicken thighs, check out my whole section dedicated to chicken thigh inspiration.
Expert Tips for Achieving Crispy Skin on Your [20-Ingredient Chicken Thigh Recipes (No Fuss)]
We’ve established that moisture is the enemy of crispy skin, right? After I finally learned that trick about patting the skin until I’m bored of blotting, the results improved instantly. But for those times when you pull the chicken out and the skin is looking just *okay*—maybe a little tanned, but not quite shatteringly crisp—I have one last move in my back pocket. This is my secret weapon for really achieving that crackle we all love.
This technique is perfect when you need that beautiful finish but you’ve already cooked the chicken through thoroughly. It’s the final touch for those **20-Ingredient Chicken Thigh Recipes (No Fuss)** that need just a little extra wow factor!
Here is my go-to trick when the oven heat alone wasn’t enough:
- The Broiler Finish: If your internal temperature is perfect (165°F!) but the skin is still pale or slightly soft, move your baking sheet to the top rack of your oven.
- Watch Like a Hawk: Turn your oven from Bake to Broil on high. This is aggressive heat, so you only need this step for 1 to 2 minutes, tops. Watch it constantly! I mean it—do not leave the kitchen. Sugar and fat burn fast under the broiler, and you don’t want to go from crispy skin to smoky disaster in one second.
- Look for Bubbling: You’ll see the fat underneath the skin start to bubble aggressively, and the skin will puff up and turn a deep, beautiful golden brown almost instantly.
I nearly ruined a whole batch once because I walked away to grab the serving platter. Big mistake! The edges of those thighs got a little charred. Now, I stay right there, ready to flick that broiler off the second I see that gorgeous, crackly texture. It’s total control for maximum crispiness.
For anyone who wants to dive deeper into getting that perfect texture every single time, I’ve put together a full breakdown of how to get extra crispy skin on your baked chicken, which you can check out right here. Mastering this small texture element makes these already simple thighs feel truly special.
Storing and Reheating Your [20-Ingredient Chicken Thigh Recipes (No Fuss)]
One of the best parts about having a winner like these simple baked chicken thighs is knowing they make fantastic leftovers! When I plan a meal, I always think, “Will this be good tomorrow too?” And yes, this basic, flavorful chicken passes the test with flying colors. Since we’ve already established this is a perfect meal prep item, let’s make sure you preserve those juicy results!
After the chicken has cooled completely—this is important so you don’t introduce condensation into your storage containers—you’ll want to store them in an airtight container. If you used a wire rack, you can just take the chicken off the rack and place it in your container. In the fridge, these simple baked thighs will stay perfectly good for about 3 to 4 days. Any longer than that, and you start losing that lovely moisture we worked so hard to keep inside the meat.
Now, reheating is where people often go wrong with chicken, whether it’s part of **20-Ingredient Chicken Thigh Recipes (No Fuss)** or something else. The microwave is fast, I get it, but it turns meat rubbery really quickly. If you want to maintain that tender texture, skip the microwave when you can!
Here’s how I reheat my leftovers for great flavor:
- Best Method (Oven/Toaster Oven): Pop the leftover thighs onto a baking sheet (no need to add any oil!) and heat them at a moderate temperature, say 325 degrees Fahrenheit, for about 10 to 12 minutes. This low, slow heat warms it through evenly and helps the skin crisp up a tiny bit again without drying out the meat.
- Quickest Method (Air Fryer): If you have an air fryer, that’s my second favorite route! 350 degrees for about 5 minutes is usually perfect for waking up that crispy skin again.
- When You Need It NOW (Microwave): If you are truly running out the door, put the thigh on a microwave-safe plate and place a damp paper towel over the top of it. This adds a tiny bit of steam back into the reheating process, which helps prevent that leathery texture. Only use this method for 60-90 seconds!
Having these make-ahead meals ready means sticking to your goals is so much easier when you’re tired. For more ways I utilize leftovers and make grab-and-go meals work for my busy schedule, head over to my guide on make-ahead healthy meals!
Serving Suggestions for Your Simple Chicken Thigh Dinner
You’ve got the star of the show cooked perfectly—juicy, simple, and ready to go! But let’s be real, you can’t eat just plain baked chicken every night, even if it is delightfully seasoned. A truly balanced, satisfying meal needs something green or something starchy on the side to soak up those fantastic chicken juices that escape during resting. Since this chicken is so neutral and flavorful, it pairs well with almost anything, but I have a few go-to combos that keep things feeling clean and intentional.
When I’m looking to keep things incredibly easy, I often go for roasting a tray of veggies right alongside the chicken if I have space, or throwing together a super quick salad. It’s all about rounding out the plate without adding another cooking project to your post-work exhaustion.
Here are my favorite partners for that perfectly baked chicken:
- Garlic-Roasted Asparagus: This is my absolute favorite lazy side dish. The asparagus roasts in about the same amount of time as the chicken needs to rest, or you can toss it in the oven 15 minutes before the chicken is done. A little olive oil, lots of minced fresh garlic (since we aren’t cooking this under the high heat where it burns!), salt, and pepper. It turns bright green and tender-crisp, offering a nice freshness against the rich dark meat.
- Simple Lemon-Herb Quinoa: If you need something heartier to make this meal stretch, quinoa is my preferred grain over rice because of the extra protein and fiber. Before you scoop it out of the pot, stir in the juice of half a lemon and a big handful of chopped fresh parsley. It provides a bright, zesty counterpoint that cuts right through the richness of the crispy chicken skin.
- Wilted Spinach Salad: This sounds fancy, but it’s not! Toss a big bowl of fresh spinach with a light vinaigrette (just olive oil, a splash of apple cider vinegar, Dijon mustard, and a pinch of salt). Then, moment before serving, pour a tablespoon of hot drippings from the baked chicken pan over the spinach. The heat slightly wilts the leaves, and it tastes absolutely heavenly. It’s the quickest way to sneak in those greens!
The goal is always balance, right? You get your quality protein from the thighs, and then you layer in those nourishing vegetables. For more ideas on how to build a truly balanced plate that still tastes amazing and fits your wellness goals, check out my philosophy on balanced meals. Keep it simple, keep it clean, and enjoy that dinner!
Frequently Asked Questions About [20-Ingredient Chicken Thigh Recipes (No Fuss)]
I always get questions when I post photos of this super easy chicken bake on my stories! It’s so flexible and simple that people often wonder about swapping things out. Remember, my whole philosophy is about supporting your body with real food that fits your life, and that means answering the practical questions that pop up when you’re trying to pull together a quick, healthy dinner.
Here are the things I hear most often about making these **20-Ingredient Chicken Thigh Recipes (No Fuss)** work for your week:
Can I use chicken breasts instead of thighs?
You totally *can*, but you must adjust your expectations and timing! Chicken breasts are leaner, which means they dry out much faster, especially under high heat. If you use boneless, skinless breasts, you’re looking at about 20 to 25 minutes bake time at 400 degrees, and you absolutely need to check the internal temp religiously. If you use bone-in breasts with the skin on, they might take closer to 40 minutes, but they are less forgiving than thighs. If you want reliable, stress-free cooking—and that beautiful balance of moisture and crisp skin—stick with the thighs for this recipe. For other reliable options, check out what I love in my general category for healthy chicken dinner recipes!
How do I *actually* know when the chicken is done?
The meat thermometer is your best friend here, truly! While appearance is important (golden brown skin), doneness is about safety and texture. You must check the temperature in the thickest part of the thigh, making sure you are not touching the bone. The USDA safety standard is 165 degrees Fahrenheit (74 degrees Celsius). I pull mine out right at that mark, knowing that it will climb a degree or two during the 5-minute rest period we talked about. If your thermometer reads 160°F, pop it back in for a few more minutes!
Can these no-fuss chicken thighs be made ahead of time?
Yes, and that’s why I love them for meal prep! Once the chicken is totally cooled after baking, store it in an airtight container in the fridge. It keeps beautifully for about 3 to 4 days. As I mentioned earlier, reheating in the oven or air fryer is the best way to restore a bit of that crispy skin without drying out the dark meat underneath. It’s the ultimate grab-and-go lunch protein!
What if I don’t have paprika? Can I skip it?
Paprika is mainly there for color and a hint of earthy sweetness, which helps balance the saltiness. If you genuinely don’t have it, yes, you can skip it and the chicken will still taste delicious because the salt and garlic powder carry the flavor load. But, if you have *smoked* paprika, using just 1/2 teaspoon of that instead of the standard paprika kicks the flavor up ten notches without adding any extra work! It makes the simple bake taste like it cooked over a campfire.
Share Your Results Making These Easy Chicken Thighs
Okay, I’ve poured out all my secrets here—from why dry chicken skin is non-negotiable to my last-minute broiler trick. Now it’s your turn! I genuinely want to see how these easy baked chicken thighs turned out for you in your own kitchen. When you stick to the simple steps, the results are always so satisfying, and I love seeing how you pair them with your healthy sides.
Sharing your success is one of the best ways we can build a supportive community here at Melt It Clean. We’re all on this journey together, learning how to eat well without sacrificing our sanity, and seeing your perfectly browned thighs makes my day!
Here’s what I’d love for you to do:
- Rate It! Please leave a star rating at the bottom of this page. Did it take exactly 50 minutes? Was the skin perfectly crispy? Your feedback helps future cooks decide if this is their next weeknight winner.
- Tell Me About It: Drop a comment below! Let me know what you served alongside the chicken. Did you go for the roasted asparagus or maybe try a new veggie pairing? I’m always looking for fresh, low-fuss ideas for clean eating!
- Snap a Picture: If you snap a photo of your delicious, simple dinner, tag me over on social media! Seeing our simple, clean habits come together on your plate is my favorite inspiration. For more amazing, whole-food inspiration, don’t forget to browse the general collection of healthy recipes I share!
Thank you so much for trusting me with your dinner plans. Enjoy that amazing, easy flavor!
Nutritional Estimates for Simple Baked Chicken Thighs
When we talk about fitting clean eating into our busy lives, looking at the nutrition facts is super helpful—but we have to remember that these numbers are just guides! Since we’re cooking with whole, real food, the exact breakdown can change depending on how fatty your specific batch of bone-in chicken thighs was, or even the brand of salt you use. But as far as a satisfying, protein-packed, totally straightforward meal goes, these baked thighs are fantastic.
This estimate is based on one serving (one standard-sized, bone-in, skin-on baked chicken thigh, made with the four simple seasonings listed). These numbers support the high-protein focus I always aim for when building meals that keep you full and energized!
Here is the general breakdown:
- Calories: Around 350 calories
- Protein: A whopping 35 grams! This is what keeps you full and supports muscle maintenance.
- Fat: Approximately 22 grams. Don’t fear the fat here—most of this comes from the skin and dark meat, which carries a ton of flavor, and remember, a lot of that fat drips away during the baking process! Saturated fat is held at a reasonable 6 grams.
- Carbohydrates: Less than 1 gram. See? Zero fuss, zero hidden sugars or starches in the main component of your meal.
Because this recipe is so clean, it naturally steers clear of high sodium or sugar counts, which are things I really focus on cutting out when building supportive meals. If you’re tracking macros or calories, always use the actual weight of your cooked meat for the most accurate count!
If you’re looking for more meals that fit neatly into calorie-conscious plans without feeling restrictive, you’ve got to check out my collection of calorie-smart recipes. They use the same principles—flavorful, simple, and clean ingredients working together!
By EMILIA, founder of MeltItClean.com – your digital space for natural weight loss, real wellness habits, and clean-living inspiration that actually fits your life.
Hi, I’m EMILIA, the founder of MeltItClean.com — your digital space for natural weight loss, real wellness habits, and clean-living inspiration that actually fits your life. For years, I struggled with the ups and downs of dieting. I tried everything — juice cleanses, low-carb crazes, fitness challenges — but I always ended up back where I started: tired, bloated, and frustrated. I didn’t just want to “lose weight” — I wanted energy, mental clarity, glowing skin, and confidence without sacrificing my joy or sanity.
After years of experimenting, learning, and unlearning, I discovered a simple truth: your body is already powerful — it just needs support, not restriction. That’s when I created Melt It Clean — a site dedicated to real transformation through clean, intentional, and nourishing daily habits that anyone can follow. My goal was simple: build a place where people could feel informed, supported, and empowered without being overwhelmed by wellness fads. You can read more about my journey on my ‘About Me’ page.
Simple Baked Chicken Thighs
Ingredients
Equipment
Method
- Preheat your oven to 400 degrees Fahrenheit (200 degrees Celsius). If you have a wire rack, place it on top of a baking sheet.
- Pat the chicken thighs completely dry using paper towels. This step helps achieve crispy skin.
- In a small bowl, mix together the salt, pepper, garlic powder, and paprika.
- Rub the seasoning mixture evenly over all surfaces of the chicken thighs, including under the skin if possible.
- Place the seasoned chicken thighs skin-side up on the prepared baking sheet or wire rack.
- Bake for 35 to 45 minutes, or until the internal temperature reaches 165 degrees Fahrenheit (74 degrees Celsius) in the thickest part of the thigh.
- Remove the chicken from the oven and let it rest for 5 minutes before serving.


